
Building .NET Applications and Services with Azure Cosmos DB Client-side Encryption (aka Always Encrypted)

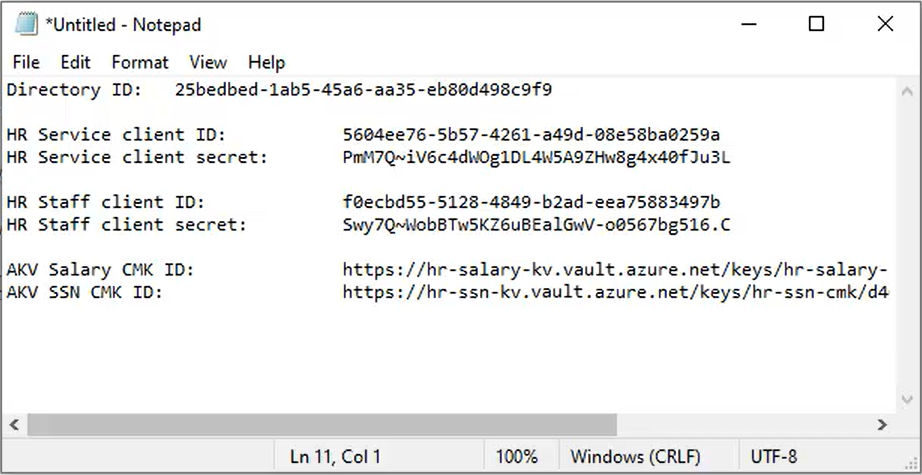
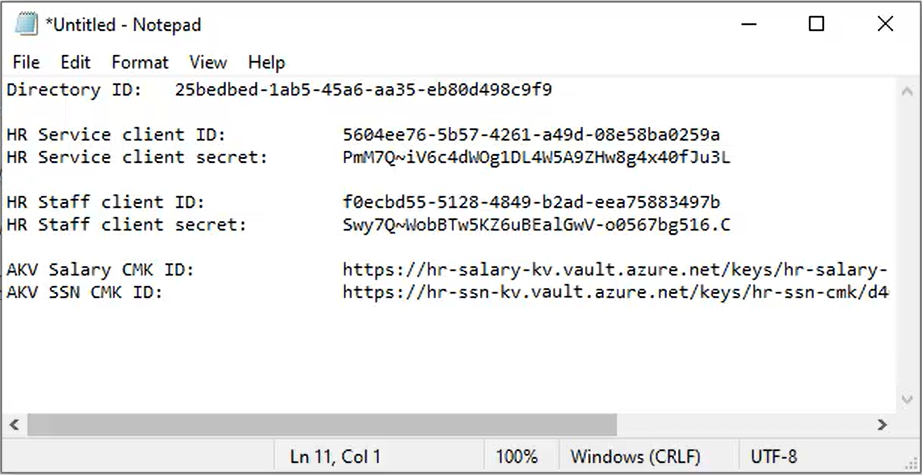
In my two previous posts, I introduced client-side encryption (also known as Always Encrypted), and showed you how to configure the client-side encryption resources (app registrations, client secrets, and key vaults) using the Azure portal. We finished up by gathering all the values you’ll need to supply to the client applications that need to perform cryptography (encryption and decryption) over your data, and we have these values readily available in Notepad:

  • Azure AD directory ID
  • Two HR application client IDs
  • Two HR application secrets
  • Two customer-managed key IDs

So now we’re ready to building the two client applications, HR Service and HR Staff. Create both of these as two distinct console applications using Visual Studio. In each one, create an empty appsettings.json file and set its Copy to Output Directory property to Copy always.

Let’s start with the HR Service application, and first take note of these NuGet packages you’ll need to install:
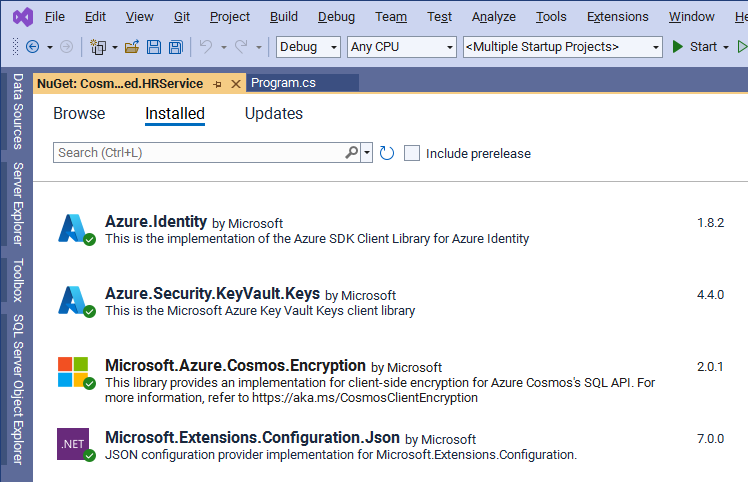
Now over to appsettings.json for the configuration. Paste in the Azure AD directory ID, and then the client ID for the HR Service application, along with its client secret. That’s all configuration that’s normally needed for an application accessing an existing container that’s configured for Always Encrypted, but in this demo, the HR Service application will also be creating the employees container and configuring it for client-side encryption on the two properties salary and ssn. And so, in order to do that, it also needs the key identifiers for both of those CMKs. So finally, also paste in the ID for the salary CMK, and then the ID for the social security number CMK.

The appsettings.json file for the HR Service application should look like this:

First, import all the namespaces we’ll need with these using statements at the top of

using Azure.Identity;
using Azure.Security.KeyVault.Keys.Cryptography;
using Microsoft.Azure.Cosmos;
using Microsoft.Azure.Cosmos.Encryption;
using Microsoft.Extensions.Configuration;
using Newtonsoft.Json;
using System;
using System.Diagnostics;
using System.Linq;
using System.Threading.Tasks;

Now create an empty Main method in Program.cs where we’ll write all the code for this demo:

static async Task Main(string[] args)
{

}

Start with our configuration object loaded from appsettings.json, and pick up the endpoint and master key to our Cosmos DB account. Then we pick up the three Azure AD values for the directory ID, and the HR Service’s client ID and client secret:

// Get access to the configuration file
var config = new ConfigurationBuilder().AddJsonFile("appsettings.json").Build();

// Get the Cosmos DB account endpoint and master key
var endpoint = config["CosmosEndpoint"];
var masterKey = config["CosmosMasterKey"];

// Get AAD directory ID, plus the client ID and secret for the HR Service application
var directoryId = config["AadDirectoryId"];
var clientId = config["AadHRServiceClientId"];
var clientSecret = config["AadHRServiceClientSecret"];

We want a Cosmos client that’s configured to support client-side encryption based on the access policies defined in Azure Key Vault for the HR Service application, so we first encapsulate the Azure AD directory ID, client ID and client secret inside a new ClientSecretCredential, and then get a new Azure Key Vault key resolver for that credential:

// Create an Azure Key Vault key resolver from the AAD directory ID with the client ID and client secret
var credential = new ClientSecretCredential(directoryId, clientId, clientSecret);
var keyResolver = new KeyResolver(credential);

Now we can create our Cosmos client as usual, but with an extra extension method to call WithEncryption on the key resolver:

// Create a Cosmos client with Always Encrypted enabled using the key resolver
var client = new CosmosClient(endpoint, masterKey)
    .WithEncryption(keyResolver, KeyEncryptionKeyResolverName.AzureKeyVault);

And now to create the database and container. The database is simple; we just call CreateDatabaseAsync, and then GetDatabase to create the human-resources database:

// Create the HR database
await client.CreateDatabaseAsync("human-resources");
var database = client.GetDatabase("human-resources");
Console.WriteLine("Created human-resources database");

The container is a bit more involved, since we need to set the encryption for the salary and social security number properties. And the way this works is by creating a data encryption key – or DEK – for each. So in fact, the properties will be encrypted and decrypted by the DEK, not the CMK itself. The DEK then gets deployed to Cosmos DB, but remember that Cosmos DB can’t encrypt and decrypt on its own. So the DEK itself is encrypted by the CMK before it gets sent over to Cosmos DB.

So, first get the key identifier for the salary CMK from appsettings.json, and wrap it up inside an EncryptionKeyWrapMetadata object. Then we can call CreateClientEncryptionKeyAsync on the database to create a data encryption key named salaryDek which will use the SHA256 algorithm for encrypting the salary property, where again, the DEK itself is encrypted by the CMK referenced in the wrap metadata object we just created:

// Create salary data encryption key (DEK) from the salary customer-managed key (CMK) in AKV
var salaryCmkId = config["AkvSalaryCmkId"];

var salaryEncryptionKeyWrapMetadata = new EncryptionKeyWrapMetadata(
    type: KeyEncryptionKeyResolverName.AzureKeyVault,
    name: "akvMasterKey",
    value: salaryCmkId,
    algorithm: EncryptionAlgorithm.RsaOaep.ToString());

await database.CreateClientEncryptionKeyAsync(
    clientEncryptionKeyId: "salaryDek",
    DataEncryptionAlgorithm.AeadAes256CbcHmacSha256,
    salaryEncryptionKeyWrapMetadata);

Console.WriteLine("Created salary database encryption key")
;

And then it’s the same for the social security number CMK. We get its key identifier from appsettings.json, wrap it up as EncryptionKeyWrapMetadata, and call CreateClientEncryptionKeyAsync to create the data encryption key named ssnDek:

// Create SSN data encryption key (DEK) from the SSN customer-managed key (CMK) in AKV
var ssnCmkId = config["AkvSsnCmkId"];

var ssnEncryptionKeyWrapMetadata = new EncryptionKeyWrapMetadata(
    type: KeyEncryptionKeyResolverName.AzureKeyVault,
    name: "akvMasterKey",
    value: ssnCmkId,
    algorithm: EncryptionAlgorithm.RsaOaep.ToString());

await database.CreateClientEncryptionKeyAsync(
    "ssnDek",
    DataEncryptionAlgorithm.AeadAes256CbcHmacSha256,
    ssnEncryptionKeyWrapMetadata);

Console.WriteLine("Created SSN database encryption key");

The last step before we can create the container is to bind each of these DEKs to their respective properties. This means creating a new ClientEncryptionIncludePath that points to the salary property in each document and is tied to the salary DEK. We also need to set the encryption type which can be either Randomized or Deterministic. So if you were wondering how it’s possible for Cosmos DB to query on an encrypted property without being able to decrypt it, the answer is in the encryption type. If you don’t need to query on an encrypted property, then you should set the type to Randomized like we’re doing here:

// Define a client-side encryption path for the salary property
var path1 = new ClientEncryptionIncludedPath()
{
    Path = "/salary",
    ClientEncryptionKeyId = "salaryDek",
    EncryptionAlgorithm = DataEncryptionAlgorithm.AeadAes256CbcHmacSha256.ToString(),
    EncryptionType = EncryptionType.Randomized, // Most secure, but not queryable
};

Using the randomized encryption type generates different encrypted representations of the same data, which is most secure, but also means it can’t be queried against on the server-side.

On the other hand, since the HR Service application will need to query on the social security number, we create a similar ClientEncryptionIncludePath for the ssn property and its corresponding DEK, only this time we’re setting the encryption type to be Deterministic:

// Define a client-side encryption path for the SSN property
var path2 = new ClientEncryptionIncludedPath()
{
    Path = "/ssn",
    ClientEncryptionKeyId = "ssnDek",
    EncryptionAlgorithm = DataEncryptionAlgorithm.AeadAes256CbcHmacSha256.ToString(),
    EncryptionType = EncryptionType.Deterministic, // Less secure than randomized, but queryable
};

This means that a given social security number will always generate the same encrypted representation, making it possible to query on it. Again though, Deterministic is less secure than Randomized, and can be easier to guess at – particularly for low cardinality values, such as booleans for example – which is why you only want to choose Deterministic when you need to be able to query on the value with SQL, server-side.

And now we can create the container. Here we’ll use the fluent style of coding supported by the SDK, where you chain multiple methods together in a single statement to build a container definition, and then create a container from that definition. In this case we call DefineContainer to name the container employees, using the ID itself as the partition key. We tack on WithClientEncryptionPolicy, and then a WithIncludePath method for each of the two properties we’re encrypting client-side. Then Attach returns a container builder for the client encryption policy, on which we can call CreateAsync to create the container, with throughput provisioned at 400 RUs a second.

This creates the employees container, which we can then reference by calling GetContainer:

// Create the container with the two defined encrypted properties, partitioned on ID
await database.DefineContainer("employees", "/id")
    .WithClientEncryptionPolicy()
    .WithIncludedPath(path1)
    .WithIncludedPath(path2)
    .Attach()
    .CreateAsync(throughput: 400);

var container = client.GetContainer("human-resources", "employees");

Console.WriteLine("Created employees container with two encrypted properties defined");

OK, we’re ready to create some documents and see client-side encryption in action:

// Add two employees
await container.CreateItemAsync(new
{
    id = "123456",
    firstName = "Jane",
    lastName = "Smith",
    department = "Customer Service",
    salary = new
    {
        baseSalary = 51280,
        bonus = 1440
    },
    ssn = "123-45-6789"
}, new PartitionKey("123456"));

await container.CreateItemAsync(new
{
    id = "654321",
    firstName = "John",
    lastName = "Andersen",
    department = "Supply Chain",
    salary = new
    {
        baseSalary = 47920,
        bonus = 1810
    },
    ssn = "987-65-4321"
}, new PartitionKey("654321"));

Console.WriteLine("Created two employees; view encrypted properties in Data Explorer");
Console.WriteLine("Press any key to continue");
Console.ReadKey();
Console.WriteLine();

Here we’re calling CreateItemAsync to create two employee documents. Inside each document we’ve got both salary and ssn properties in clear text, but it’s the SDK’s job to encrypt those properties before the document ever leaves the application. So let’s run the HR Service application up to this point, and have a look at these documents in the database.

Heading on over to the data explorer to view the documents, and sure enough, both the salary and ssn properties are encrypted in the documents:
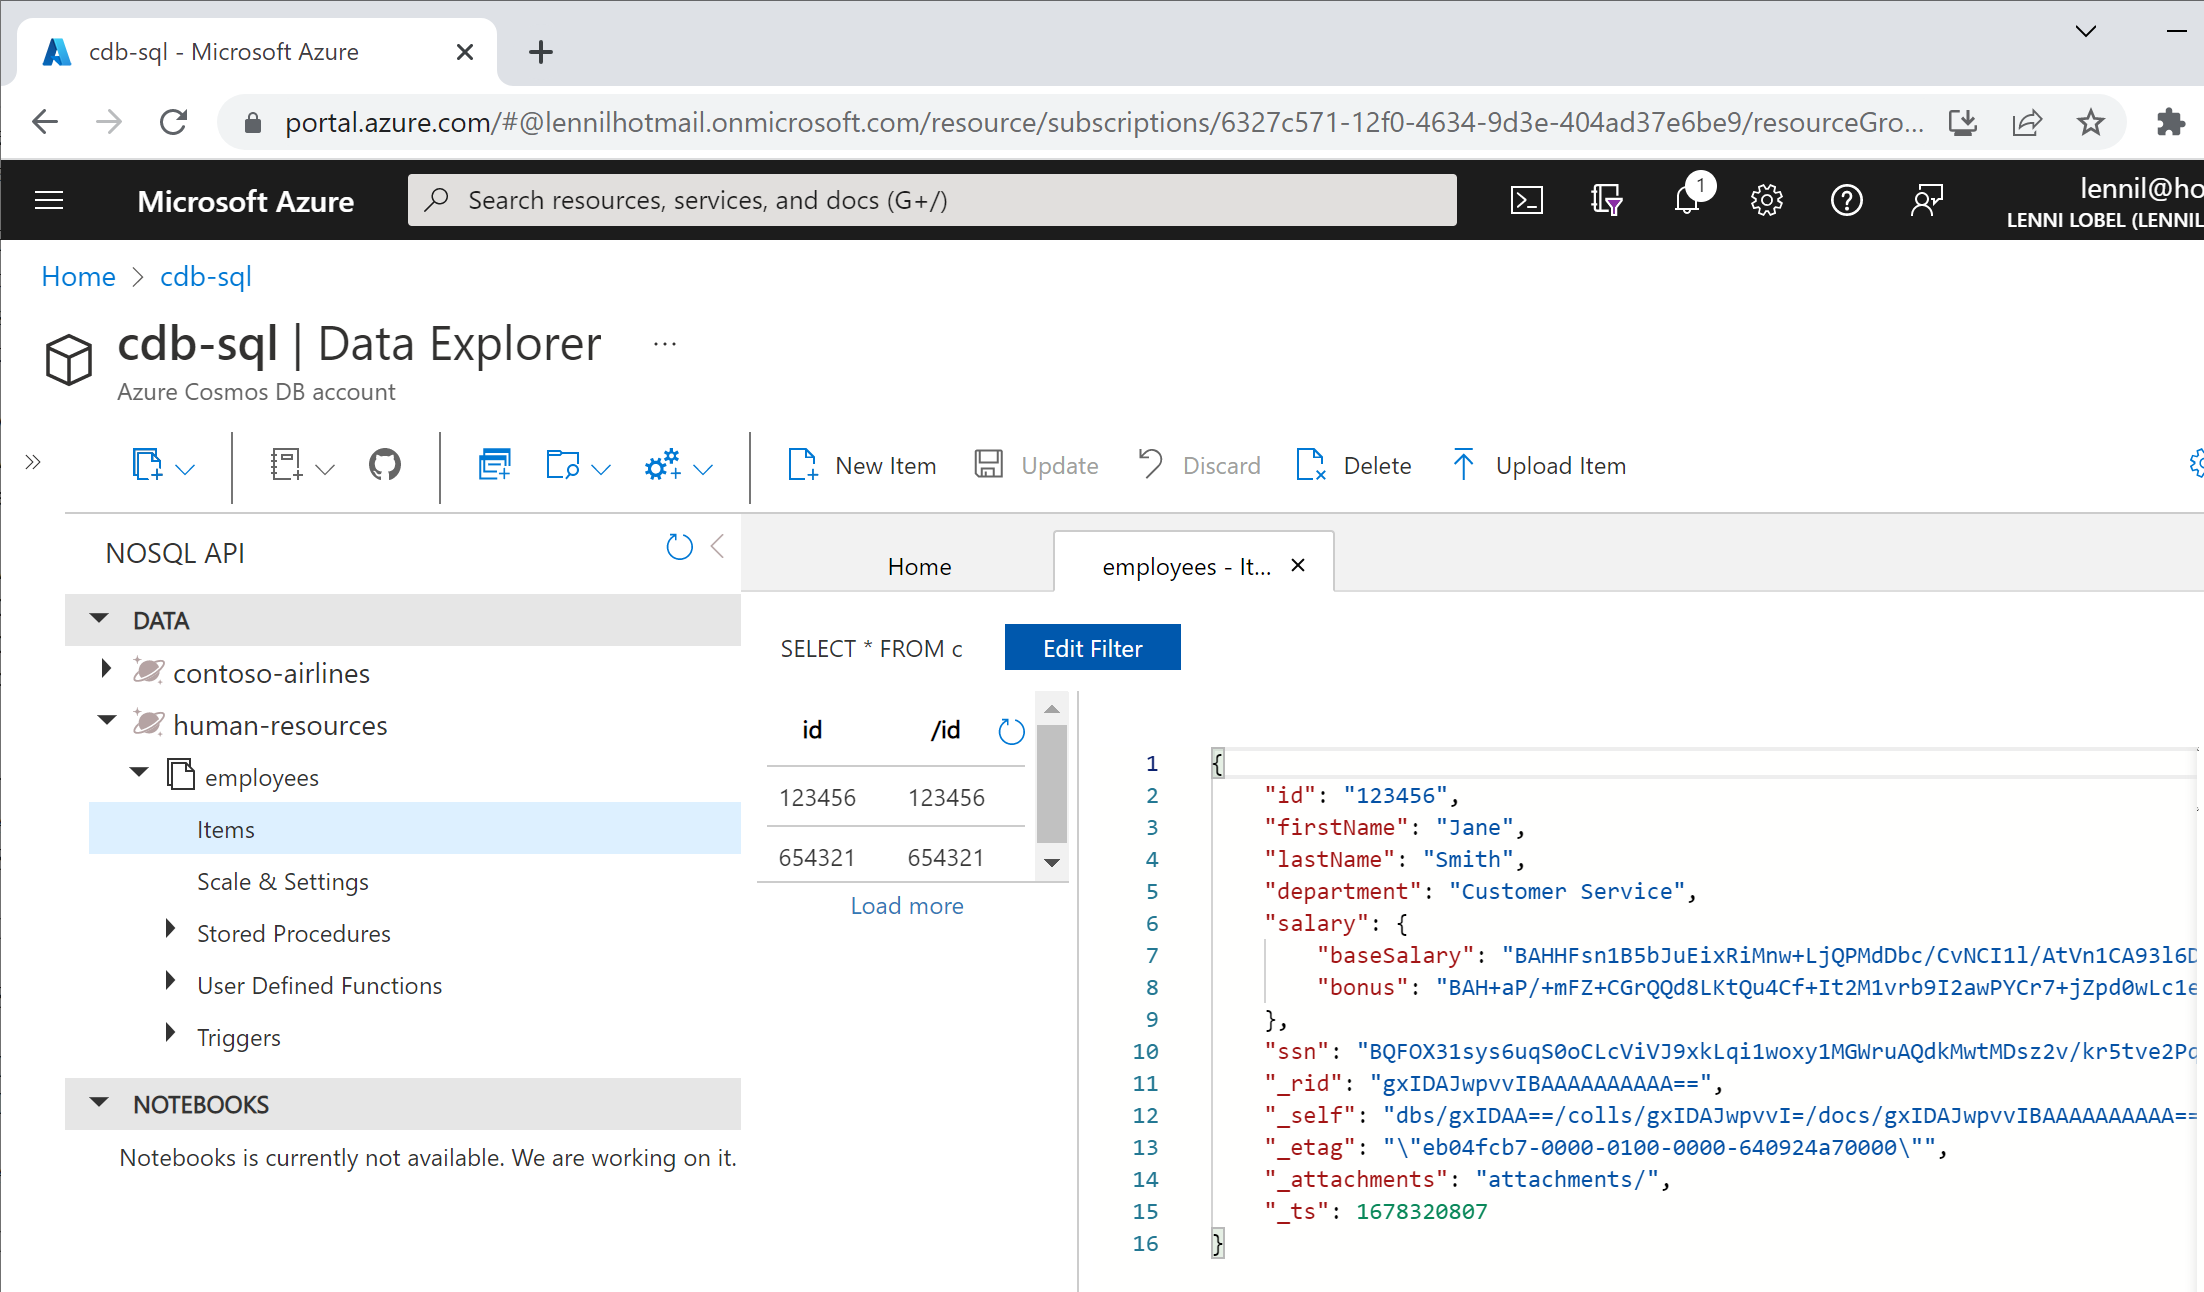
Remember, these properties can be decrypted only by client applications with access to the required CMKs, while Cosmos DB can never decrypt these values. Also notice that the salary property is actually a nested object holding base salary and bonus values – both of which have been encrypted as two separate parts of the parent salary property. This is significant because, at least now, the client-side encryption policy is immutable – you can’t add or remove encrypted properties once you’ve created the container. But because of the schema-free nature of JSON document in Cosmos DB, you can easily create a single property for client-side encryption, and then dynamically add new properties in the future that require encryption as nested properties, like we’re doing here for salary.

Back to the last part of the HR Service application to retrieve documents from the container. First we’ll do a point read on one document, by ID and partition key – which are both the same in this case since we’ve partitioned on the ID property itself:

// Retrieve an employee via point read; SDK automatically decrypts Salary and SSN properties
var employee = await container.ReadItemAsync("123456", new PartitionKey("123456"));
Console.WriteLine("Retrieved employee via point read");
Console.WriteLine(JsonConvert.SerializeObject(employee.Resource, Formatting.Indented));
Console.WriteLine("Press any key to continue");
Console.ReadKey();
Console.WriteLine();

And sure enough, we can see the document with both salary and ssn properties decrypted:
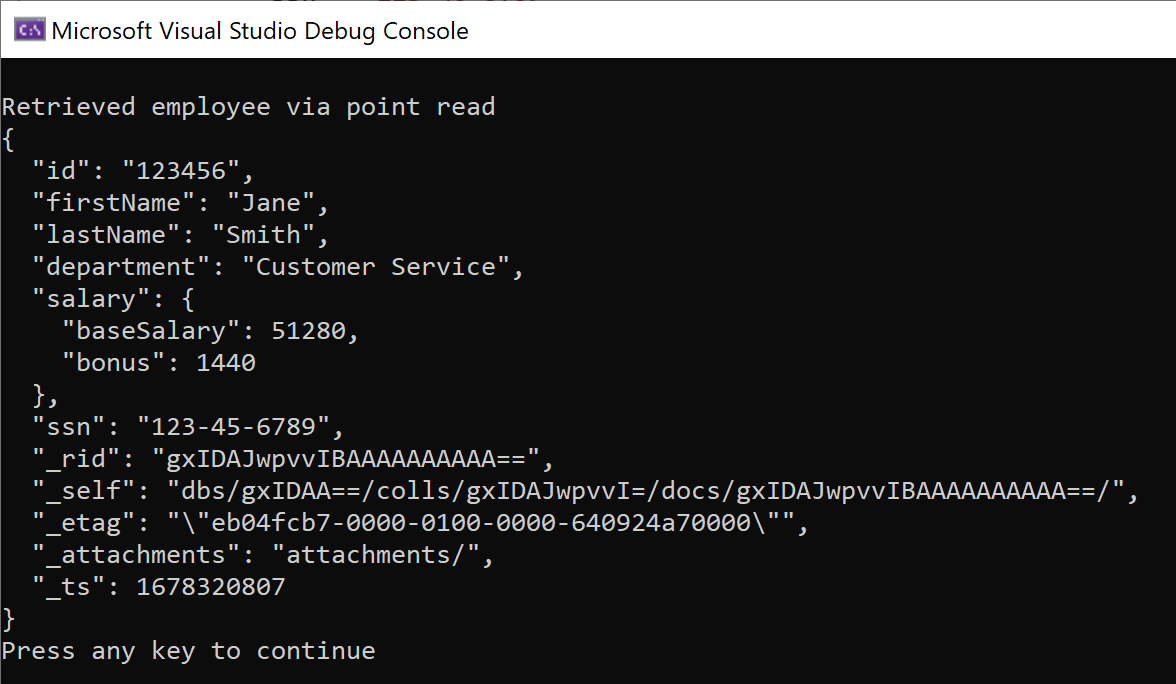
Remember though, that the document was served to the application with those properties encrypted like was just saw in the data explorer. It’s the .NET SDK that is transparently decrypting them for the HR Service application, since that application is authorized to access the CMKs from Azure Key Vault for both properties.

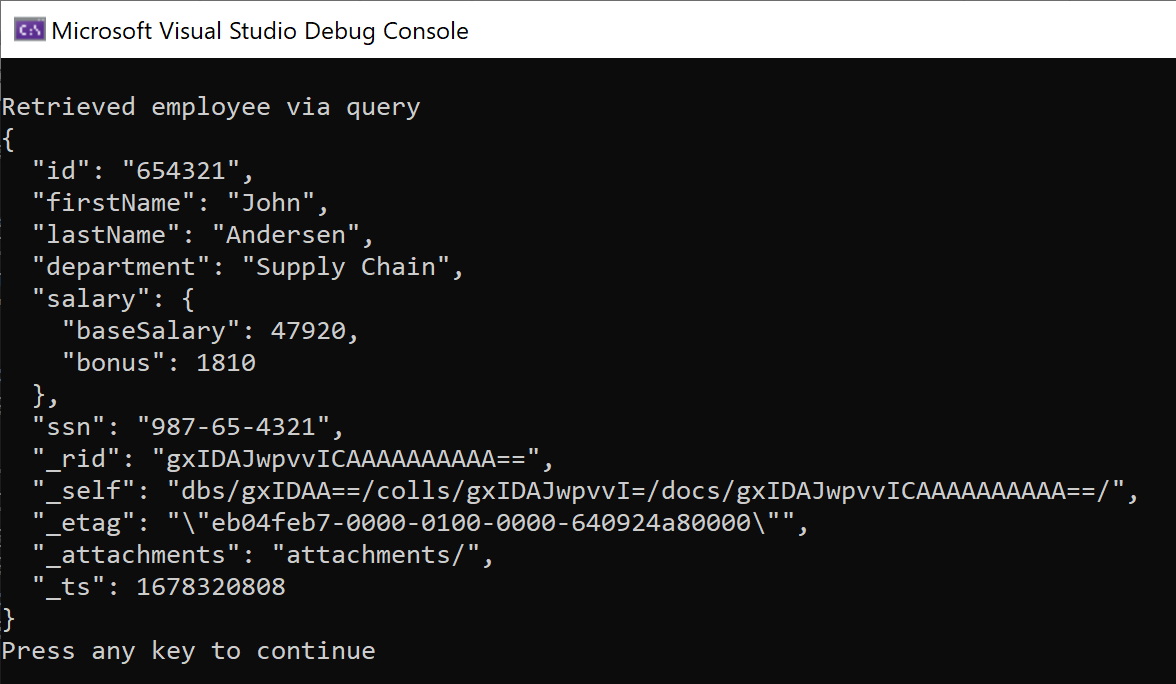
Finally, let’s see if we can query on the social security number. This should work, since we’re using deterministic encryption on that property, but it needs to be a parameterized query (as shown below). You can’t simply embed the clear text of the social security number you’re querying right inside the SQL command text since, again, remember that the SDK needs to deterministically encrypt that parameter value before the SQL command text ever leaves the application:

// Retrieve an employee via SQL query; SDK automatically encrypts the SSN parameter value
var queryDefinition = container.CreateQueryDefinition("SELECT * FROM c where c.ssn = @SSN");
await queryDefinition.AddParameterAsync("@SSN", "987-65-4321", "/ssn");

var results = await container.GetItemQueryIterator(queryDefinition).ReadNextAsync();
Console.WriteLine("Retrieved employee via query");
Console.WriteLine(JsonConvert.SerializeObject(results.First(), Formatting.Indented));
Console.WriteLine("Press any key to continue");
Console.ReadKey();
Console.WriteLine();

And, sure enough, this works as we’d like. The SDK encrypted the SSN query parameter on the way out, and decrypted both Salary and SSN properties on the way back in:
So now, let’s wrap it up with a look at the HR Staff application.

Let’s first update appsettings.json, and plug in the Azure AD values that’s we’ve copied into Notepad. That’s the same directory ID as the HR Service application, plus the client ID and client secret we have just for the HR Staff application:

And now, over to the code in Program.cs, starting with these namespace imports up top:

using Azure.Identity;
using Azure.Security.KeyVault.Keys.Cryptography;
using Microsoft.Azure.Cosmos;
using Microsoft.Azure.Cosmos.Encryption;
using Microsoft.Extensions.Configuration;
using Newtonsoft.Json;
using System;
using System.Diagnostics;
using System.Threading.Tasks;

Next, prepare to write all the code inside an empty Main method:

static async Task Main(string[] args)
{


}

Inside the Main method, we get similar configuration as the HR Service application. We grab the endpoint and master key, plus the Azure AD directory, and the client ID and client secret defined for the HR Staff application. And then we wrap up the Azure AD information in a ClientSecretCredential, which we use to create an Azure key vault key resolver for a new Cosmos client, just like we did in the HR Service application.

// Get access to the configuration file
var config = new ConfigurationBuilder().AddJsonFile("appsettings.json").Build();

// Get the Cosmos DB account endpoint and master key
var endpoint = config["CosmosEndpoint"];
var masterKey = config["CosmosMasterKey"];

// Get AAD directory ID, plus the client ID and secret for the HR Staff application
var directoryId = config["AadDirectoryId"];
var clientId = config["AadHRStaffClientId"];
var clientSecret = config["AadHRStaffClientSecret"];

// Create an Azure Key Vault key store provider from the AAD directory ID with the client ID and client secret
var credential = new ClientSecretCredential(directoryId, clientId, clientSecret);
var keyResolver = new KeyResolver(credential);

// Create a Cosmos client with Always Encrypted enabled using the key store provider
var client = new CosmosClient(endpoint, masterKey)
    .WithEncryption(keyResolver, KeyEncryptionKeyResolverName.AzureKeyVault);

// Get the employees container
var container = client.GetContainer("human-resources", "employees");

Now let’s run a query. Usually, SELECT * is no problem, but that includes the ssn property which the HR Staff application cannot decrypt. And so we expect this query to fail. Let’s see:

// Try to retrieve documents with all properties
Console.WriteLine("Retrieving documents with all properties");
try
{
    // Fails because the HR Staff application is not listed in the access policy for the SSN Azure Key Vault
    await container.GetItemQueryIterator("SELECT * FROM C").ReadNextAsync();
}
catch (Exception ex)
{
    Console.WriteLine("Unable to retrieve documents with all properties");
    Console.WriteLine(ex.Message);
    Console.WriteLine("Press any key to continue");
    Console.ReadKey();
    Console.WriteLine();
}
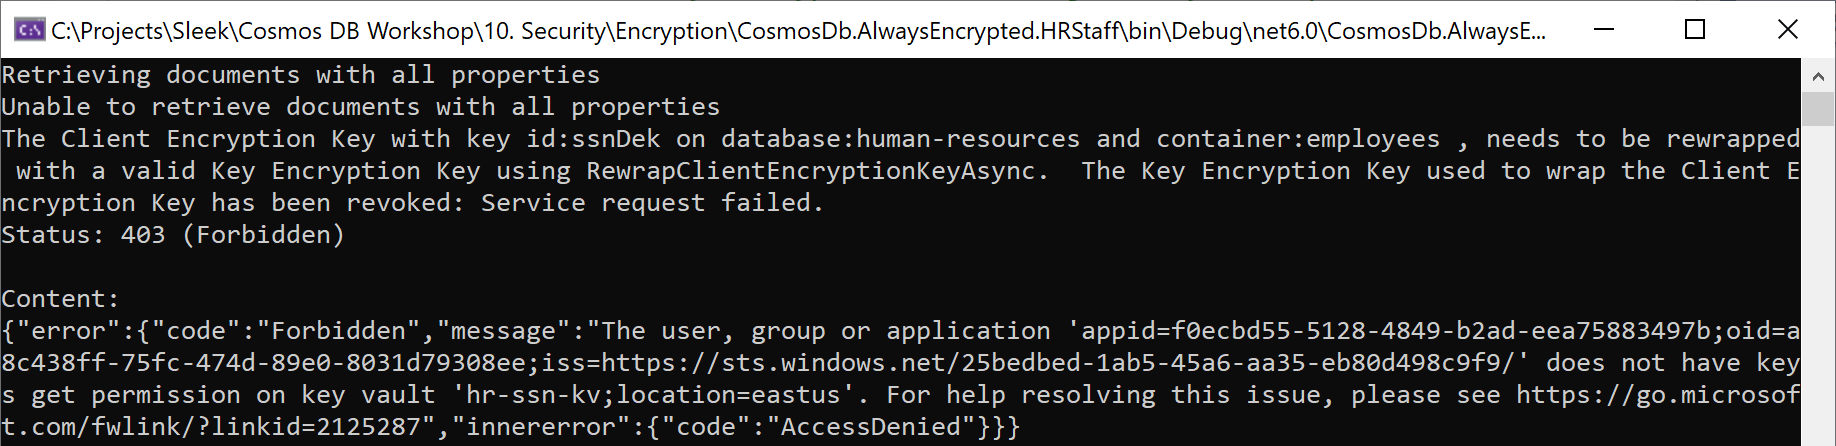
Sure enough, we get an exception for error code 403 (forbidden), for trying to access the ssn property, which the HR Staff application cannot decrypt.

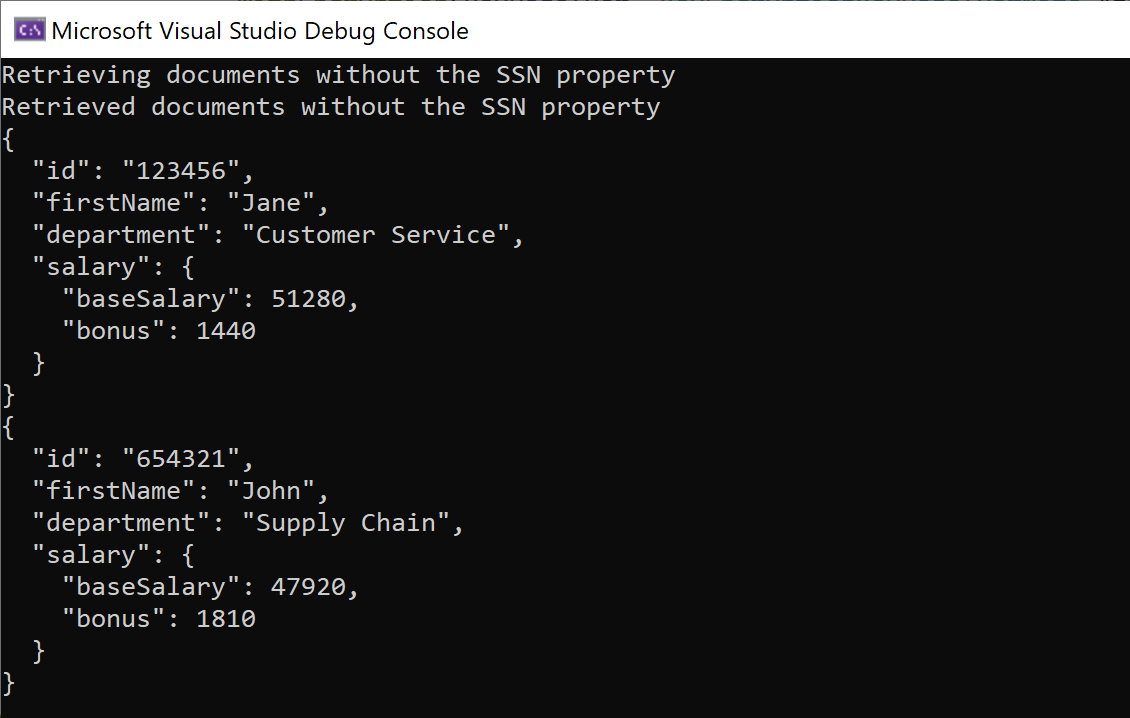
But this second query here doesn’t use SELECT *; instead, it lists all the desired properties that includes salary, but not ssn. This should work because the HR Staff application is authorized to decrypt salary, but not ssn:

// Succeeds because we are excluding the SSN property in the query projection
Console.WriteLine("Retrieving documents without the SSN property");
var results = await container.GetItemQueryIterator(
    "SELECT c.id, c.firstName, c.LastName, c.department, c.salary FROM c").ReadNextAsync();

Console.WriteLine("Retrieved documents without the SSN property");
foreach (var result in results)
{
    Console.WriteLine(JsonConvert.SerializeObject(result, Formatting.Indented));
}

And indeed, this query does work, showing that the HR Staff application can decrypt salary information, but not social security numbers:
And that’s client-side encryption (Always Encrypted) for Azure Cosmos DB in action!

Happy coding…
Configuring Client-side Encryption (aka Always Encrypted) in Azure Cosmos DB

I introduced client-side encryption (also known as Always Encrypted) in my previous post. In this post, I’ll walk you through the process of configuring this feature, so that your applications can encrypt sensitive information client-side, before sending it to the database in Cosmos DB. Likewise, your applications will be able to decrypt that information client-side, after retrieving it from Cosmos DB.

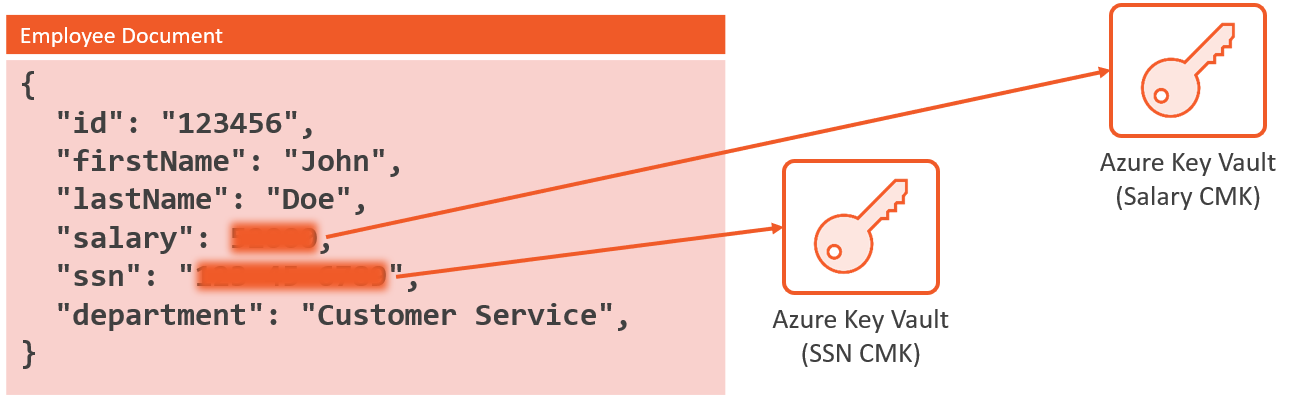
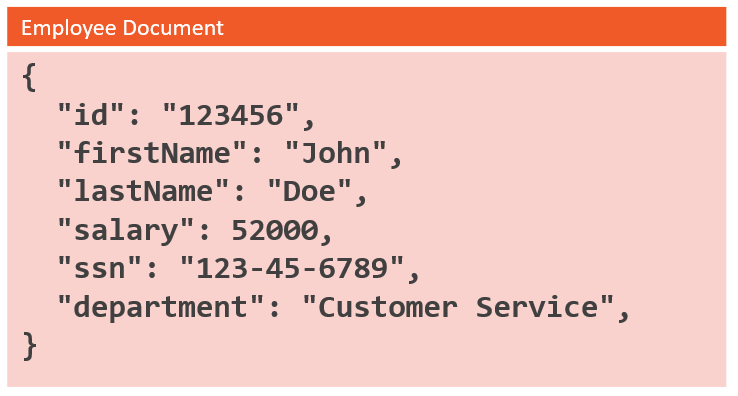
Let’s examine a concrete use case for client-side encryption. Imagine a Human Resources application and a database of employee documents that look like this:

There are two particularly sensitive properties in here that we want to encrypt so they can only be accessed by specific applications; notably the salary and social security number. In particular, we have an HR Service that requires access to both properties, and an HR Staff application that should be able to access the salary but not the social security number.

To achieve this, we’ll create two new customer-managed keys in two new Azure Key Vaults. Now it’s certainly possible to create multiple keys in a single vault, but here we need two separate vaults because we have two separate applications with different access policies, and the application access policy get defined at the key vault level. So we’ll have one CMK in one key vault for encrypting the salary property, and another CMK in another key vault for the Social Security Number, as illustrated below:

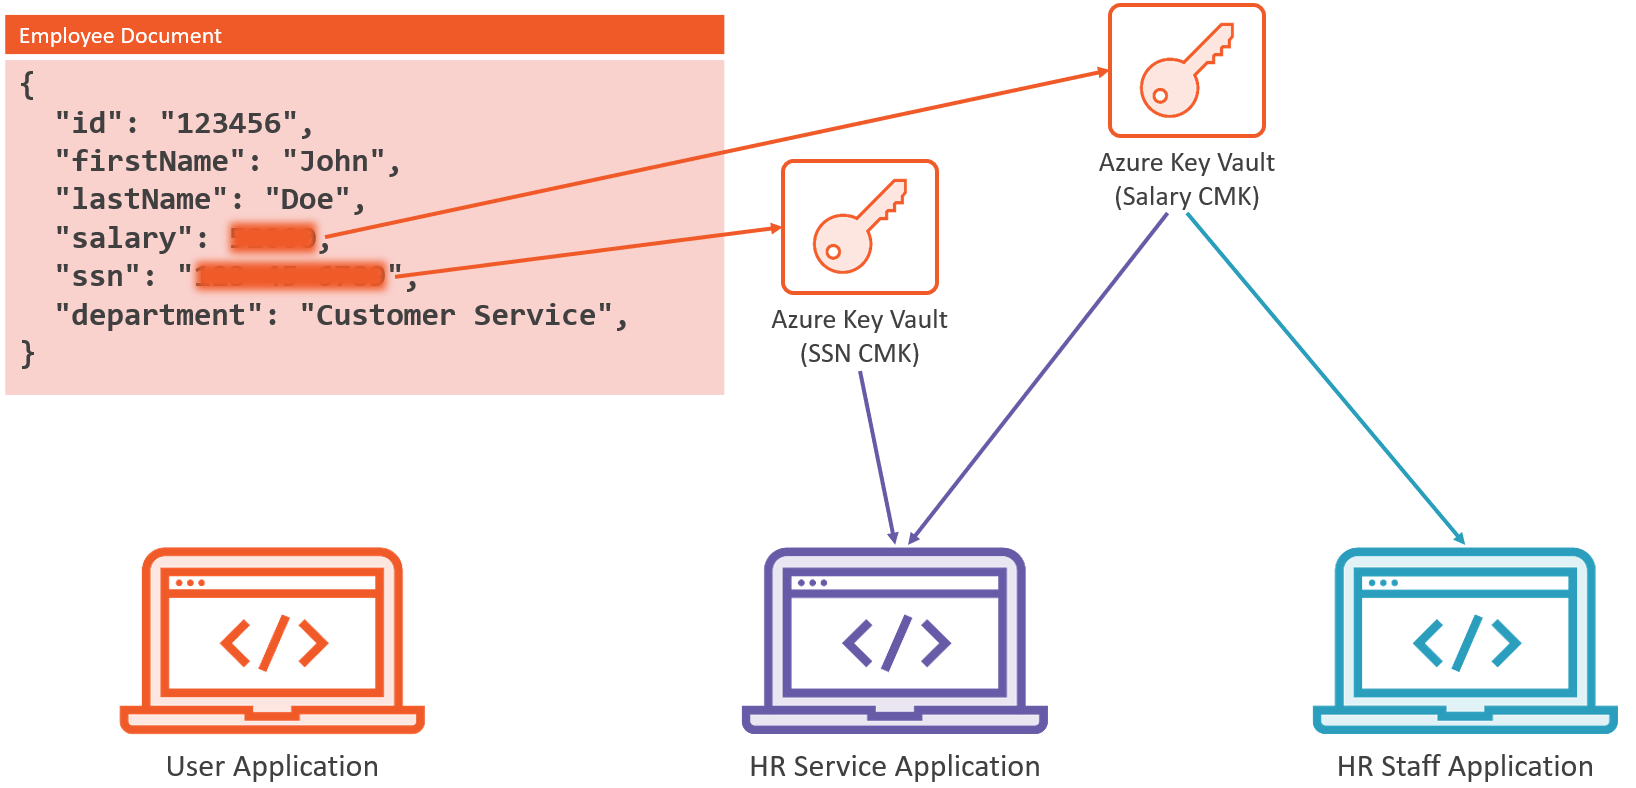
Client applications need to be expressly authorized for each key vault in order to be able to access the key needed to encrypt and decrypt these properties. Here are three applications, an ordinary user application that can’t access either property, an HR Staff application that can access the salary property but not the SSN property, and an HR Service application that can access both the salary and SSN properties:

So an ordinary user application that has no access to either vault gets no access to these properties. This application can read documents, but won’t be able to view the salary or SSN; nor will it be able to create new documents with either a salary or SSN.

Meanwhile, we have our HR Staff Application, which we have added to the access policy of the key vault holding the CMK for the salary property. So this application can access the salary but not the SSN.

And then we’ve got the HR Service, which we’ve added to the access policies of both key vaults, such that this application has access to both the salary and the SSN.

Now let’s configure client-side encryption in the Azure portal for this HR scenario.

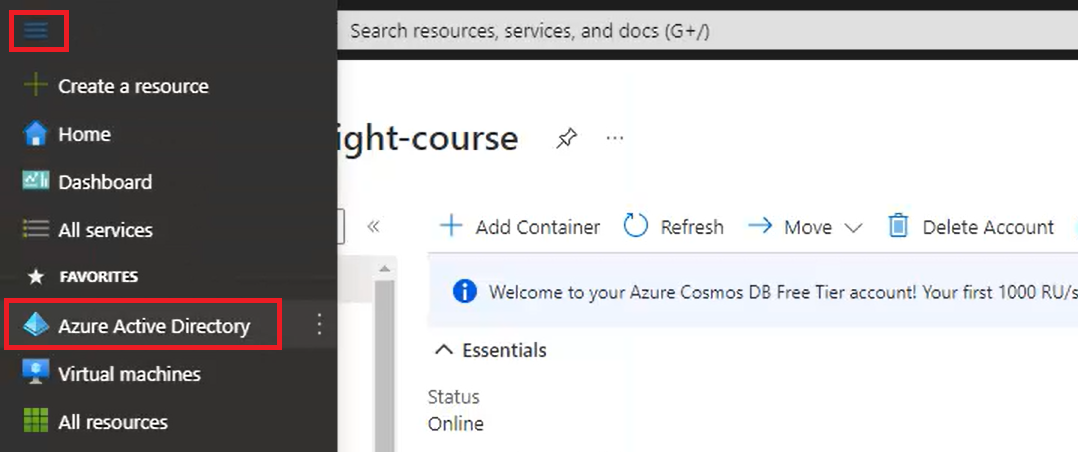
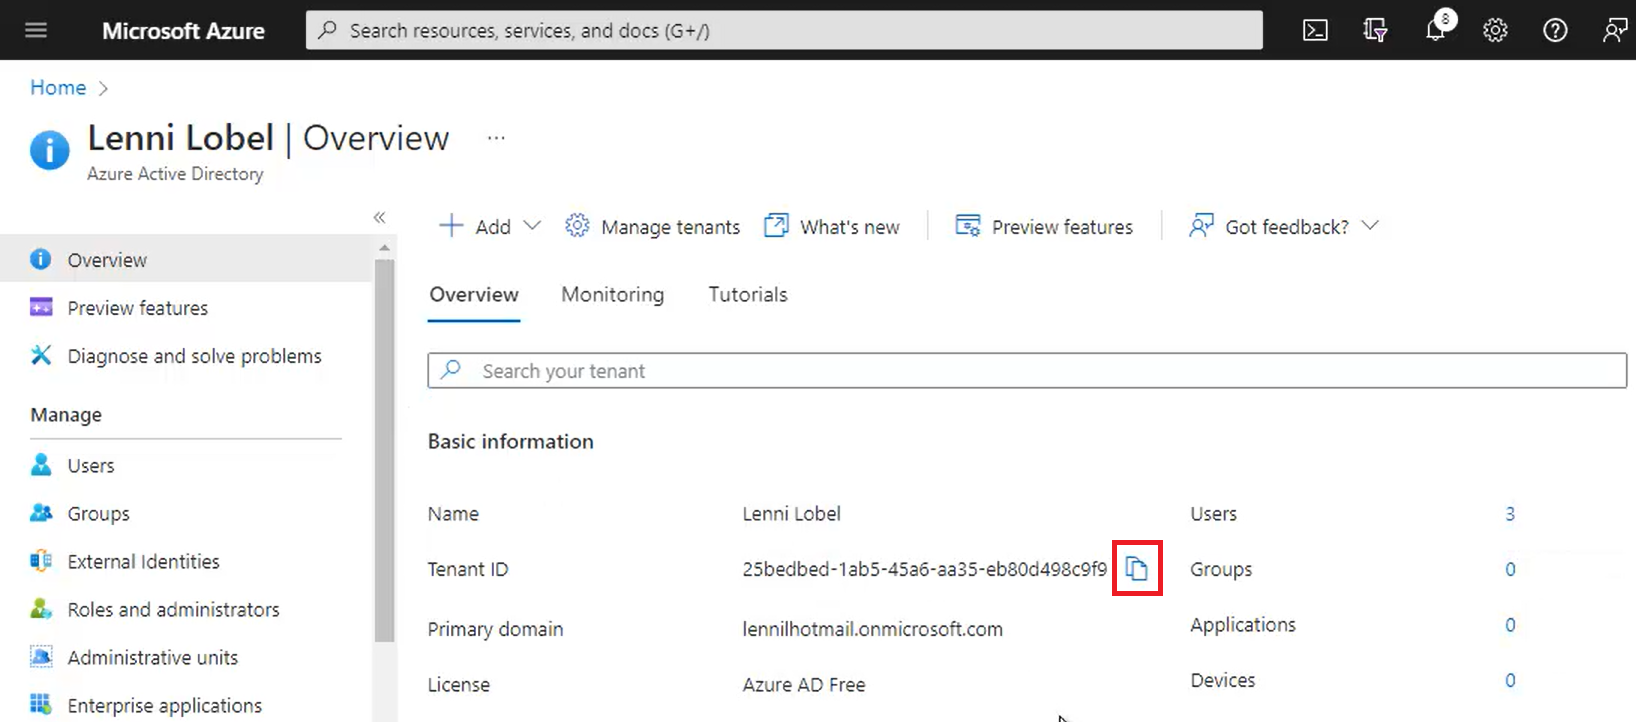
First thing we’ll need to do is head over to Azure Active Directory:

First we’ll need the Azure AD directory ID (also known as the “tenant ID”), which you can copy to the clipboard:

Then paste the directory ID into Notepad so we can use it later. Keep the Notepad window open for pasting additional IDs that we’ll be gathering throughout this process.

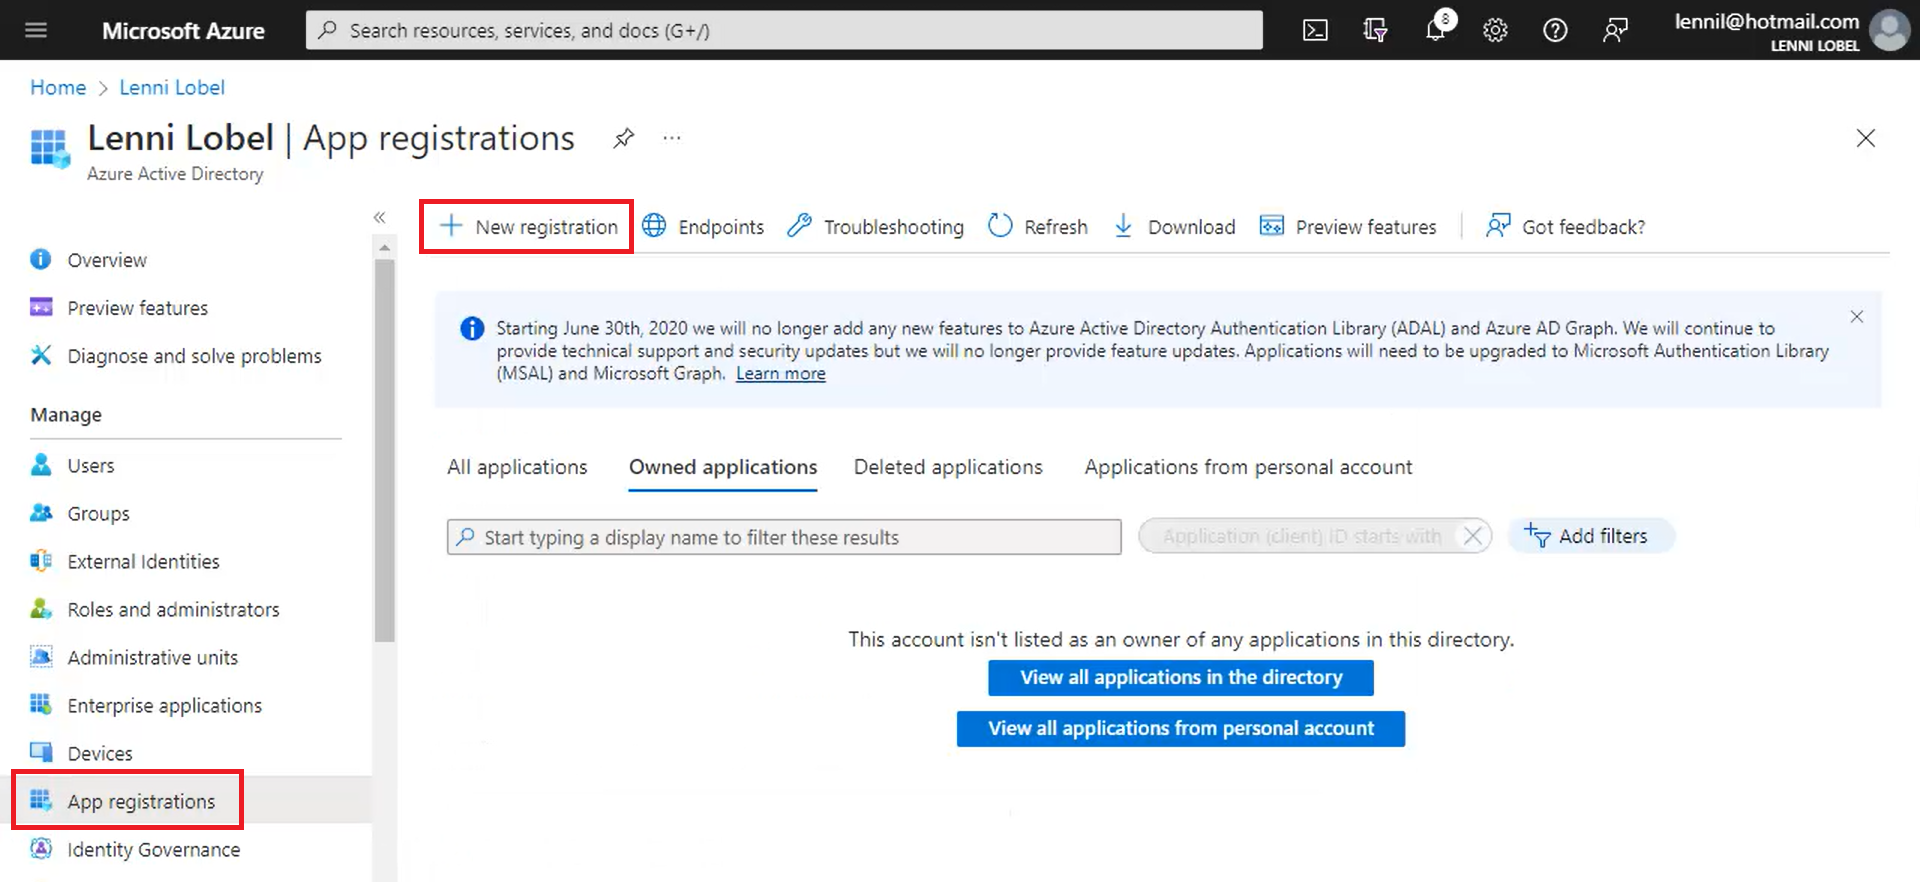
Now head over to App Registrations, and then click to create a New registration:

We’ll be creating two app registrations which will be, essentially two identities representing the HR Service and HR Staff applications.

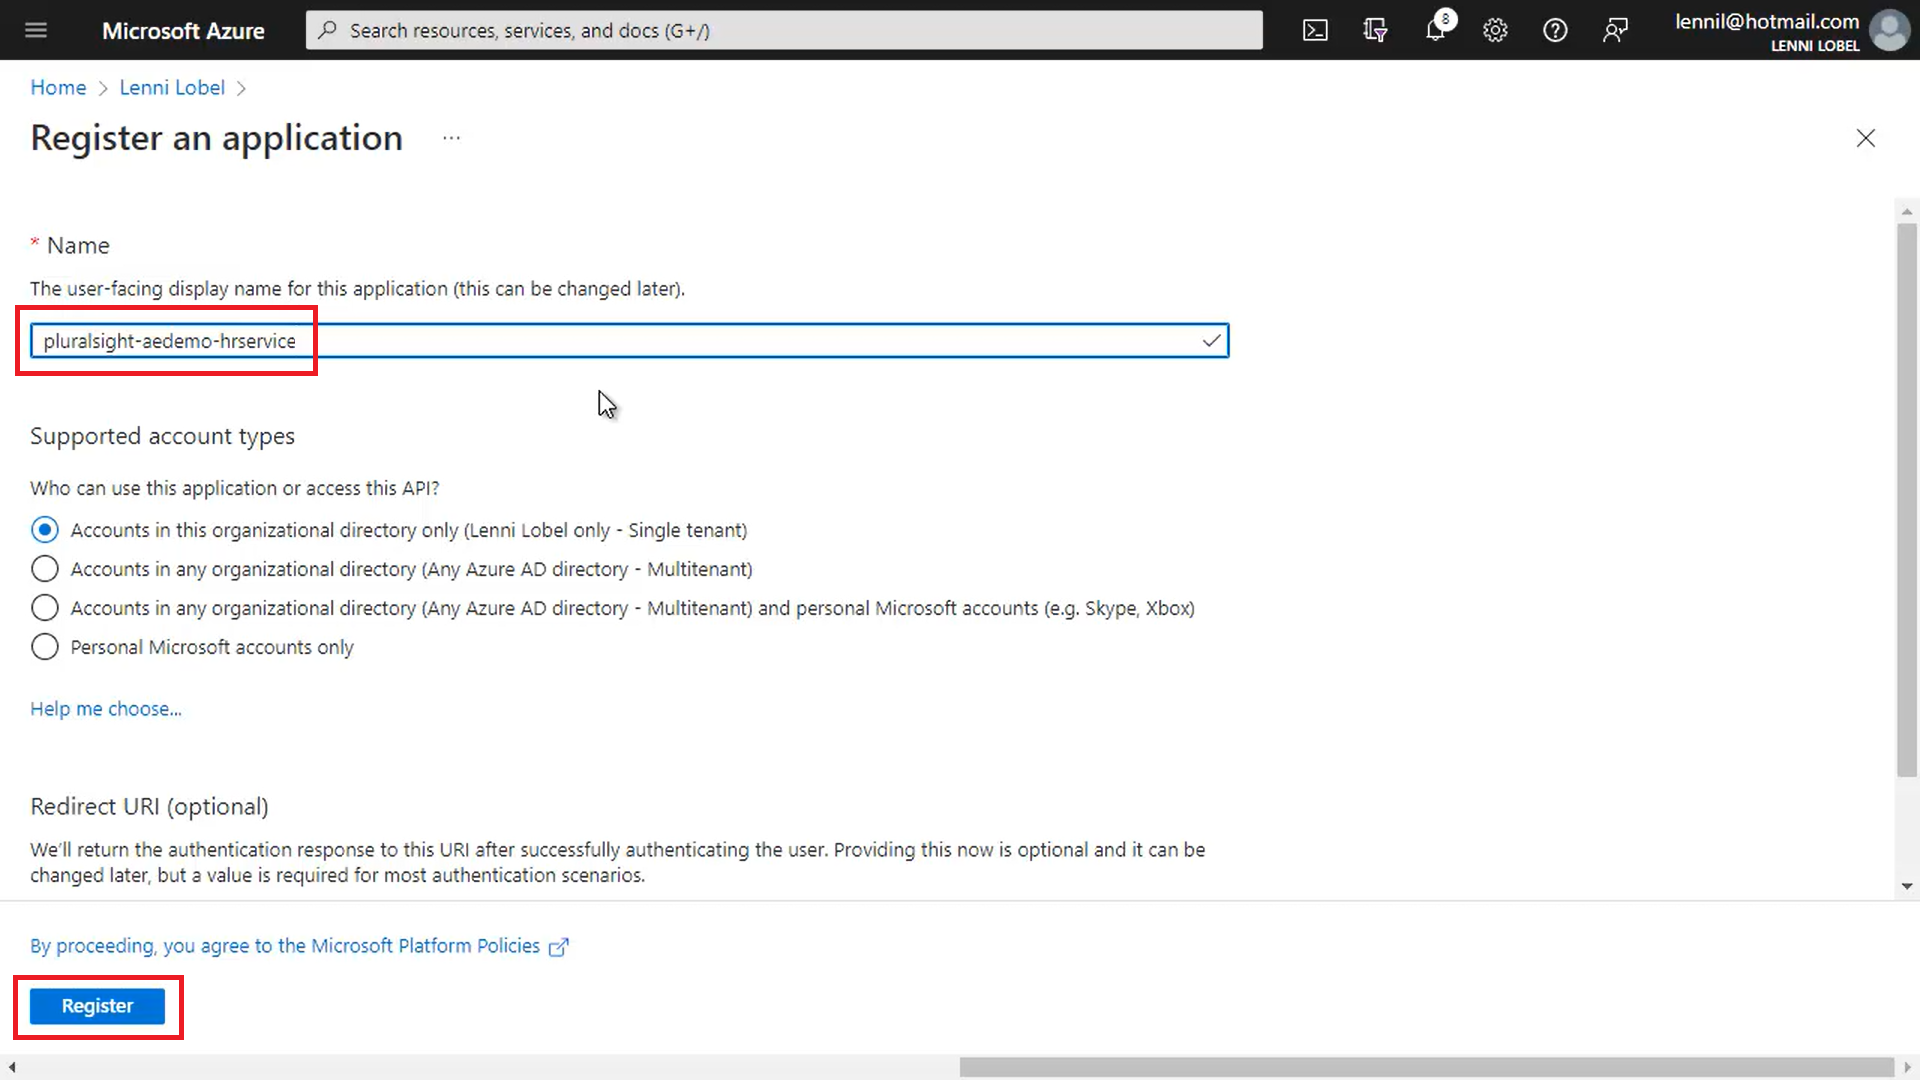
Let’s name the first registration pluralsight-aedemo-hrservice, and click Register.

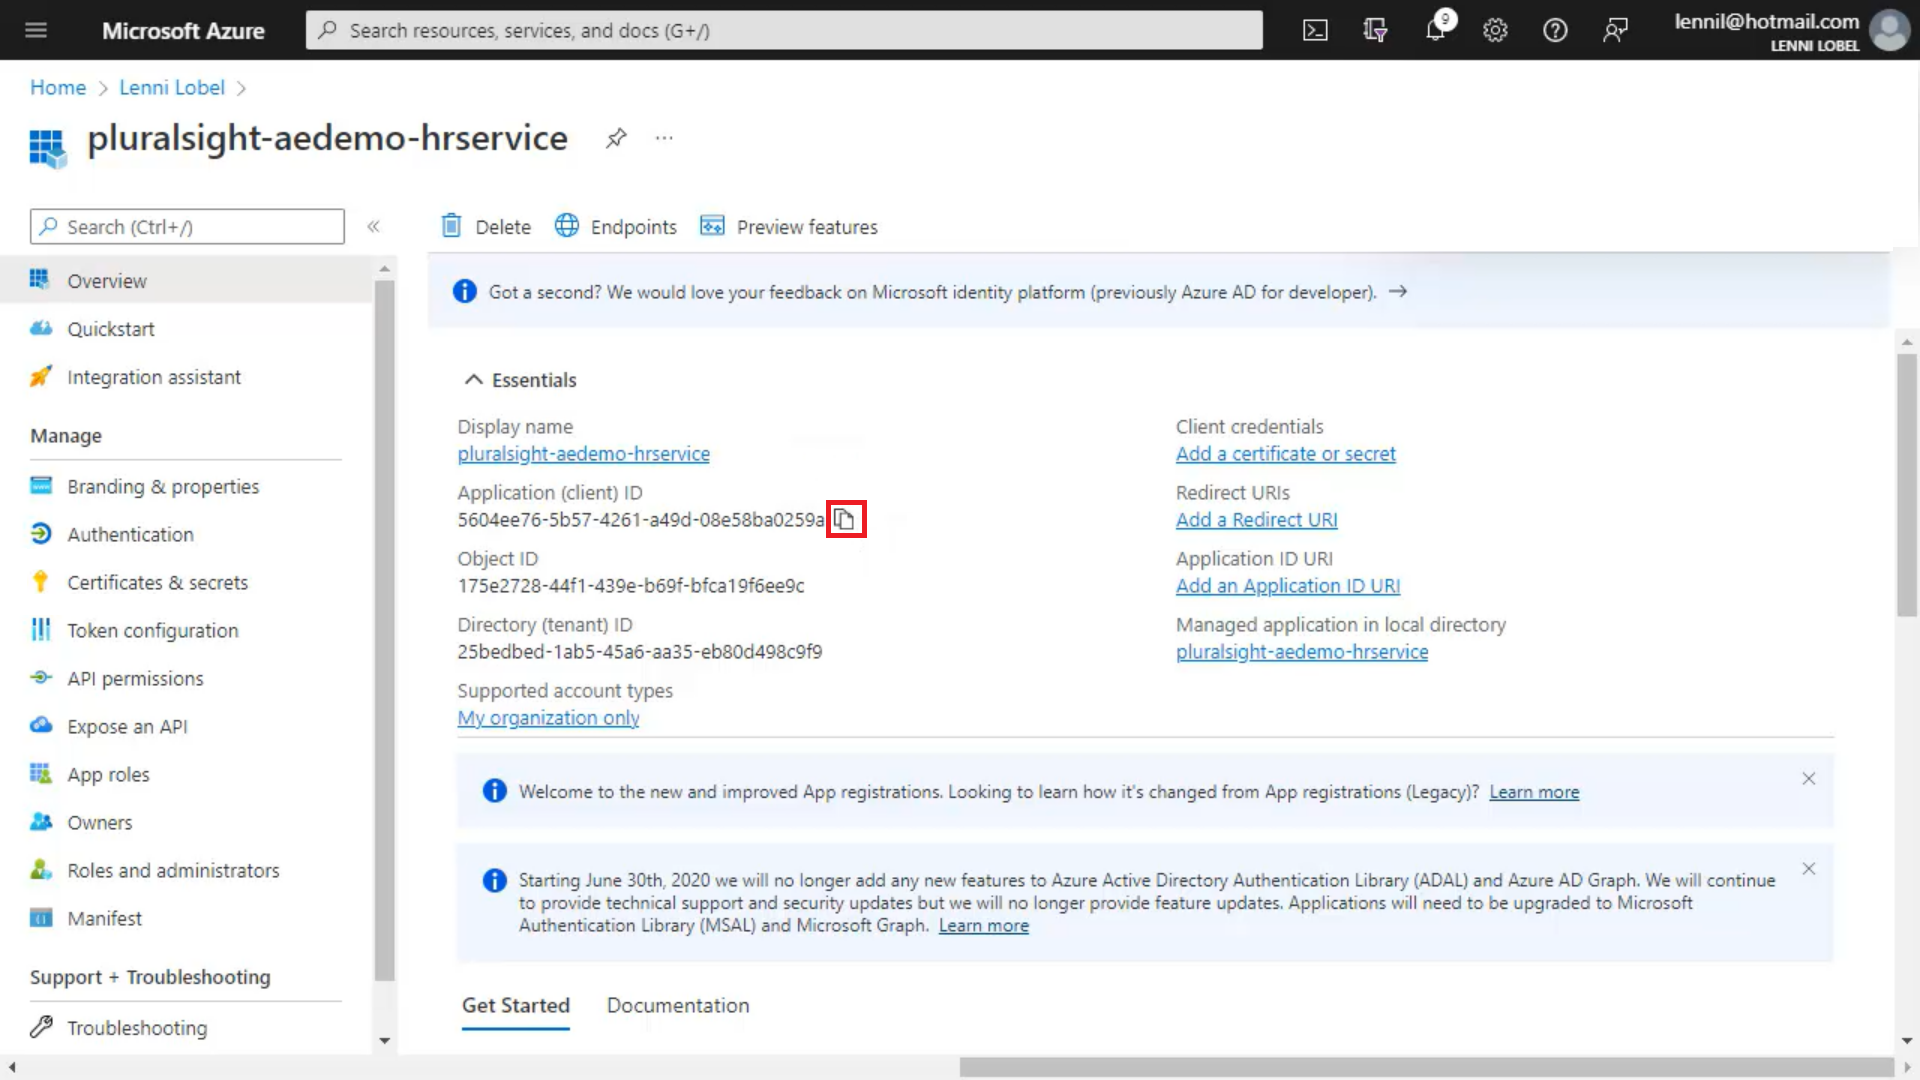
We’ll need the app registration’s client ID (also known as the “application ID”), plus its client secret that we’ll create next. So copy the client ID, and paste it into Notepad:

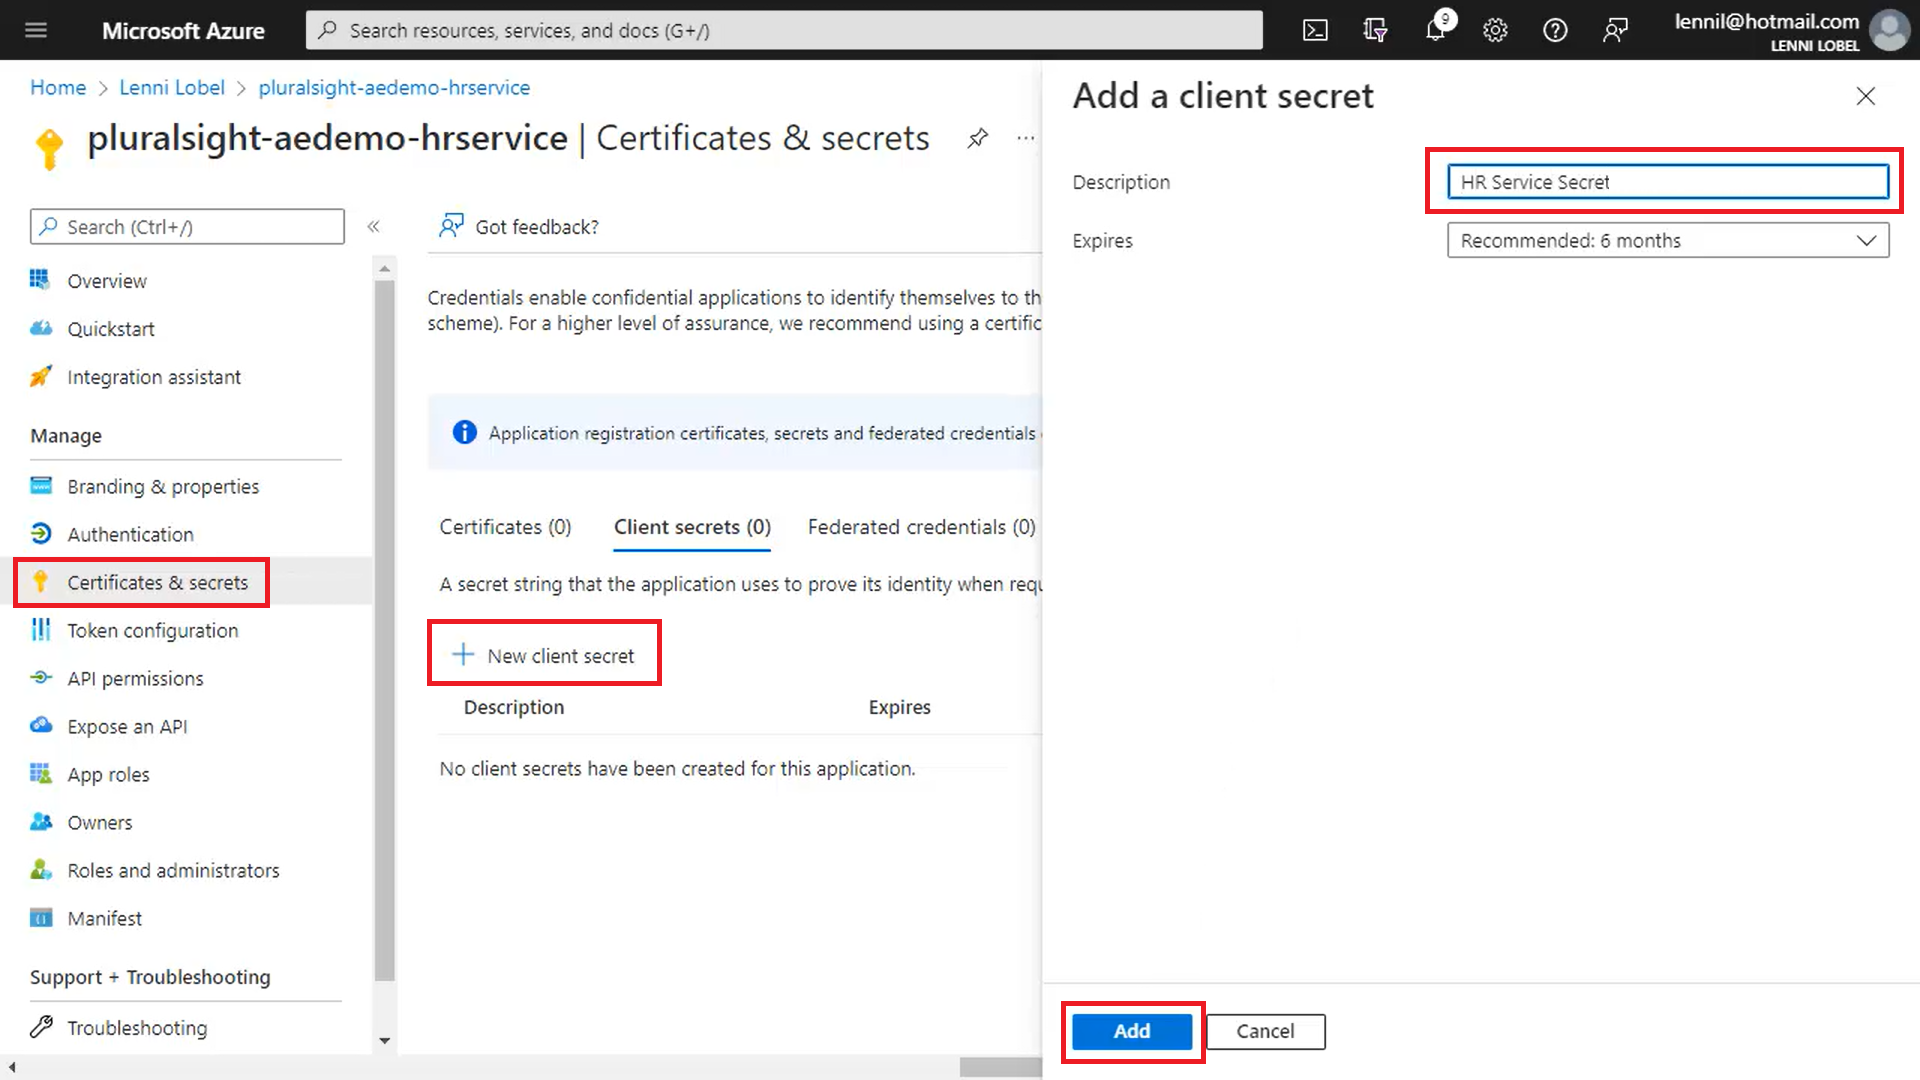
Next, click on Certificates & secrets. Then click New client secret, name it HR Service Secret, and click Add:

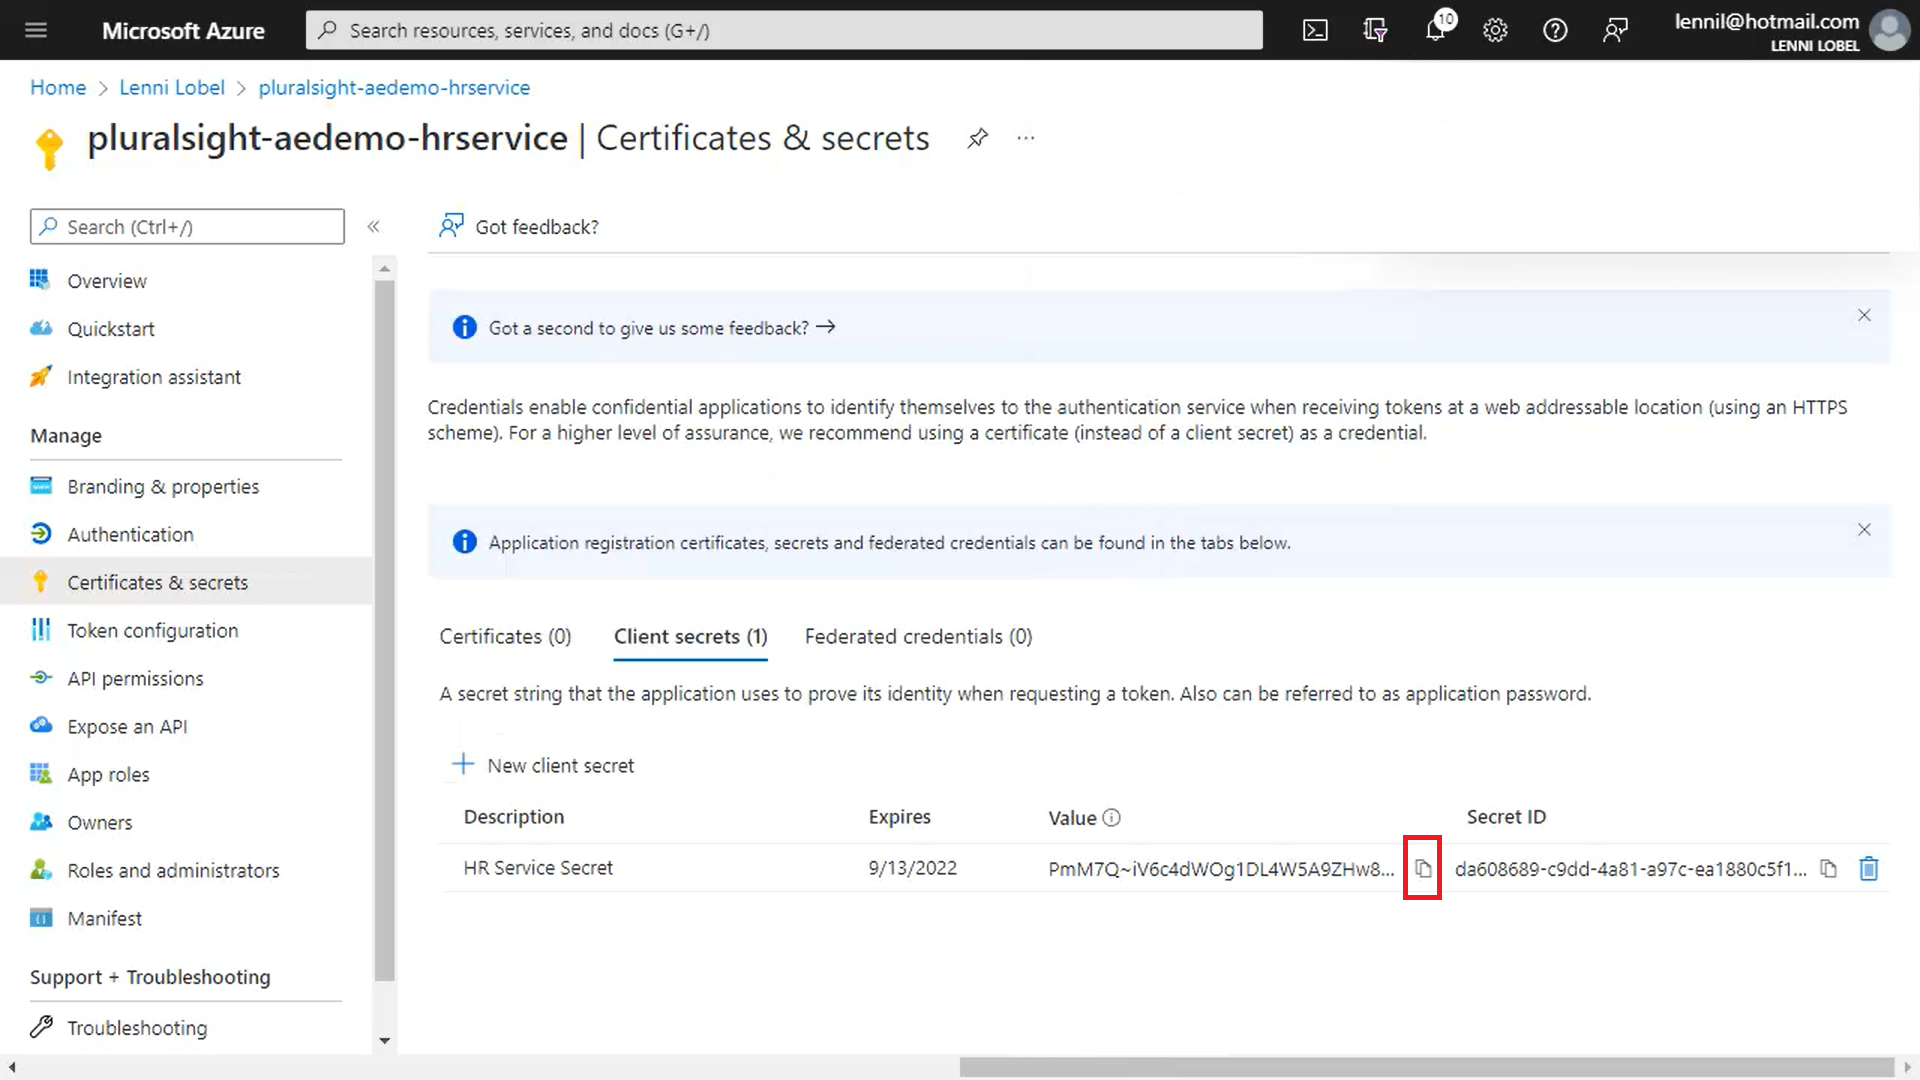
Now copy the client secret and paste it into Notepad (be sure to copy the secret value, not the Secret ID). Also, note that this is the only point in time that the client secret is exposed and available for copying to the clipboard; the Azure portal will always conceal the secret from this point on:

Repeat the same process to configure the HR Staff application:

  • Click New Registration, and name it pluralsight-aedemo-hrstaff.
  • Copy and paste this app registration’s client ID
  • Click to open Certificates and Secrets, and create a new client secret named HR Staff Secret
  • Copy the secret value and paste it over to Notepad

Everything is now setup in Active Directory, and it’s time to move on the Azure Key Value.

We need to create the two key vaults for our customer-managed keys that are going to encrypt the salary and social-security number properties.

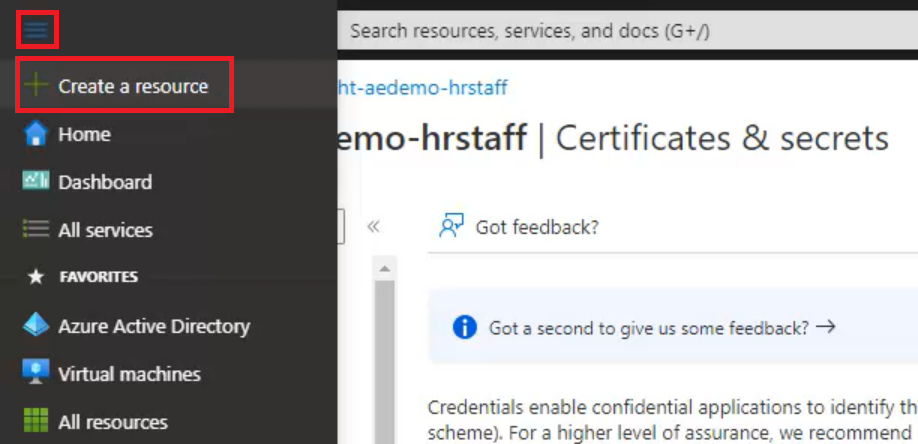
Click to create a new resource:

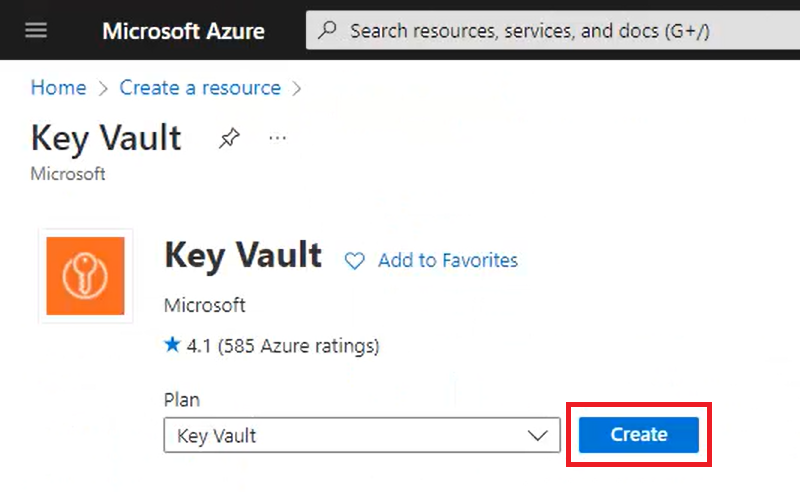
Now search for key vault, and click Create.

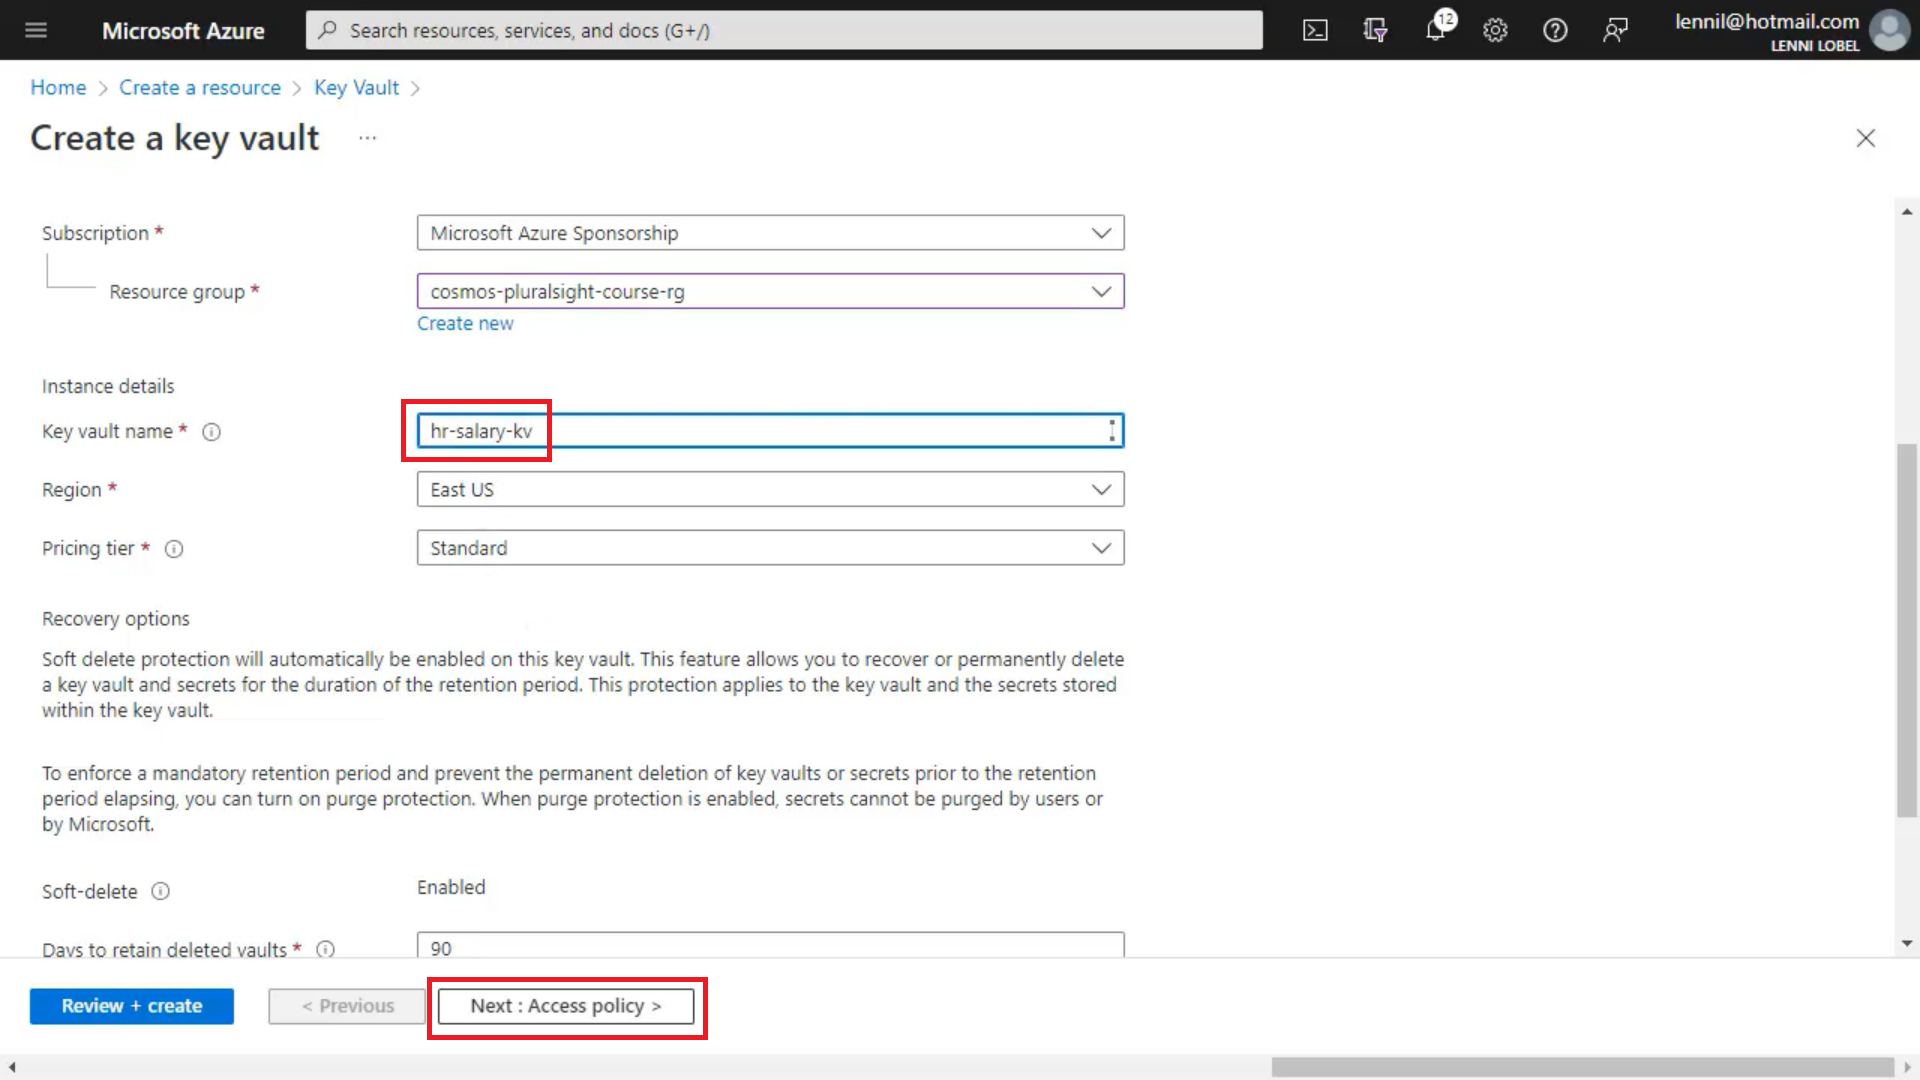
Choose a resource group (it can be the same one as the Cosmos DB account), and name the new key vault hr-salary-kv. Then click Next to set the access policy.

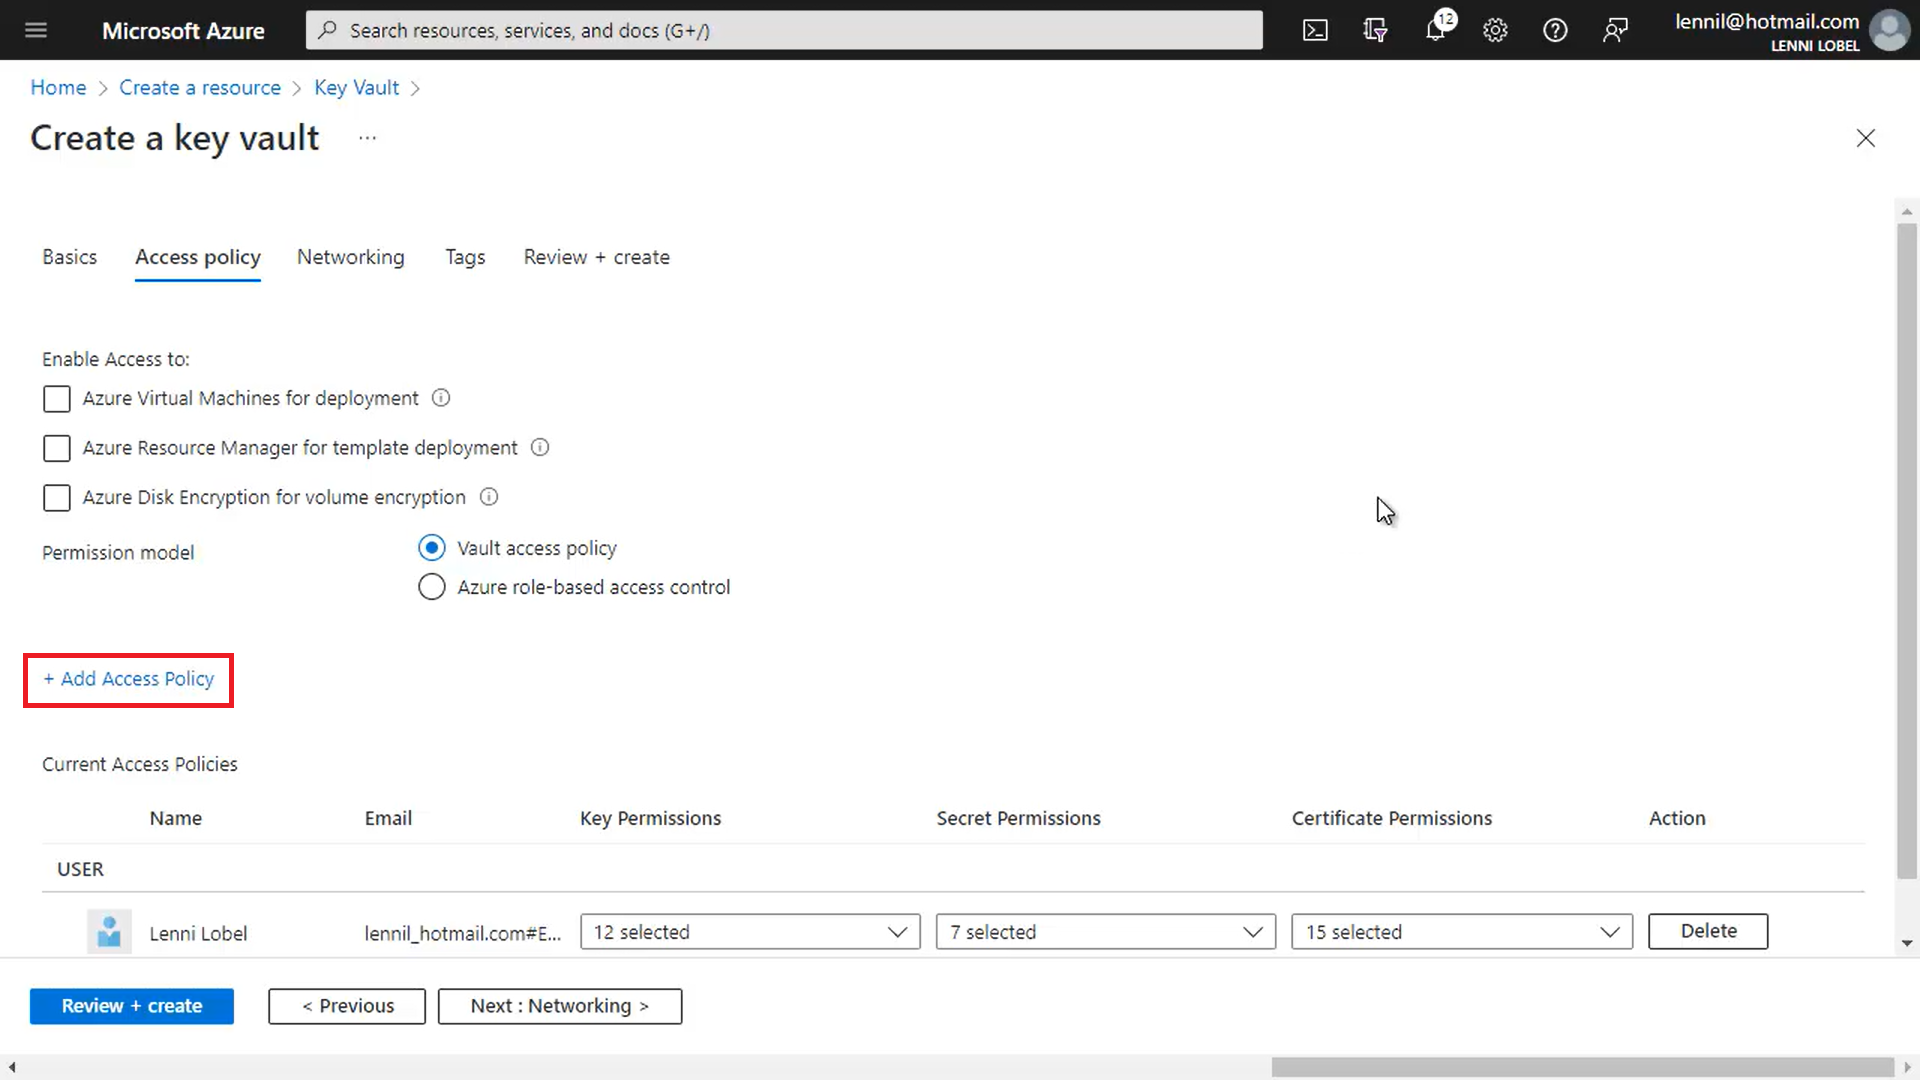
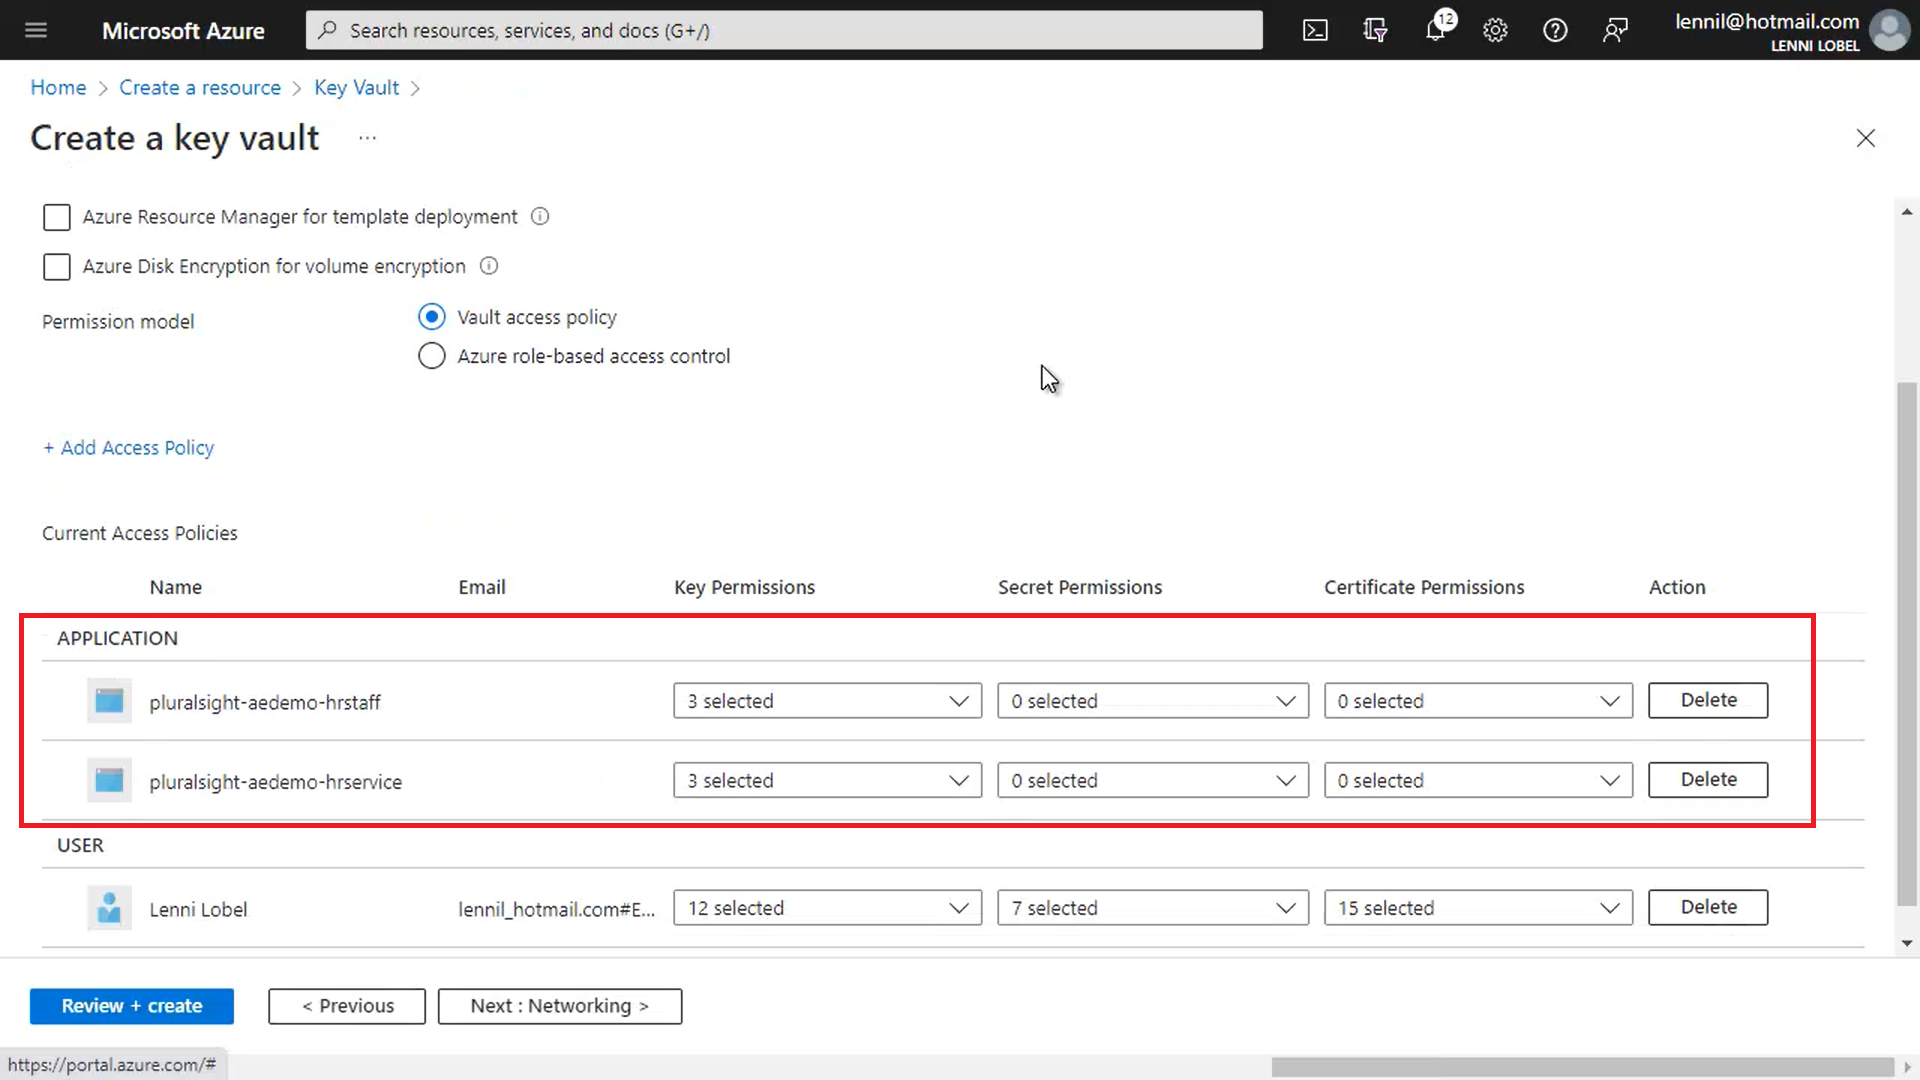
This is where we authorize which applications can access this key vault, and since we want both the HR Service and HR Staff applications to be able to access the salary property, we’ll add an access policy to this key vault for both of those app registrations we just created.

So click Add Access Policy to add the first access policy.

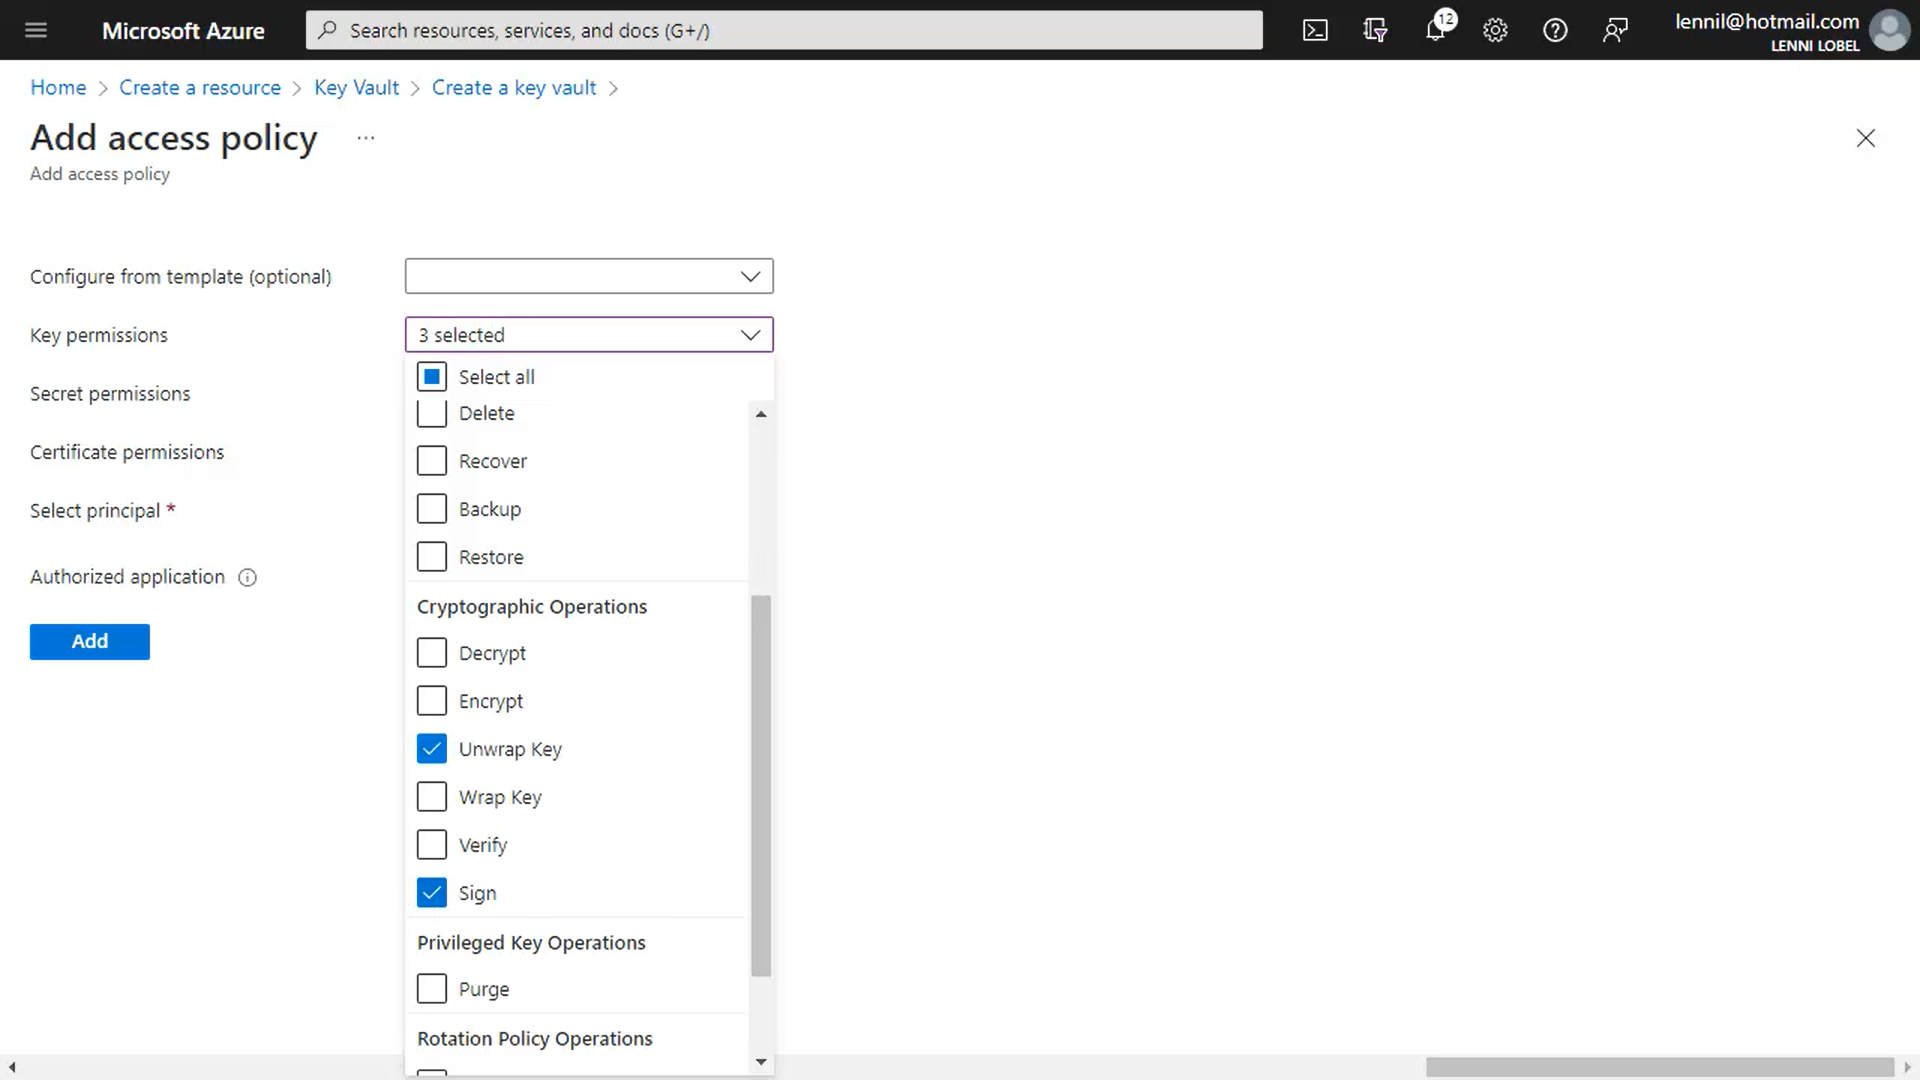
Each policy can be granted a variety of permission, and for our scenario, we need three permissions in particular. So click the Key permissions dropdown and check the Get, Unwrap Key, and Sign permissions:

And then choose the principal, which is the app registration.

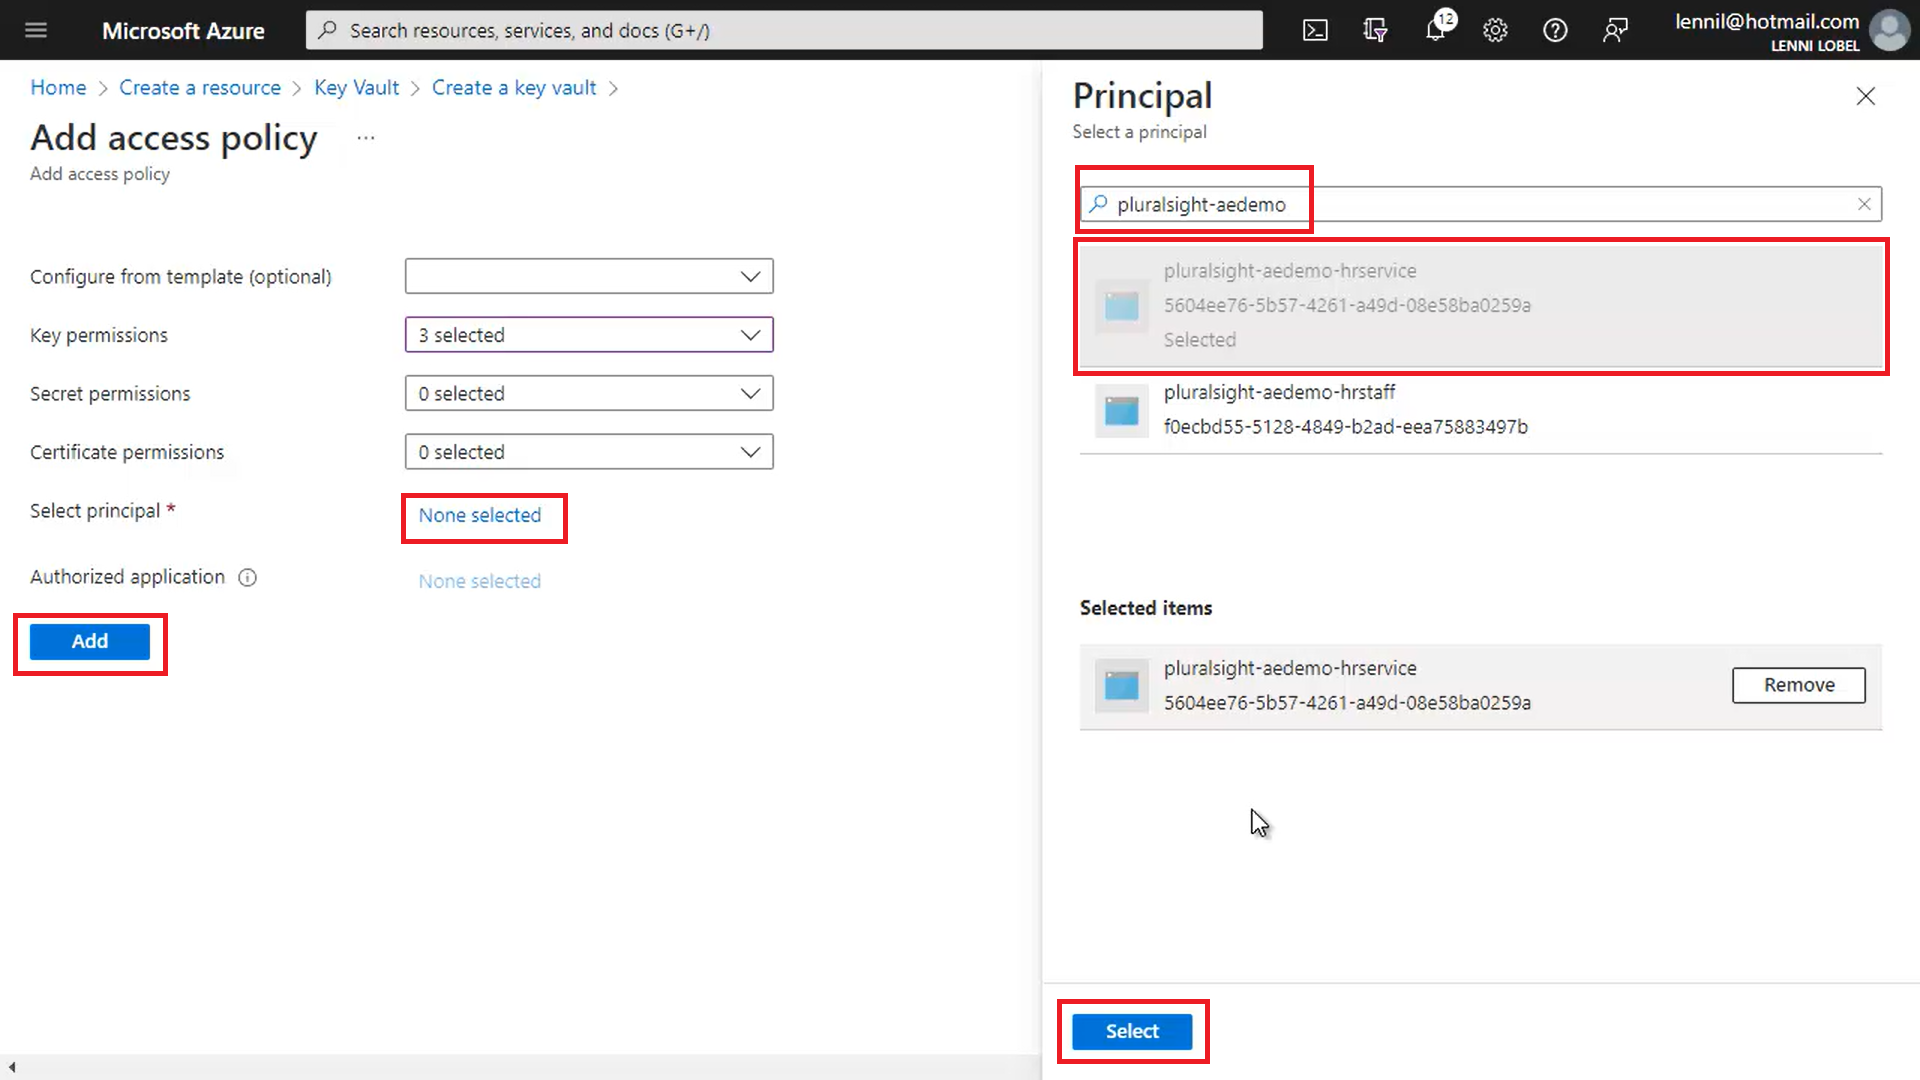
Click the None selected link, and then filter the list this down to pluralsight-aedemo, and you’ll find the two app registrations that we created starting with that name, which are the two that we need. For this access policy we’ll choose the pluralsight-aedemo-hrservice app registration, and then we’ll create a second access policy for this key vault that points to the pluralsight-aedemo-hrstaff app registration.

Click Select to choose the app registration, and then click Add to create the access policy:

Now repeat for the second access policy:

  • Click Add Access Policy
  • Check the three key permissions for Get, Unwrap Key, and Sign
  • Choose the principal (app registration) pluralsight-aedemo-hrstaff
  • Click Add

And now, here are the two access policies we just created for both HR applications:

Again, this means that both applications can access this key vault, which is where we’ll store the customer-managed key for encrypting and decrypting the salary property in each document.

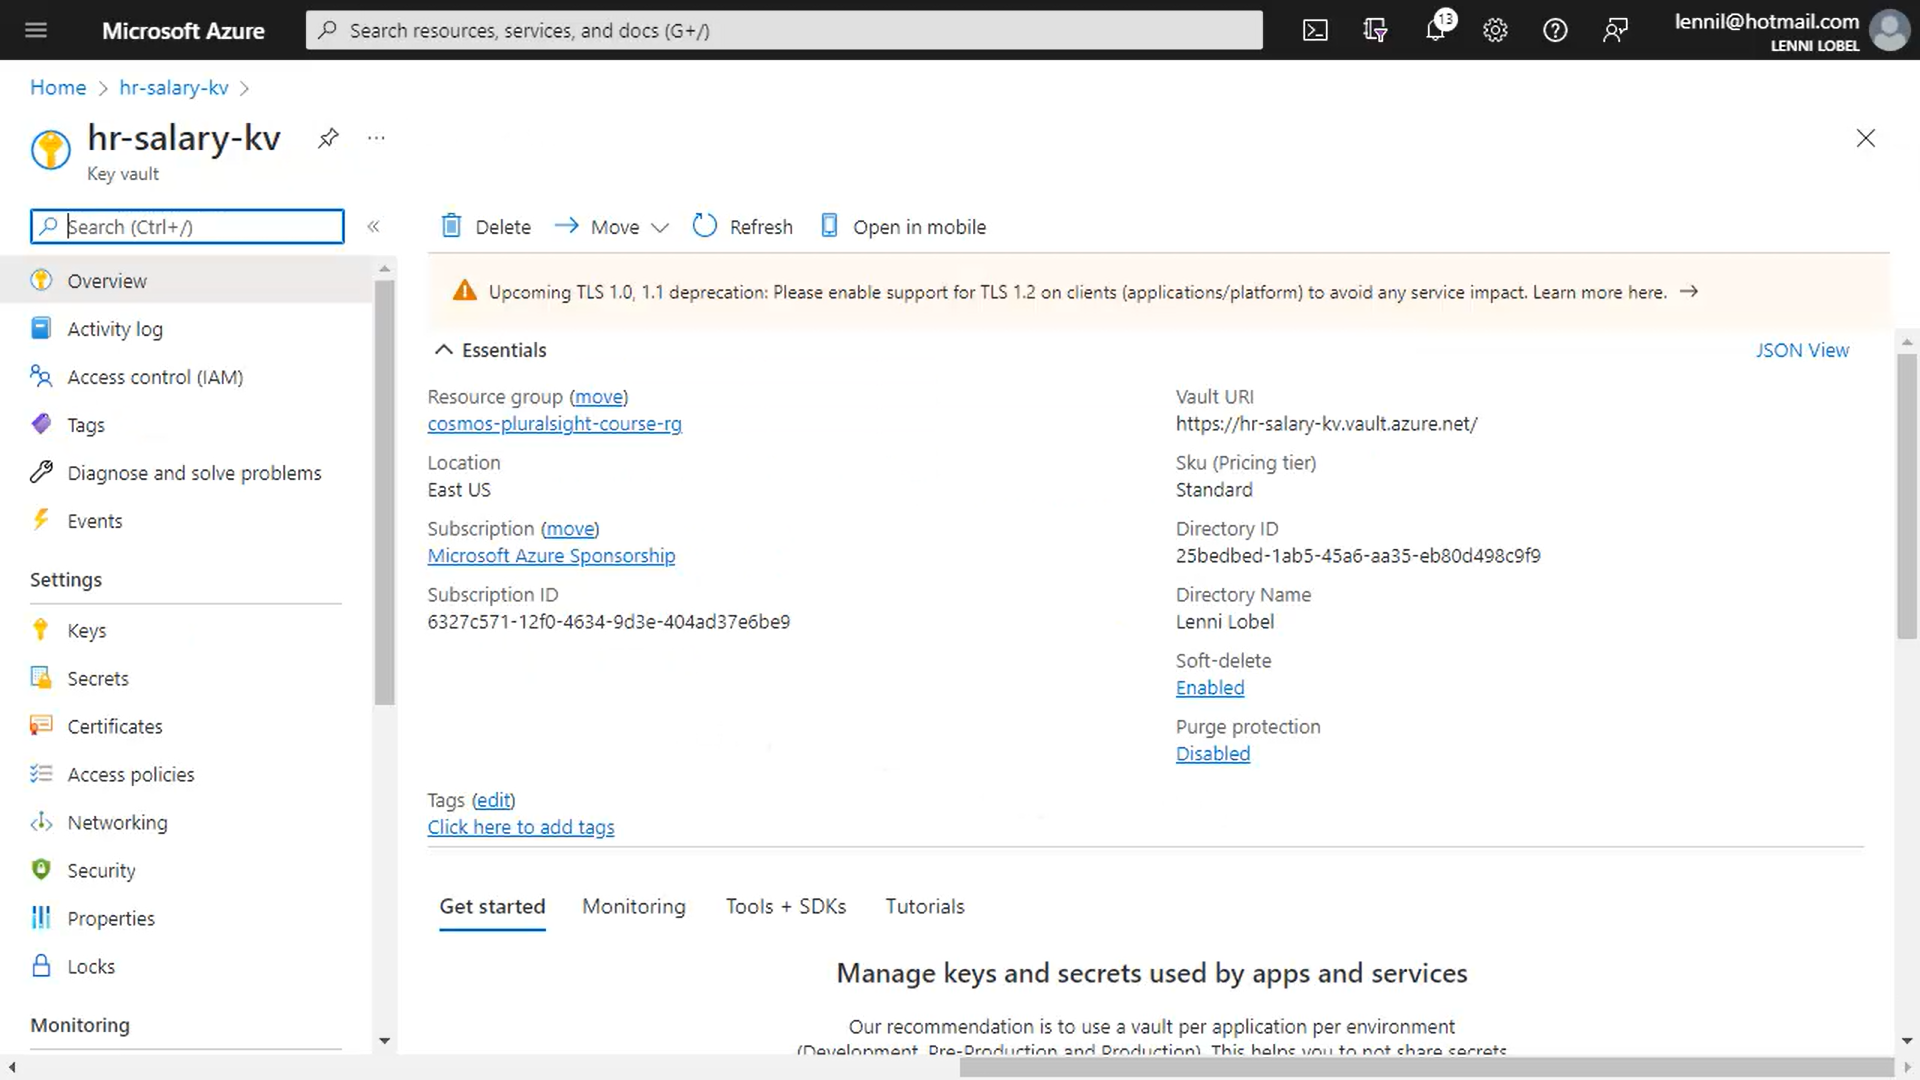
So now click Review & Create, and then Create, and just a few moments later, we have our new key vault:

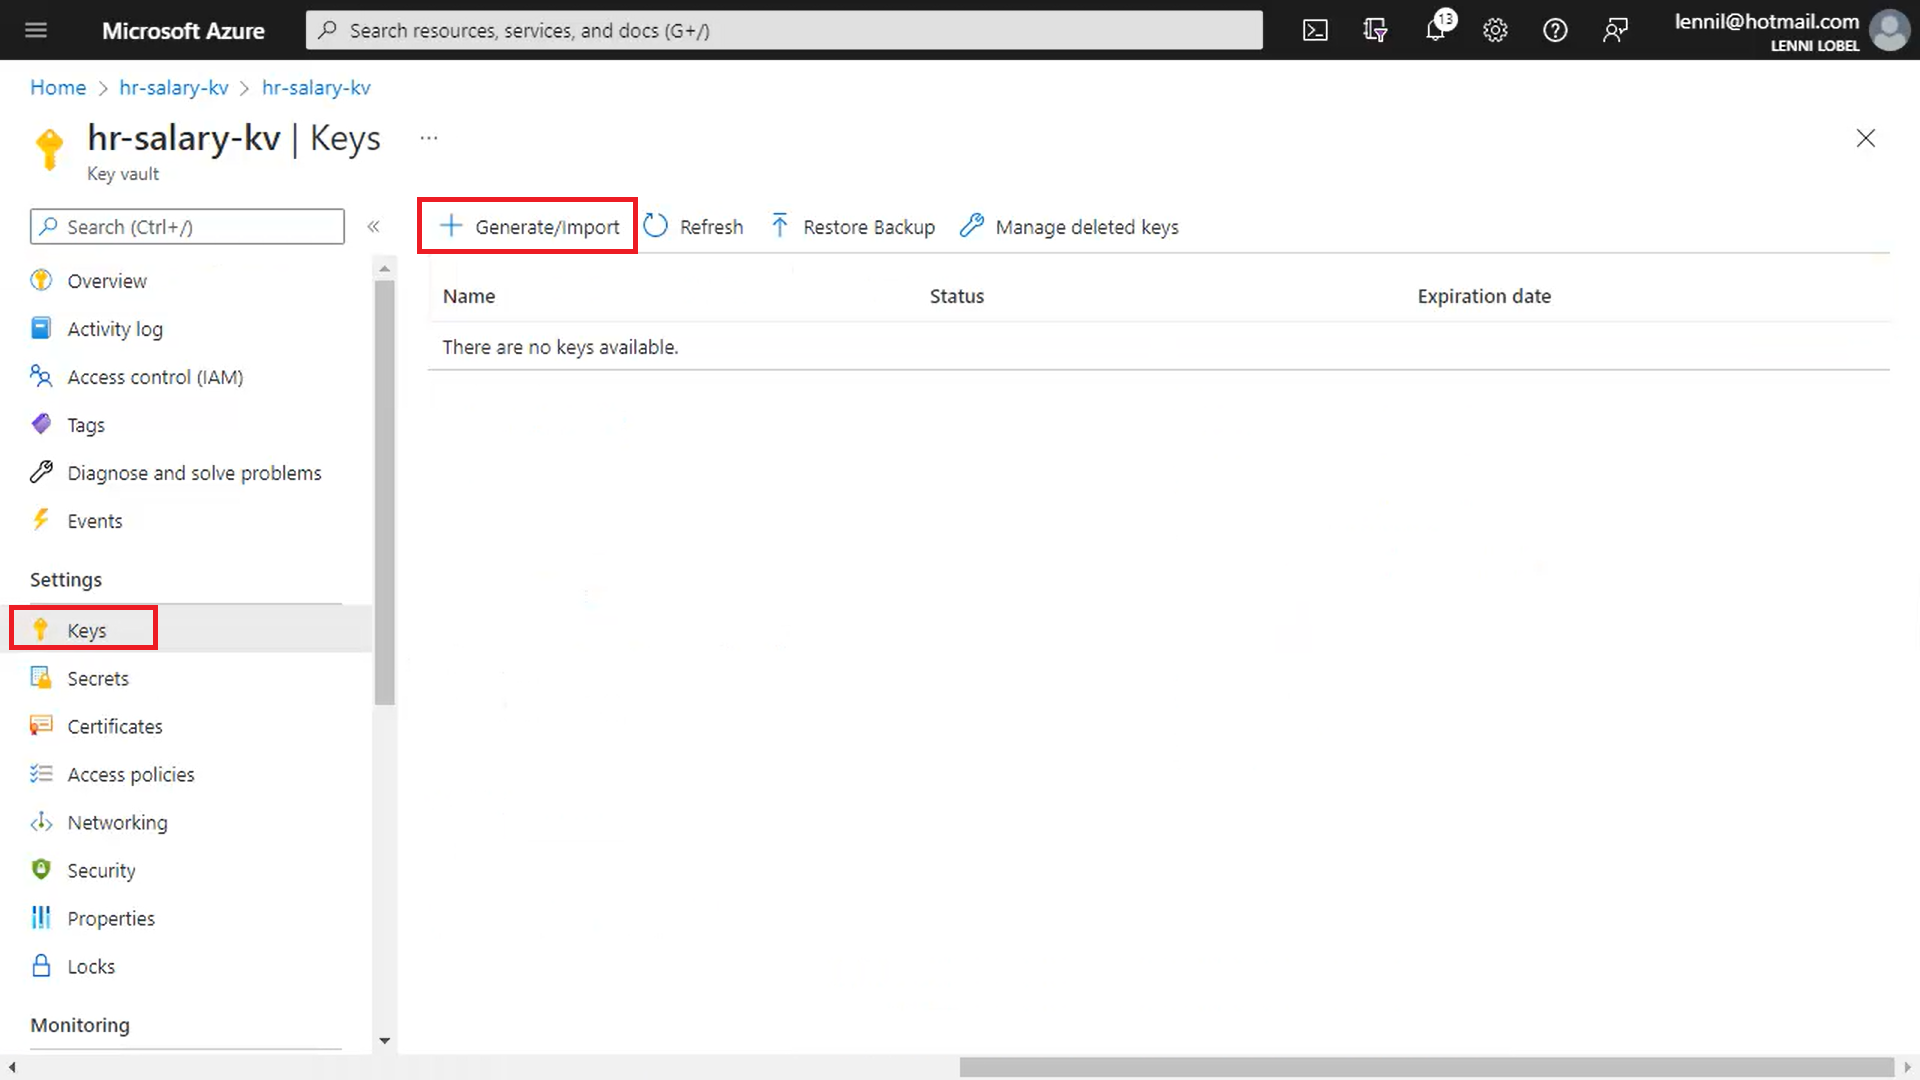
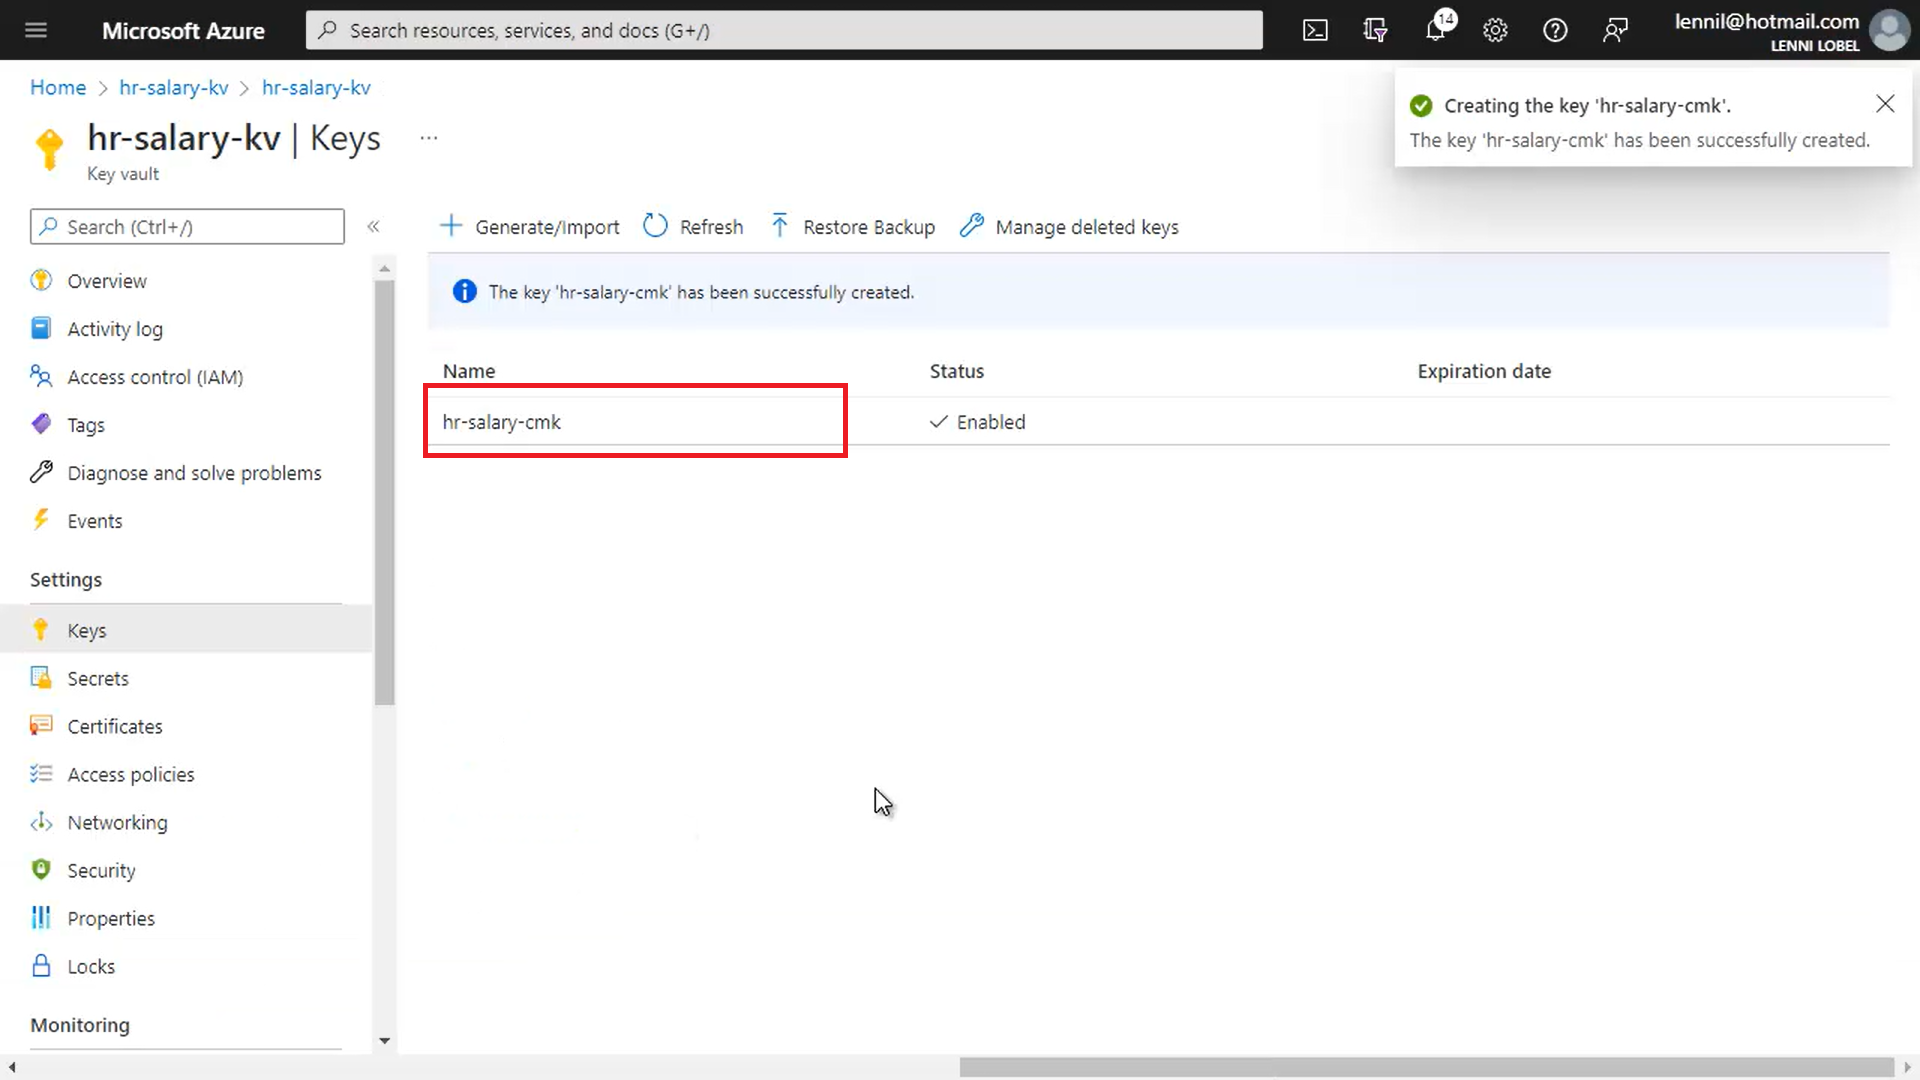
Now let’s create the key itself. Click on Keys, and then Generate/Import:

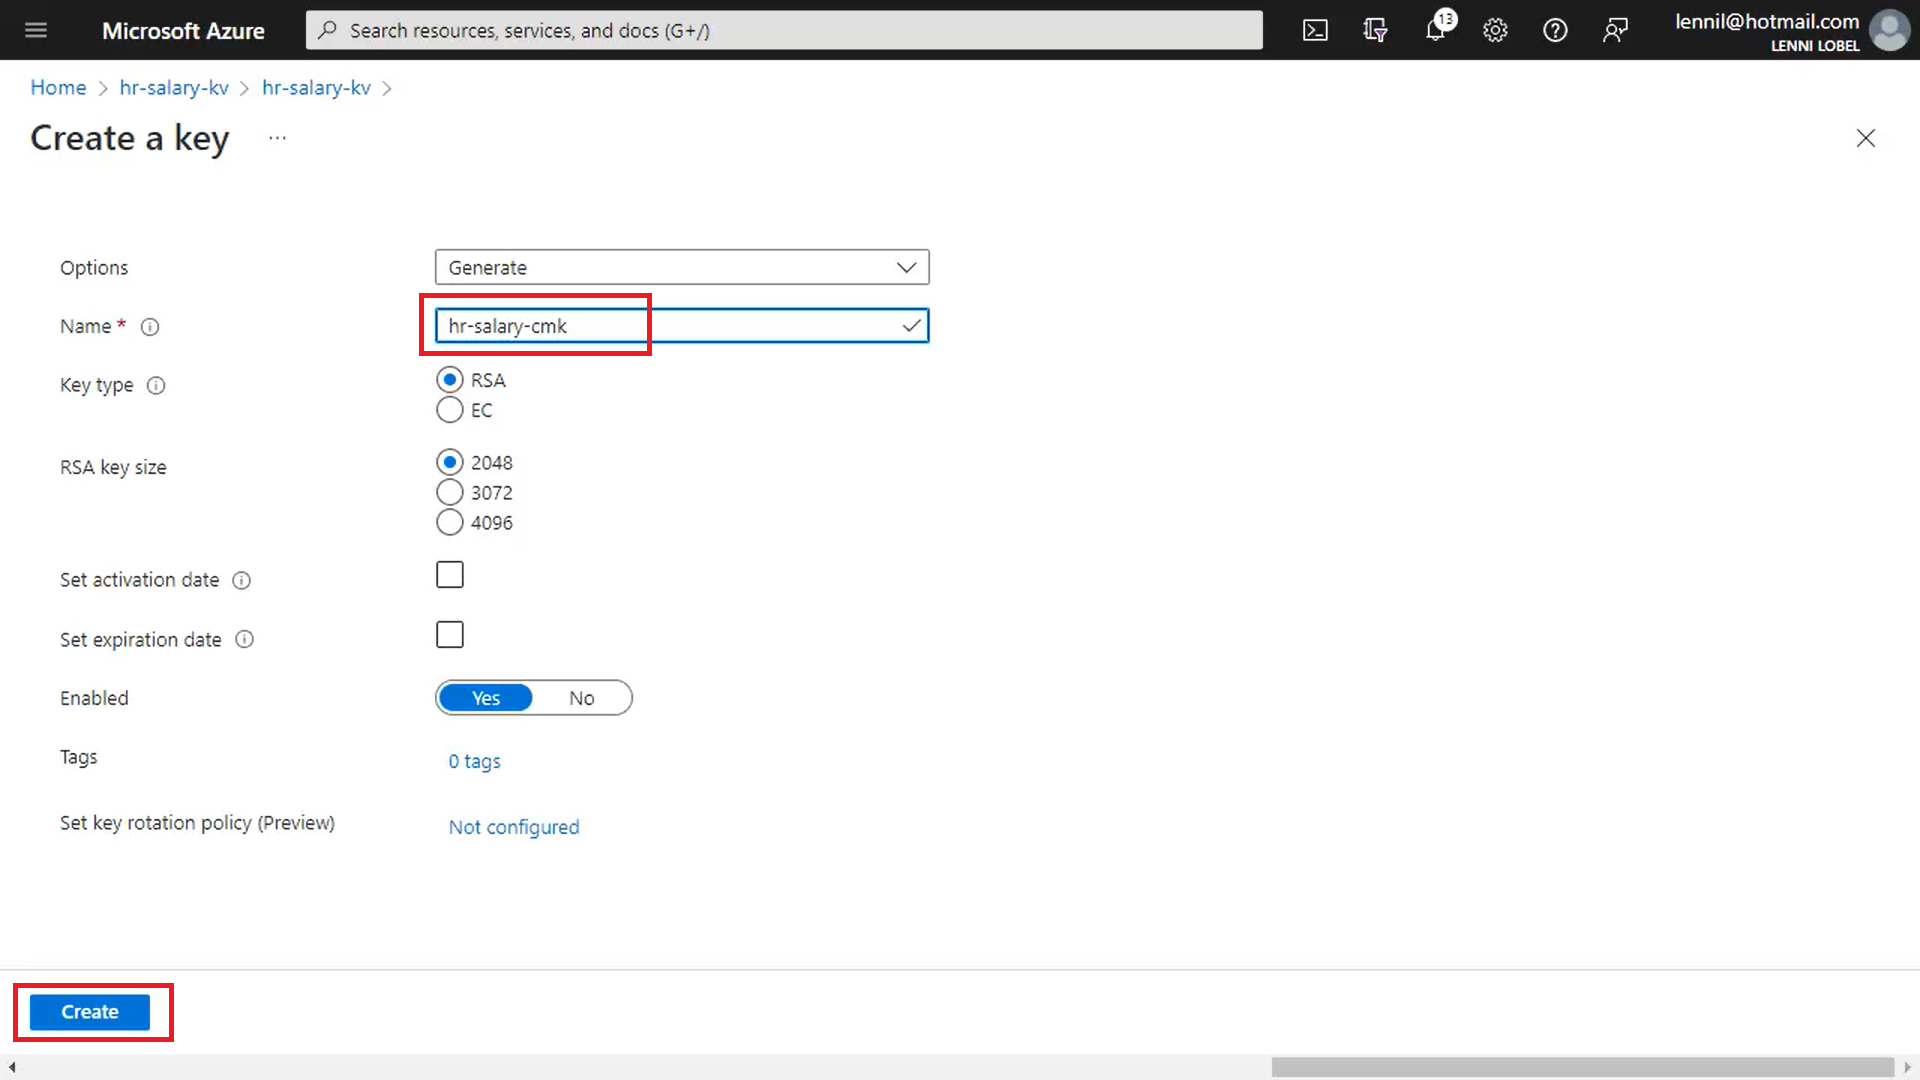
This key is for the salary property, so let’s name it hr-salary-cmk, for customer-managed-key. All the other defaults are fine, so just click Create.

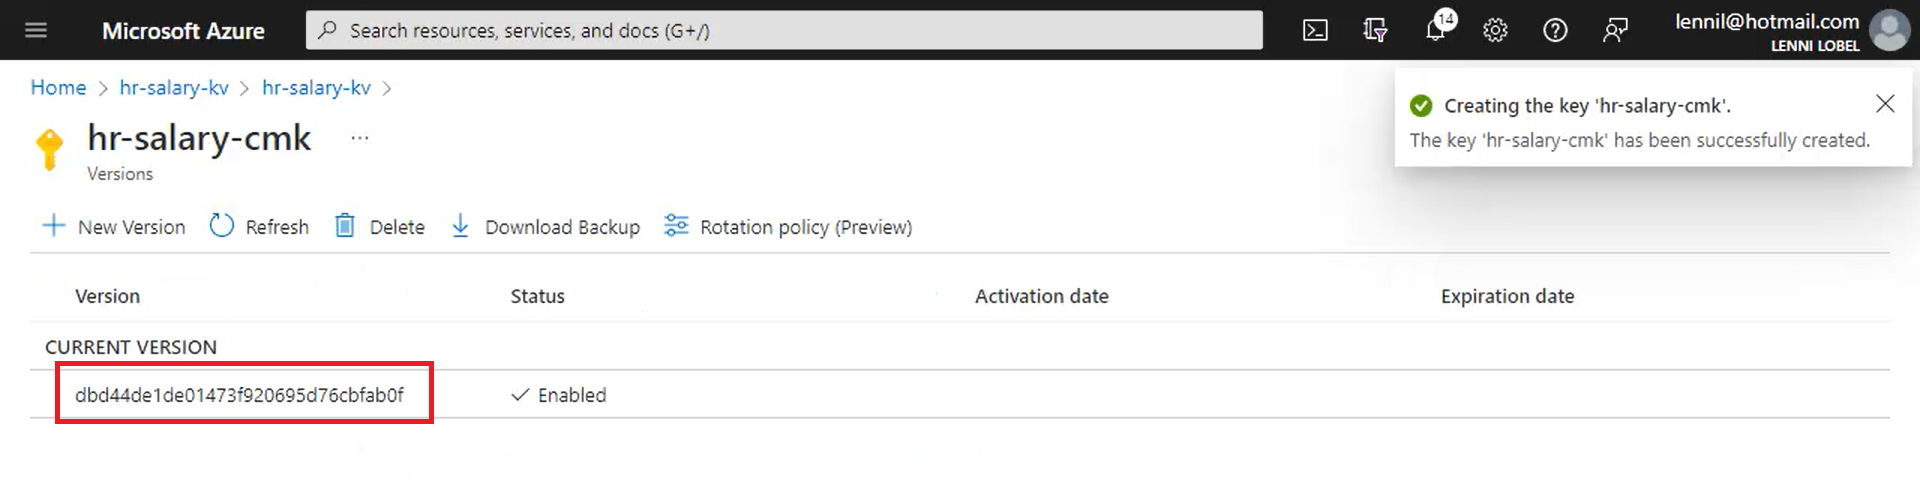
And we’ve got our new CMK. We’ll need an ID for this CMK when we create our employees container, so click to drill in:

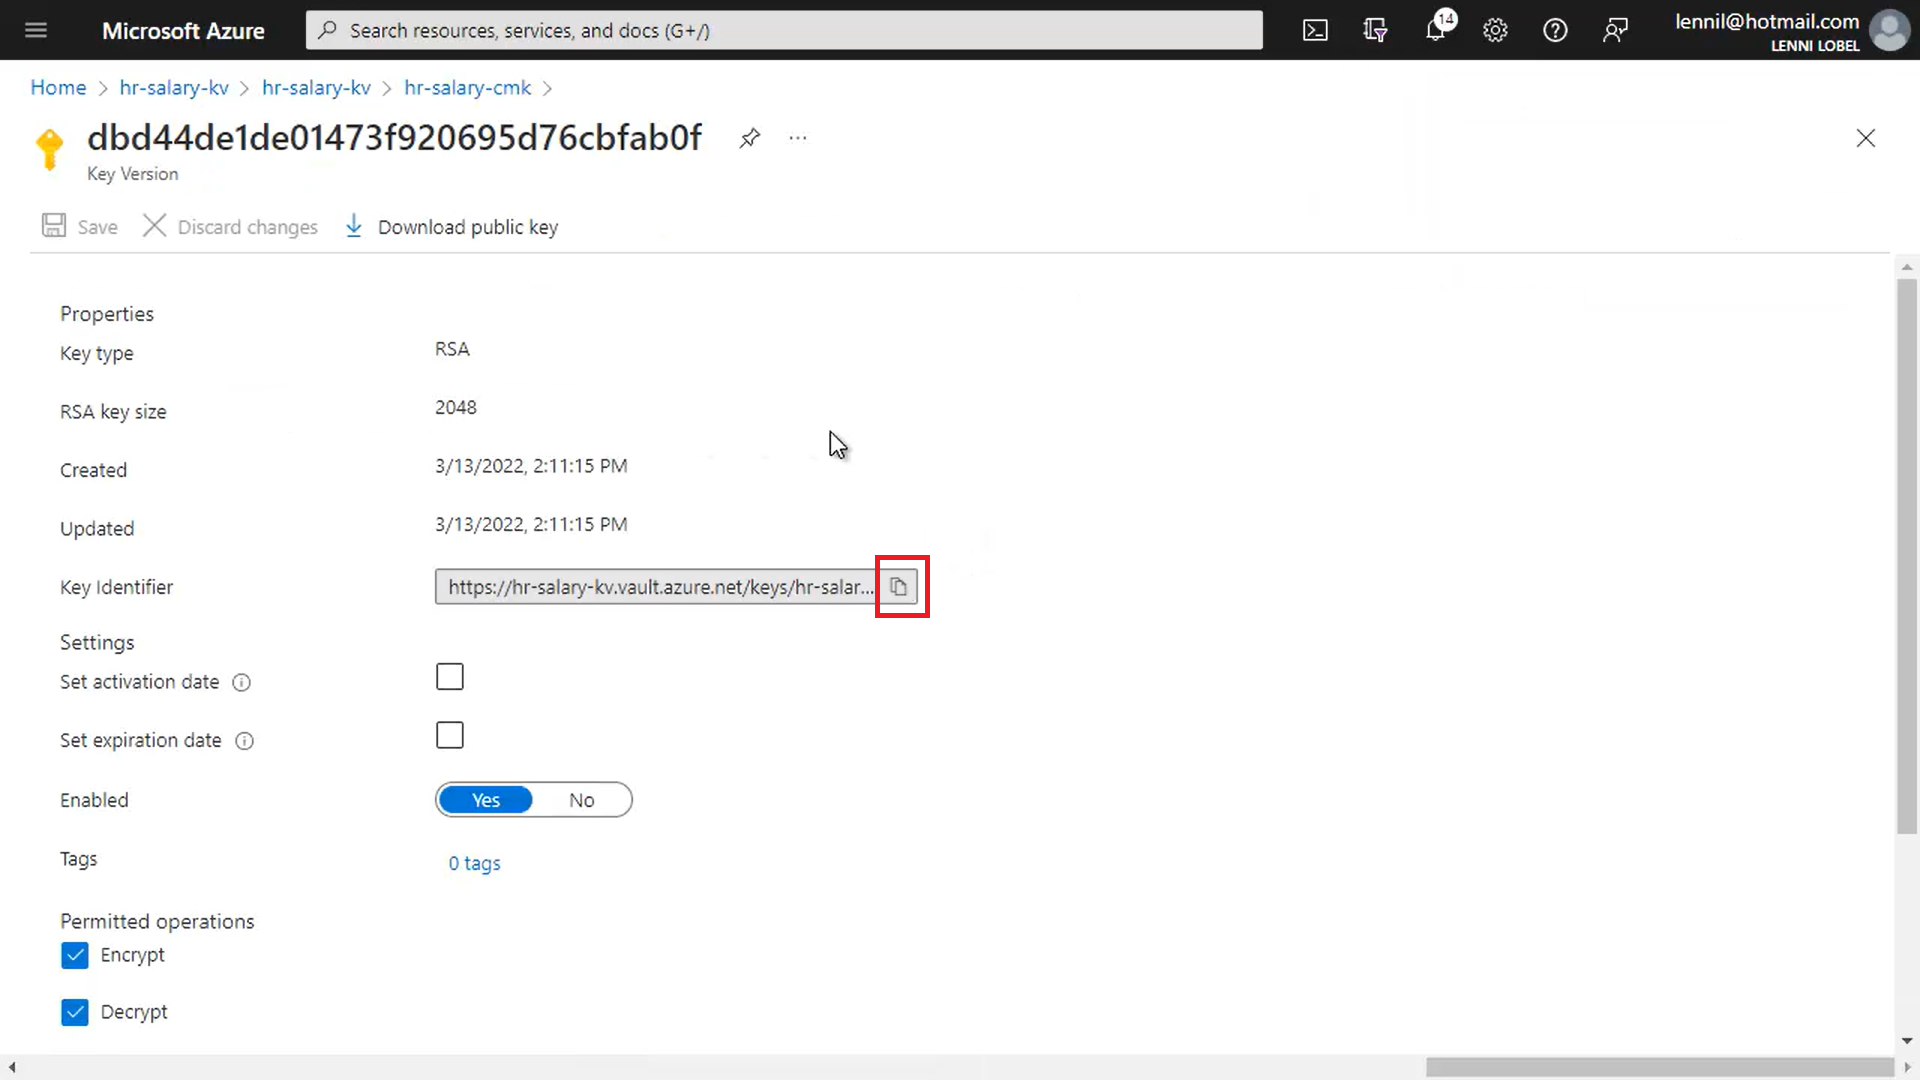
Now copy its Key identifier, and paste that into Notepad:

Finally, repeat this process for the second key vault.

  • Create a Resource, search for key vault, and click Create.
  • Name the new key valut hr-ssn-kv
  • Click Next for the access policy, only this time create just one for the HR Service application, and not the HR Staff application, which should not be able to access the social security number property.
  • Check the key permissions Get, Unwrap key, and Sign.
  • For the principal, select the app registration for the HR Service application – pluralsight-aedemo-hrservice.
  • Click Add to create the access policy
  • Click Review and Create, and Create to create the second key vault.
  • Click Keys, Generate/Import
  • Name the new key hr-ssn-cmk and click Create.
  • Click into the CMK to copy its key identifier and paste it into Notepad

All our work is done in the Azure portal. At this point, your Notepad document should contain:

  • Azure AD directory ID
  • Two HR application client IDs
  • Two HR application secrets
  • Two customer-managed key IDs

Save this document now. It will be needed when we build the two client applications in my next post.


Introducing Client-side Encryption (aka Always Encrypted) in Azure Cosmos DB

In my previous post, I explained how server-side encryption works in Cosmos DB. You can rely on the server-side encryption that’s built into the service, and can also add another layer of encryption using customer-managed keys so that even Microsoft cannot decrypt your data without access to your own encryption keys.

Beyond server-side encryption, Cosmos DB supports client-side encryption – a feature that’s also known as Always Encrypted. In this post, I’ll introduce client-side encryption at a high level. My next two posts will then dig into the process of how to configure this feature, and use it in your .NET applications.

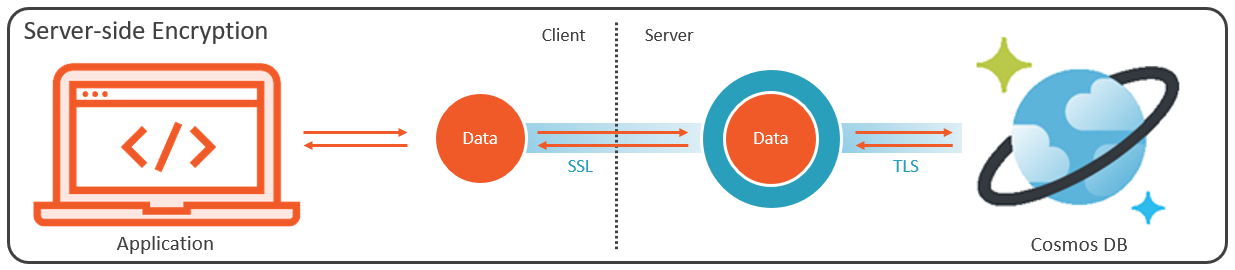
Because your data is always encrypted only on the server-side, enabling client-side encryption as well means that your data is truly always encrypted, even as it flows into and out of your client. Let’s start with a quick review of server-side encryption, and then see how client-side encryption works to achieve data that’s always encrypted.

Here’s an application that generates some data, and on the client-side that data is not encrypted:

When the client sends the data across the internet to the server-side, it gets encrypted in-flight using SSL, and then once it crosses that boundary, Cosmos DB encrypts the data as I explained in my previous post – meaning that it gets encrypted using a Microsoft-managed encryption key, and then optionally double-encrypted using a customer-managed key. It then continues to make its way across the network, where it remains encrypted in flight until it reaches your Cosmos DB account, where it’s stored in the database, encrypted at rest. And the return trip is similar; the data is encrypted in flight on the way back, across the wire to the client, where it arrives decrypted for the client application to consume.

So you can see how – on the client side – the data is not encrypted. In fact, the client will never see the encrypted state of the data because the encryption is only happening on the server-side. So essentially every client is able to see all the data being returned from the server.

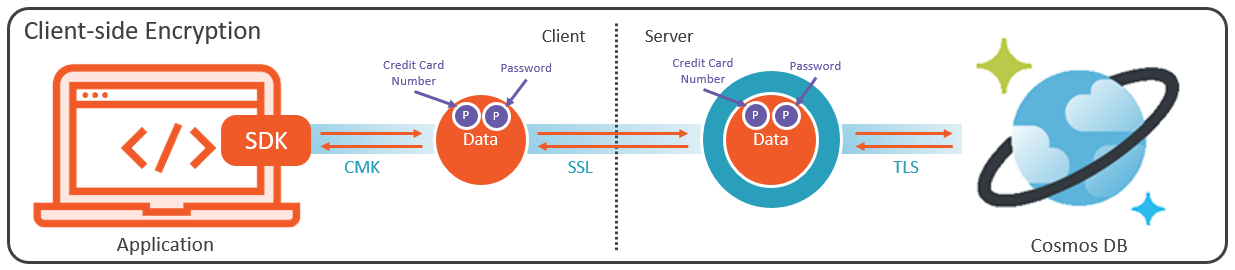
With client-side encryption, we rely on the .NET SDK to handle encryption from right inside your application, where the application itself requires access to customer-managed encryption keys that are never, ever, exposed to the Cosmos DB service.

This process is completely transparent, so as soon as the application generates any data, the SDK immediately encrypts it before it ever gets to leave the application. Furthermore, this process is capable of encrypting only the most sensitive properties in your document, without necessarily having to encrypt the entire document. So properties like credit card numbers and passwords for example are encrypted on the client-side, from within your application, automatically by the SDK, right inside the document that your application is creating for the database.

The document then continues on to the server where now, it gets at least one additional layer of encryption using a Microsoft-managed key, and possibly one more layer of encryption if you’ve supplied a customer-managed key for server-side encryption. But even if you peel those encryption layers off on the server-side, the properties encrypted using your customer-managed key on the client side can never be revealed. So the data gets written to Cosmos DB, where ultimately, Cosmos DB – and that means Microsoft itself, is utterly incapable of reading those properties that were encrypted on the client. And that’s because the CMK used for client-side encryption is never revealed anywhere outside the client application.

Likewise, when returning data back to the client, those protected properties remain encrypted throughout the flight back to the application. Again, assuming the application has been granted access to the client-side customer-managed key, the SDK seamlessly decrypts the protected properties for the application.

Stay tuned for my next post, where I’ll show you how to configure client-side encryption for Cosmos DB using the Azure portal.


Server-side Encryption in Azure Cosmos DB

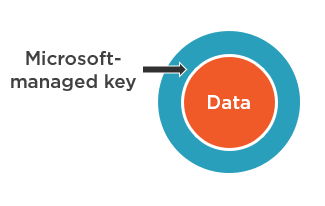
Encryption is an important way to keep you data secured. Cosmos DB has server-side encryption built into to the service, so that on the server-side of things, your data is always encrypted – both in flight – as it travels the network, and at rest – when it’s written to disk. As I said, this functionality is built-in, and there’s simply no way to disable this encryption.

One nice part of this feature is that Microsoft creates and manages the keys used for server-side encryption, so there are no extra steps you need to take in order to make this work. Your data is simply encrypted on the server-side using encryption keys managed entirely by Microsoft. As part of this management, Microsoft applies the usual best practices, and protects these keys with a security life cycle that includes rotating keys on a regular basis.

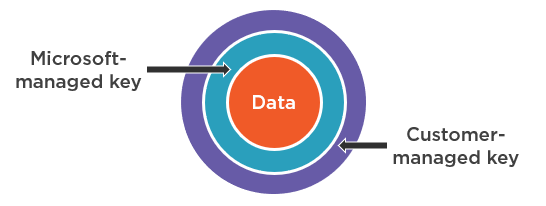
In addition, customer-managed encryption keys are also supported, so that you can use your own encryption keys. This adds another layer of encryption, on top of the encryption based on Microsoft-managed keys that, again, can never be disabled. That said, using customer-managed keys is generally discouraged, unless you are absolutely obliged by regulatory compliance guidelines mandated by your industry. And the reason for this is simple; because then you become responsible for managing those keys, and that’s a huge responsibility. Now you need to maintain and rotate encryption keys yourself, and if you should lose a key, then you lose access to all your data, and Microsoft will not be able to help you recover it. And another relatively minor consideration is that you’re going to incur a slight increase in RU charges when using customer-managed keys, because of the additional CPU overhead needed to encrypt your data with them.

So again, using customer-managed keys does not disable the default behavior; your data still gets encrypted using a Microsoft managed key. The result is double-encryption, where that encrypted data is then encrypted again using your own key that you supply.

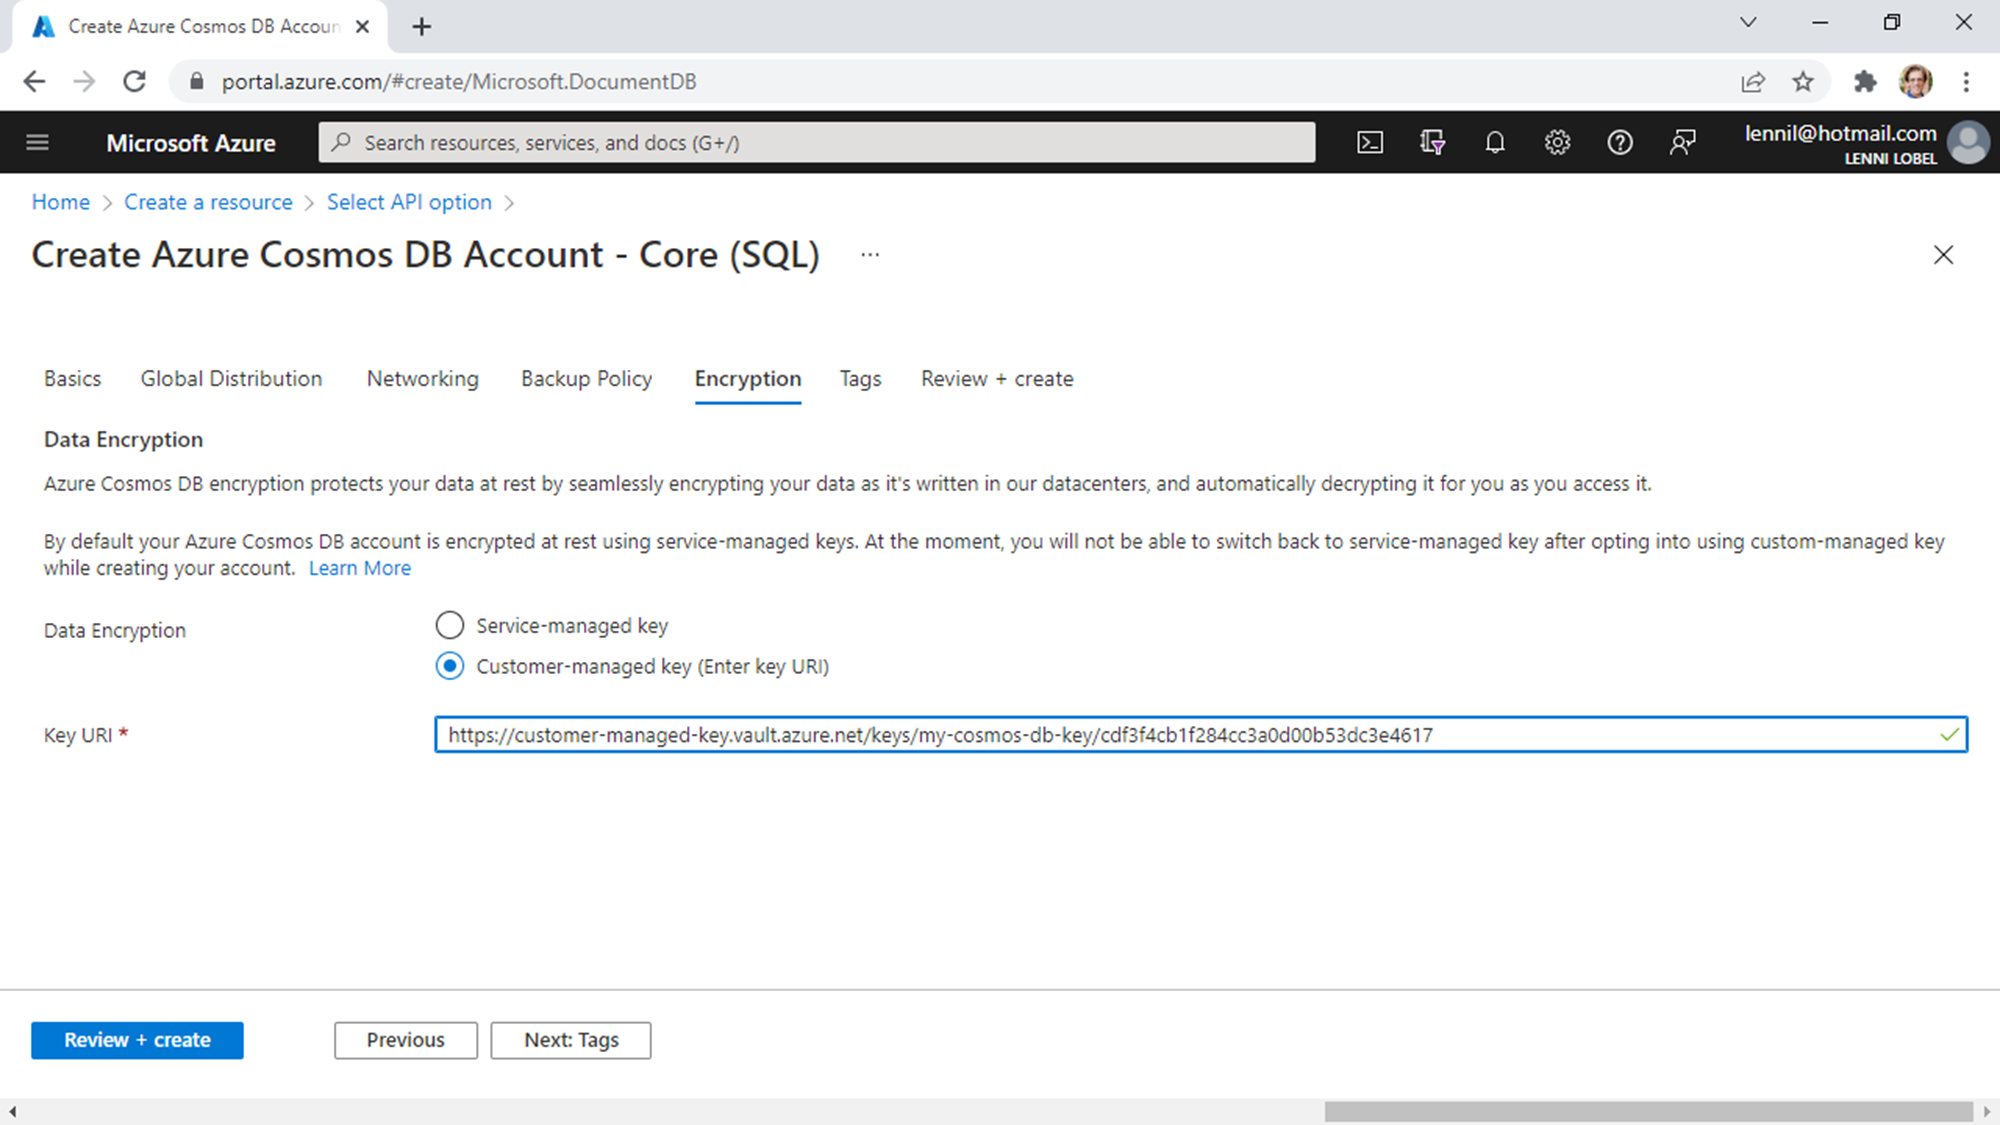
Currently, you can only configure your account to use customer-managed keys when you’re creating the account; they cannot be enabled on an existing account. So here in the portal, during the process of creating a new account, the Encryption tab lets you set it up.

The default is to use a service-managed key – that is, the one provided and managed by Microsoft, but you can also choose to use a customer-managed key. And when you make this choice, the portal prompts you for the Key URI, and that’s simply the path to your own key that you’ve got stored in your own Azure key vault.

So you see that it’s pretty simple to configure your Cosmos DB account to encrypt your data using your own encryption key that you have in Azure Key Vault.

Beyond server-side encryption, Cosmos DB supports client-side encryption – a feature that’s also known as Always Encrypted. Because your data is always encrypted on the server-side, enabling client-side encryption as well means that your data is truly always encrypted, even as it flows into and out of your client. So stay tuned for my next post where we’ll dive into client-side encryption with Always Encrypted.

Network Security in Azure Cosmos DB

Overview

Network security is your first line of defense against unauthorized access to your Cosmos DB account. Before a client can even attempt to authenticate against your account, it needs to be able to establish a physical network connection to it.

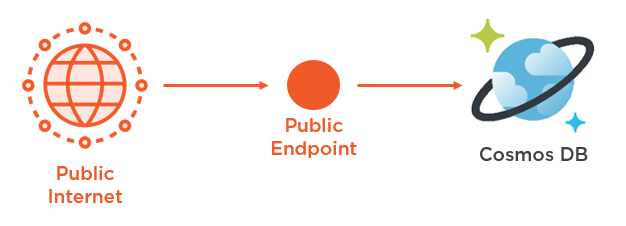
Now Cosmos DB is a cloud database service on Azure, and Azure is a public cloud, so by default, a new Cosmos DB account can be accessed from anywhere on the internet. While this is very convenient when you’re getting started, such exposure is often unacceptable for sensitive mission-critical databases running in production environments.

And so, there are several ways for you to lock down network access to your Cosmos DB account.

IP Firewall

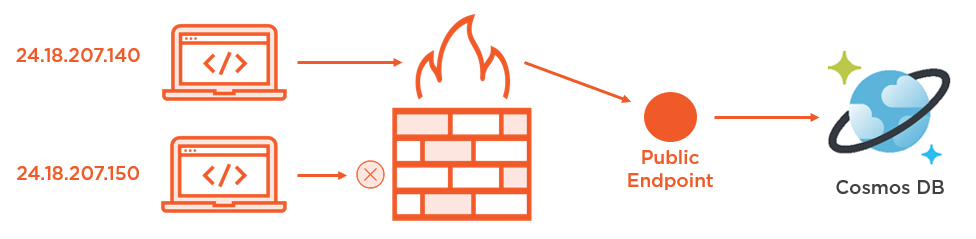
First, you can use the IP firewall which is both simple and effective. This works very much like firewalls that you find in other systems, where you maintain a list of approved IP addresses, which could be individual addresses, or address ranges. Network traffic from IP addresses that are not approved, get blocked from the firewall; while traffic from approved addresses are allowed to pass through the firewall, and reach your account by its public IP address.

So here I’ve got my Cosmos DB account, which can be reached by its public endpoint, and that’s a public IP address on the internet. And we’ve got two clients hanging out on the internet, each on their own public IP address. Now by default, both clients can reach our account, but if we enable the IP firewall, then we can add the IP address for the first one, with the IP address ending in 140, so that incoming traffic from that client is allowed access to the account’s public endpoint. Meanwhile, since we haven’t added the IP address for the second client ending in 150, that client gets blocked and can’t access the account.

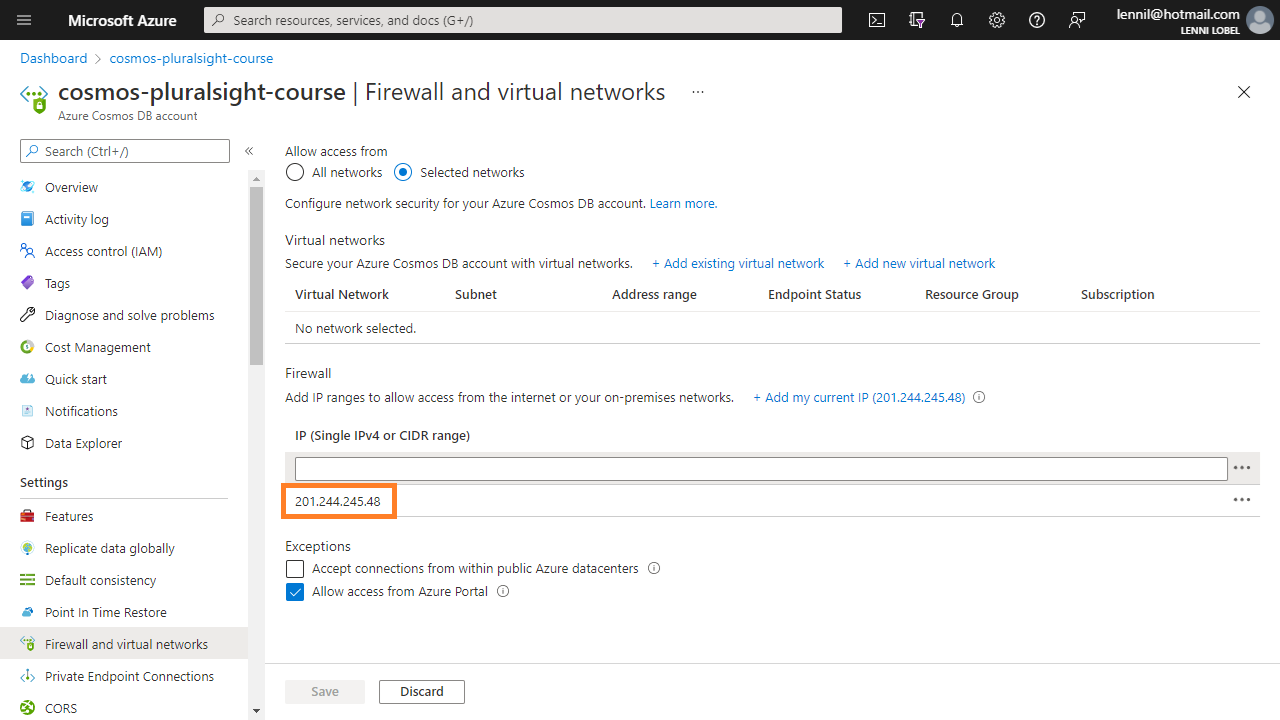
In the Azure Portal, head on over to Firewall and Virtual Networks, where by default, any client can access the account. But if you choose selected networks, then you can configure the firewall.

There are actually two sections to this page, and right now we’re focused on the bottom section, Firewall. Here you can add IP addresses, or IP address ranges, one at a time, for approved clients, while clients from all other IP addresses are unapproved and get blocked by the firewall.

To make it easier to connect through the firewall from you own local machine, you can click on Add My Current IP, where the portal automatically detects your local machine’s IP address. You can see I’ve done this in the previous screenshot, where my local IP address has been added to the firewall as an approved client.

Also take note of the bottom two checkboxes for exceptions. First, you may reluctantly want to select the first checkbox, which accepts connections from within public Azure data centers. You would only do this if you need access to your account from a client running on Azure that can’t share its IP address or IP address range. And these can be VMs, functions, app services; any kind of client. Again, this is why you want to be cautious with this checkbox, because selecting it would accept connections from any other customer that’s running a VM.

The second checkbox, which is selected by default, makes sure that the account can always be reached by the Cosmos DB portal IPs; so you’ll want to keep this setting if you want to use portal features – notably the Data Explorer, with your account.

When you click Save, be prepared to wait a bit for the changes to take effect. With the distributed nature of the Cosmos DB service, it can take up to 15 minutes for the configuration to propagate, although it usually less time than that. And then, the firewall is enabled, blocking network traffic from all clients except my local machine.

VNet Through Service Endpoint

Using the IP firewall is the most basic way to configure access control, but it does carry the burden of having to know the IP addresses of all your approved clients, and maintaining that list.

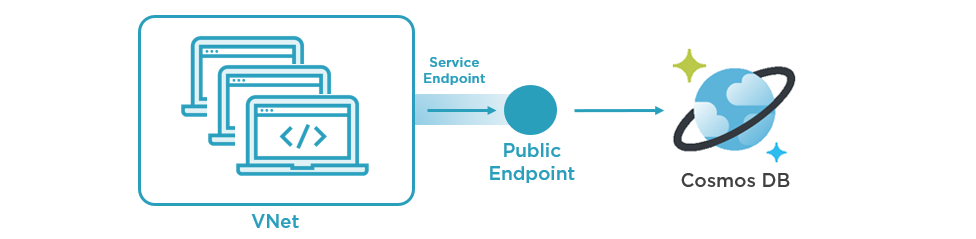
With an Azure virtual network, or a VNet, you can secure network access to all clients hosted within that VNet, without knowing or caring what those client IP addresses are. You just approve one or more VNets, and access to your account’s public endpoint is granted only to clients hosted by those VNets. Like the IP firewall, all other clients from outside approved VNets are blocked from your account’s public endpoint.

So once again, we have our Cosmos DB account with its public endpoint. And we’ve got a number of clients that need to access our account. But rather than approve each of them to the firewall individually by their respective IP addresses, we simply host them all on the same virtual network. Then, when we approve this VNet for our account, that creates a service endpoint which allows access to our account only from clients that the VNet is hosting.

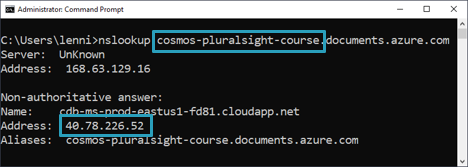
If you run an NSLookup to the fully qualified domain name for your account, from within the VNet, you can see that this resolves to a public IP address, for your account’s public endpoint:

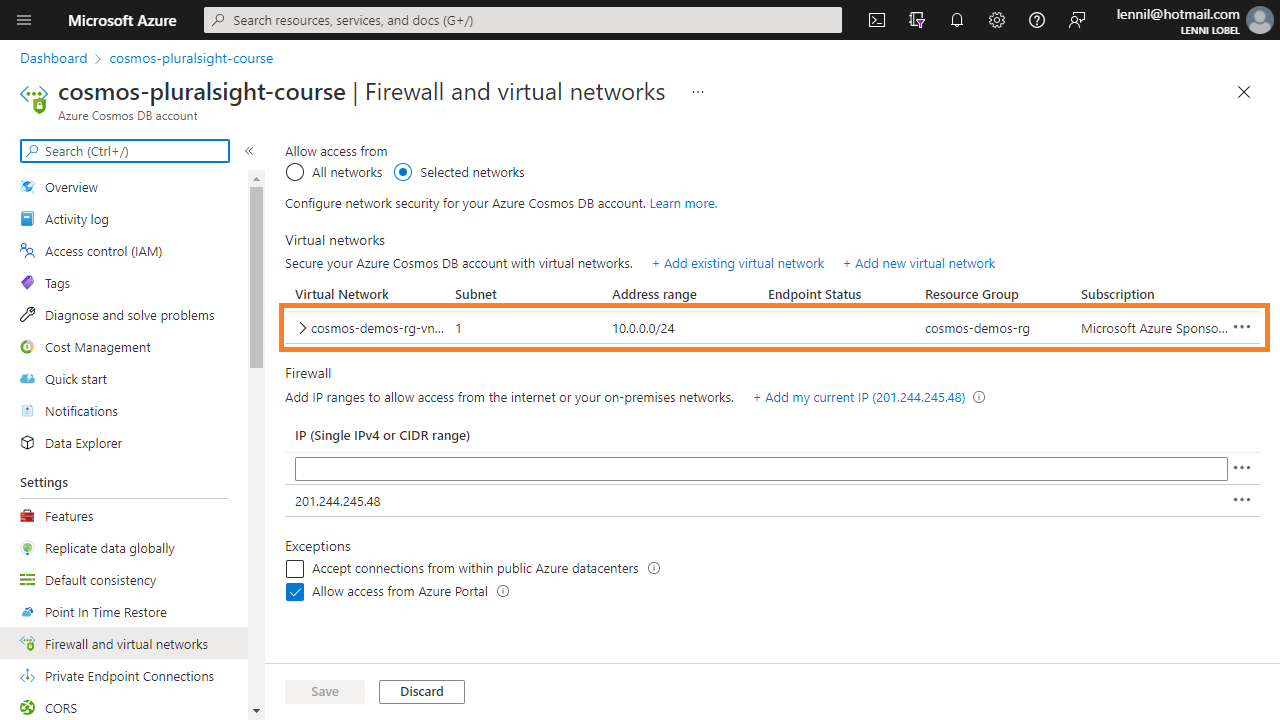
You can approve individual VNets from the top section of the same page we were using to configure the IP firewall, where you use these links to choose a new or existing vnet.

Here I’ve added an existing VNet which I’ve named cosmos-demos-rg-vnet, and you can see the VNet is added as approved. Also notice that you can mix-and-match, combining VNet access with the IP firewall, so you can list both approved IP addresses and approved VNets on this one page in the Azure portal, like you see above.

VNet Through Private Endpoint

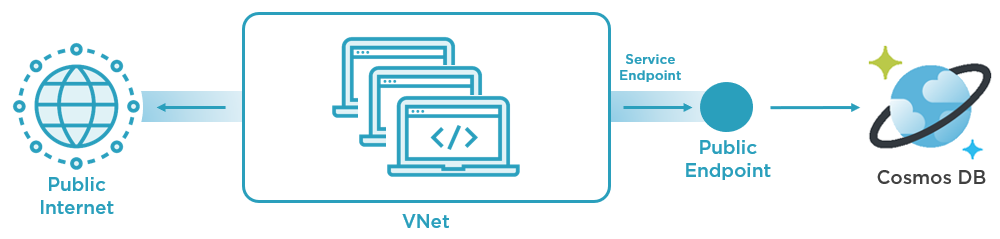
VNet access using service endpoints is very convenient, but there’s still a potential security risk from within the VNet. Because as I just showed you, the Cosmos DB account is still being accessed by its public endpoint through the VNet’s service endpoint, and that means that the VNet itself can connect to the public internet. So a user that’s authorized to access the VNet could, theoretically, connect to your Cosmos DB account from inside the VNet, and then export it out to anywhere on the public internet.

This security concern known as exfiltration, and can be addressed using your third option, VNet access using private endpoints.

This is conceptually similar to using VNets with service endpoints like we just saw, where only approved VNets can access your account. However now, the VNet itself has no connection to the public internet. And so, when you enable private endpoints, you’ll see that your Cosmos DB account itself is accessible only through private IP addresses that are local to the VNet. This essentially brings your Cosmos DB account into the scope of your VNet.

So again here’s our Cosmos DB account which, technically still has a public endpoint, but that public endpoint is now completely blocked to public internet traffic. Then we’ve got our clients that, like before, all belong to the same VNet that we’ve approved for the account. However, now the VNet has no public internet access, and communicates with your Cosmos DB account using a private IP address accessible only via the private endpoint that you create just for this VNet.

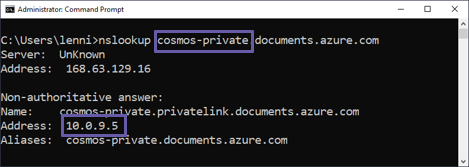
So if you run NSLookup from within a VNet secured with a private endpoint, you can see that your account’s fully qualified domain name now resolves to a private IP address. And so, there’s simply no way for a malicious user that may be authorized for access to the VNet, to exfiltrate data from your account out to the public internet.

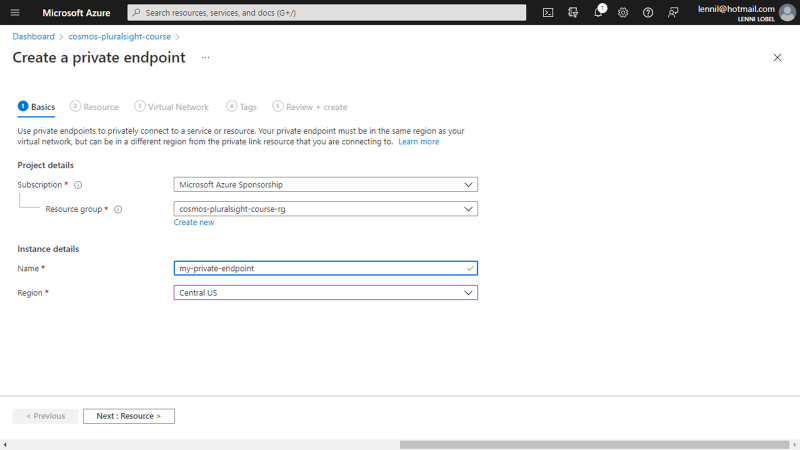
It’s fairly straightforward to configure a private endpoint for your VNet. Start by clicking to open the Private Endpoint Connections blade, and then to create a new one. This is actually a new resource that you’re adding to he same resource group as the VNet that you’re securing.

Just give your new private endpoint a name, and click Next to open the Resource tab.

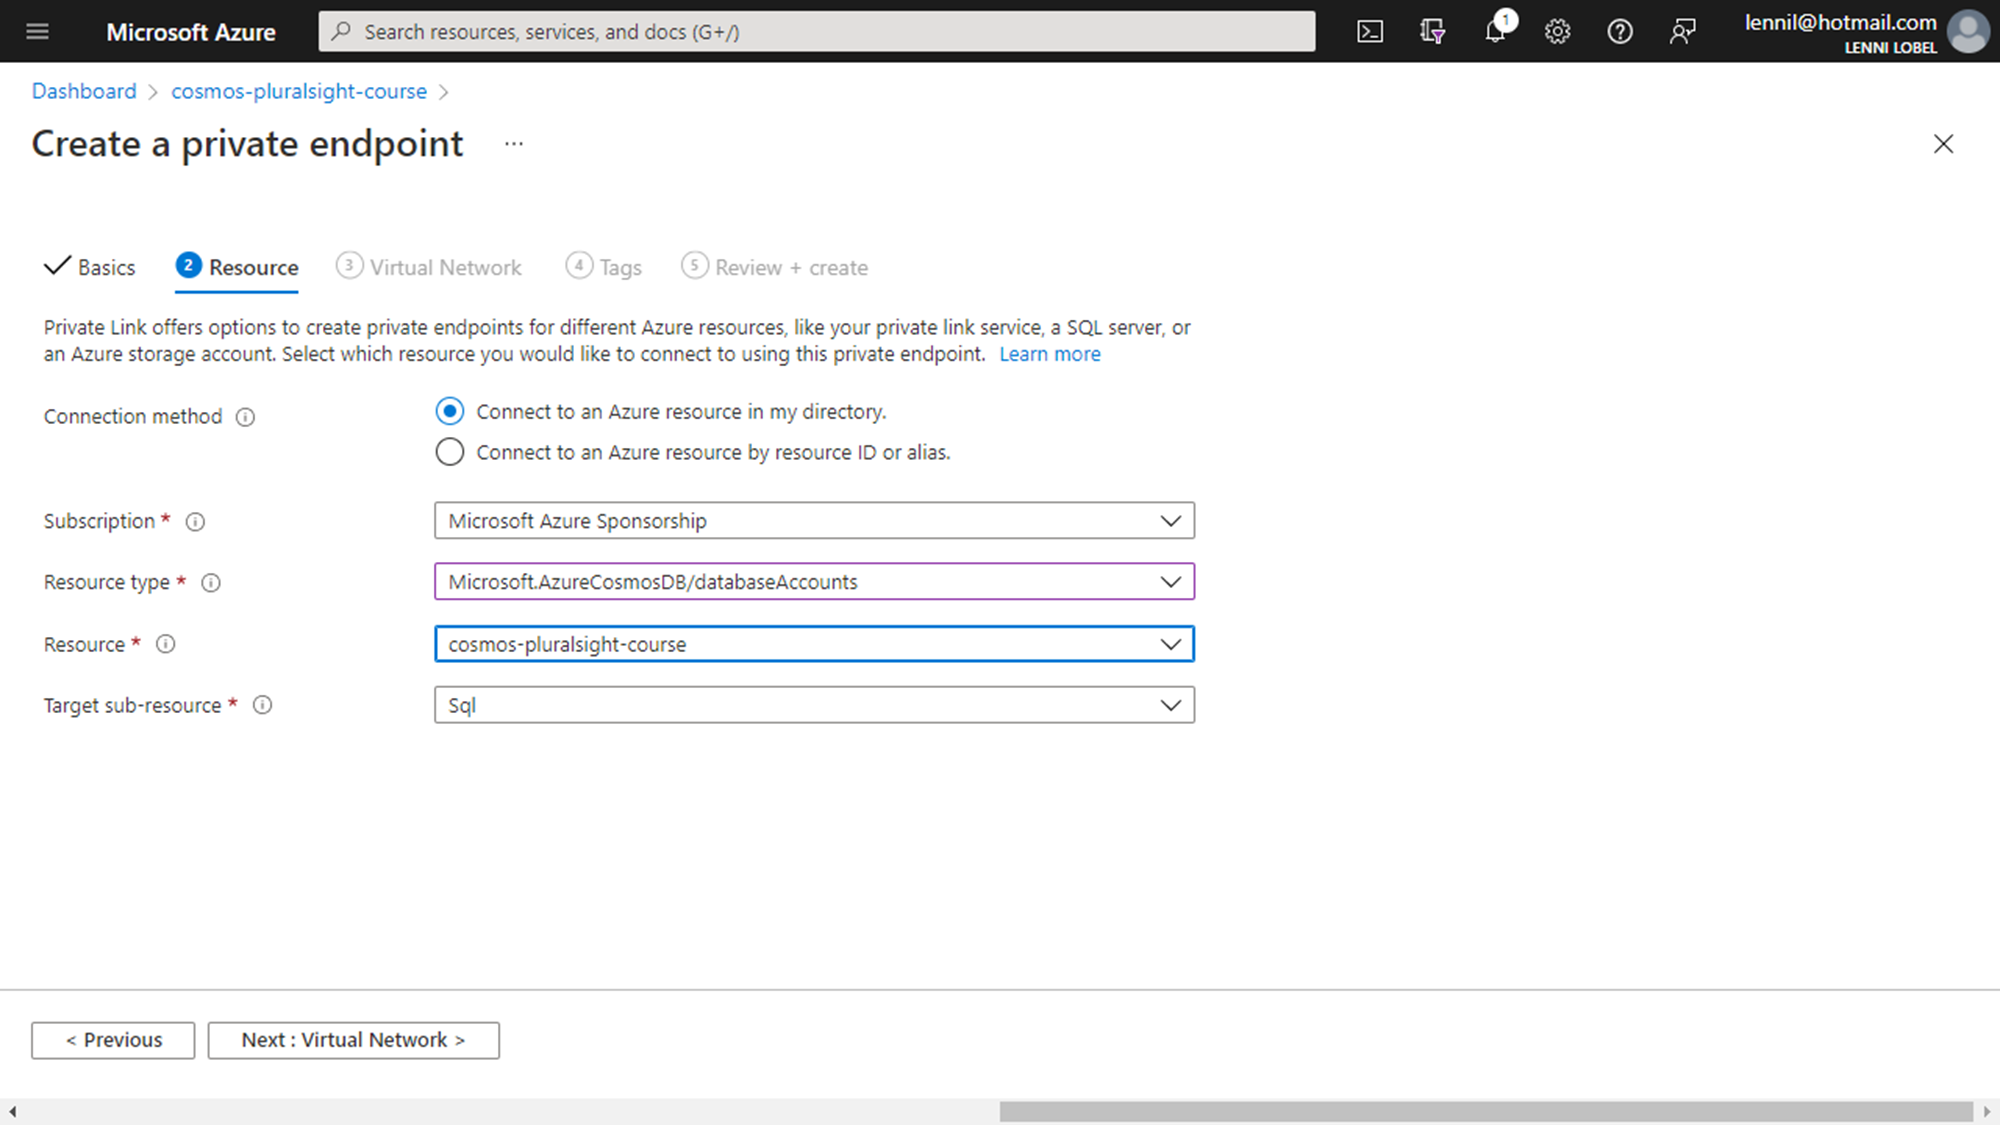
Here you select the resource type, which is Microsoft Azure Cosmos DB slash Database Accounts, and the resource itself, which is the Cosmos DB account you are connecting to with this new private endpoint. Then there’s the target sub-resource, which is just the API that you’ve chosen for the account, and that’s the SQL API in this case.

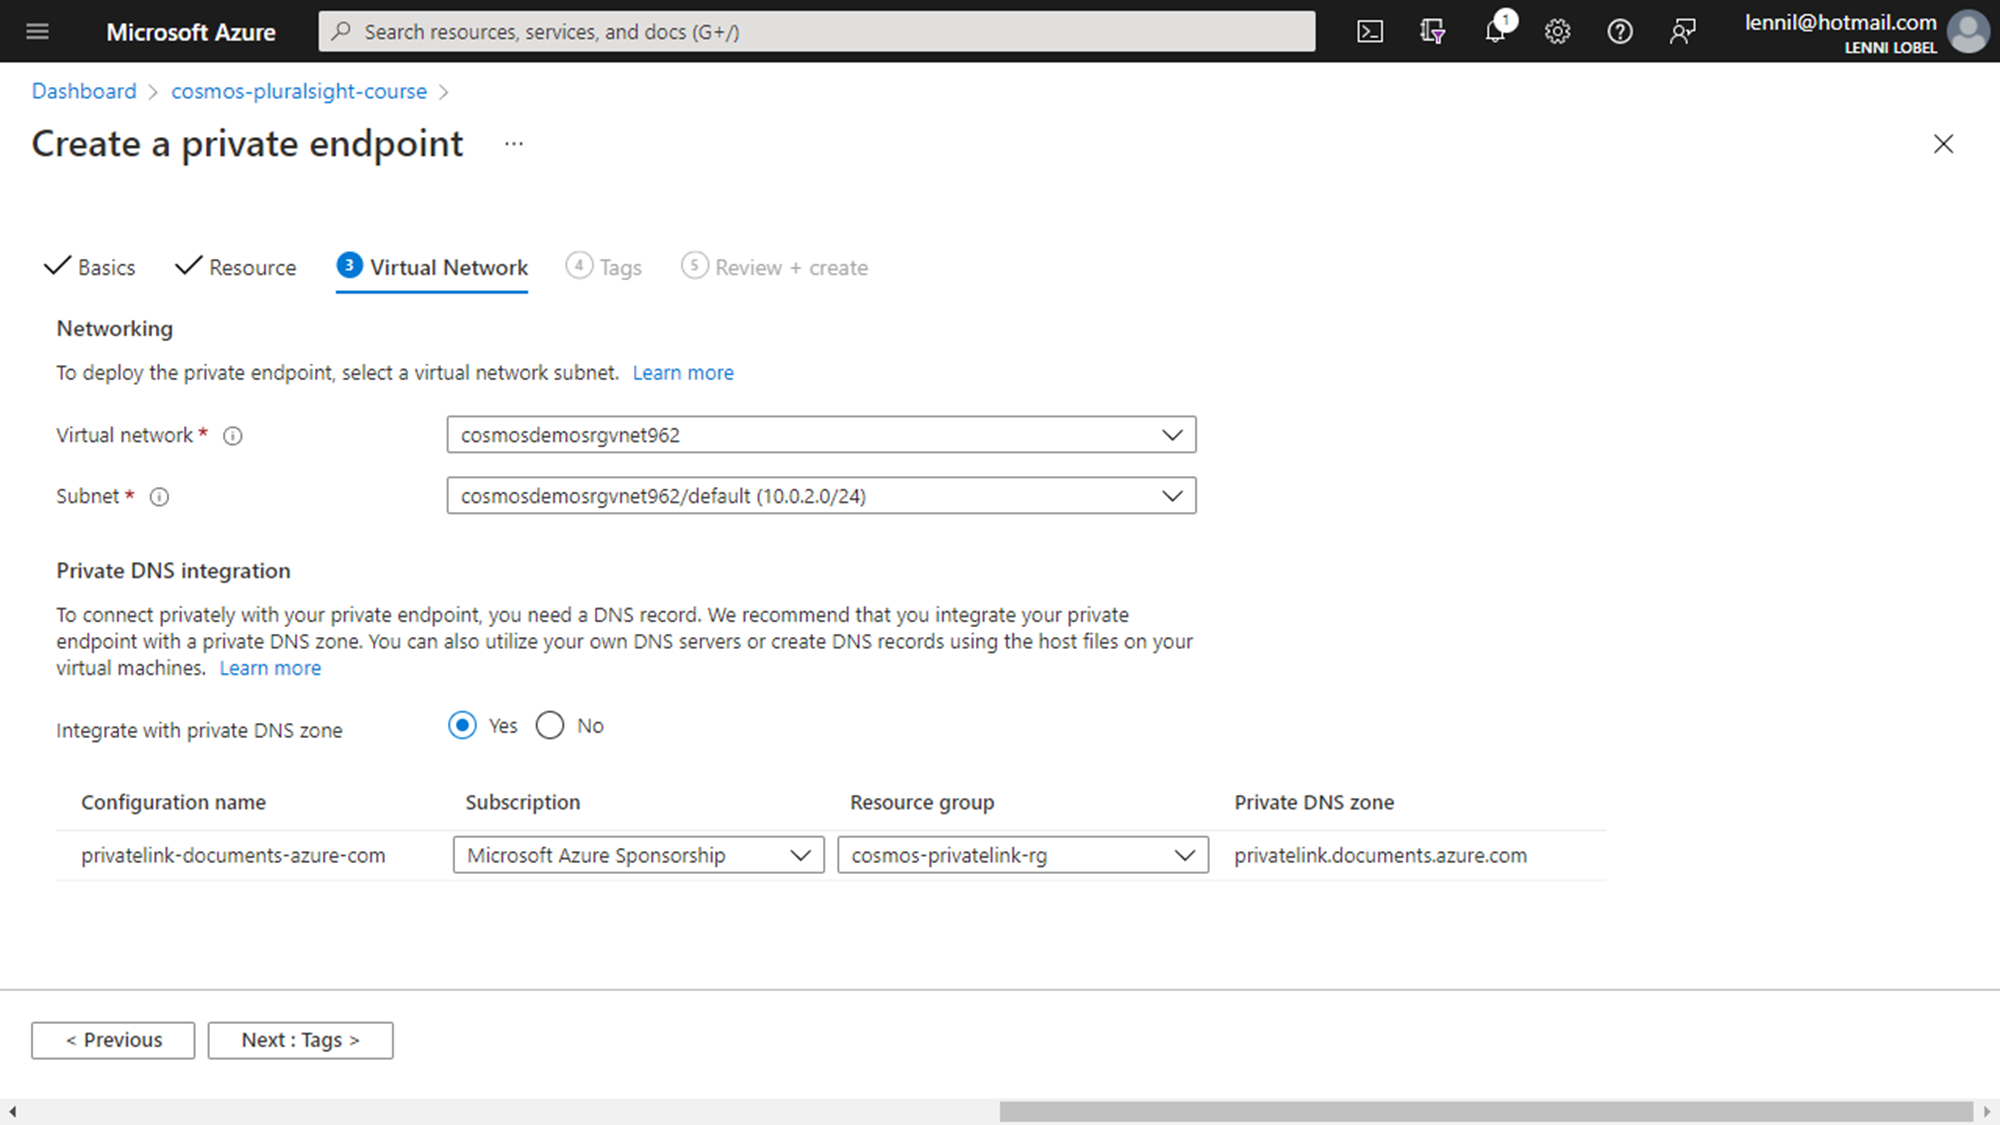
Then click Next for the Virtual Network tab, where you can choose the VNet and its subnet for the new private endpoint.

Notice that Private DNS Integration option is turned on by default, and this is what transparently maps your account’s fully qualified domain name to a private IP address. So, really without you having to do anything different in terms of how you work with your Cosmos DB account, this makes the account accessible only from the private endpoint in this VNet, which itself is accessible only through private IP addresses, and no access to the public internet.

And that’s pretty much it. Of course, you can assign tags to the private endpoint just like with any Azure resource, and then just click Create. It takes a few moments for Azure to create and deploy the new private endpoint, and then you’re done.

Summary

This post examined three different ways to secure network access to your Cosmos DB account. You can approve IP addresses and IP address ranges with the IP firewall, or approve specific virtual networks using service endpoints. Both of these options carry the risk of exfiltration, since the Cosmos DB account is still accessible via its public endpoint. However, you can eliminate that risk using your third option, which is to use private endpoints with virtual networks that are completely isolated from the public internet.