Leonard Lobel (Microsoft MVP, Data Platform) is the chief technology officer and co-founder of Sleek Technologies, LLC, a software development and consulting firm with an early adopter philosophy toward new technologies.
Programming since 1979, Lenni specializes in Microsoft-based solutions, with experience that spans a variety of business domains, including publishing, financial, wholesale/retail, health care, and e-commerce. Lenni has served as chief architect and lead developer for various organizations, ranging from small shops to high-profile clients. He is also a consultant, trainer, and frequent speaker at local usergroup meetings, VSLive, SQL PASS, and other industry conferences.
Lenni has also authored several MS Press books and Pluralsight courses on SQL Server programming
This post explains the new UNISTR function in SQL Server 2025, a small but handy way to embed Unicode codepoints directly into string literals using escape sequences.
Before SQL Server 2025, the only way to insert Unicode characters by their numeric codepoints was to use the NCHAR() function — one character at a time — and concatenate them manually. This approach worked but was verbose, hard to read, and error-prone when dealing with complex strings or emoji sequences.
While the NCHAR function is SQL Server–specific and not ANSI-compliant, UNISTR is part of the ANSI SQL standard and is already supported by other databases (like Oracle). Its addition to T-SQL improves cross-platform consistency and standards compliance, which is an important consideration when writing portable SQL code.
With UNISTR, you now have a cleaner, more readable, and standards-compliant way to embed multiple Unicode characters using escape sequences, all in a single function call. This is essentially a convenient shorthand for performing multiple NCHAR() calls and string concatenations in a single expression.
Furthermore, UNISTR supports Unicode escape sequences like \xxxx (for UTF-16 code units) and \+xxxxxx (for full Unicode codepoints). This makes it much easier to work with emojis, symbols, accented characters, and multilingual strings directly in T-SQL.
Before and After: UNISTR vs NCHAR
Here’s an example showing how the old NCHAR function requires clumsy string concatentation to compose a Unicode string with emojis:
SELECT CONCAT('I ',NCHAR(0x2665),' SQL Server 2025 ',NCHAR(0xD83D),NCHAR(0xDE03),'.')
This query produces the following output:
I ♥ SQL Server 2025 😃.
But with UNISTR, you can achieve the same result much more cleanly using a single string with no concatenation:
SELECT UNISTR(N'I \2665 SQL Server 2025 \D83D\DE03.')
The first version requires string concatenation plus three calls to NCHAR to compose the result. The second version uses UNISTR and is much cleaner and self-contained. Both versions use UTF-16 surrogate pairs to represent the second emoji (laughing face), but UNISTR works with a single function call.
UTF-16 Surrogate Pairs vs Full Unicode Codepoints
This alternate version also works, but uses the full Unicode codepoint escape format to represent the second emoji, rather than UTF-16 surrogate pairs:
SELECT UNISTR(N'I \2665 SQL Server 2025 \+01F603.')
Full Unicode codepoints are preferred over UTF-16 surrogate pairs, because they are generally more readable and easier to maintain, especially when dealing with longer strings or multiple Unicode characters. It’s also more convenient for looking up special characters in various Unicode reference tables (such as https://unicode.org/emoji/charts/full-emoji-list.html).
Custom Escape Character
UNISTR also lets you define a custom escape character (instead of the default backslash \). This is helpful if you need to treat the backslash as a literal character.
For example, the following query uses $ as the escape character instead of \, which is now treated as an ordinary literal:
In this query, the backslash is treated as a regular character, while $ is used to escape the Unicode content:
I ♥ SQL Server 2025 \ Azure SQL Database 😃.
Summary
NCHAR() requires one call per character and manual concatenation.
UNISTR() simplifies this by allowing multiple Unicode escapes in a single string with a single function call.
Supports \xxxx (UTF-16) and \+xxxxxx (full Unicode codepoints) escape formats.
You can define custom escape characters as needed.
UNISTR makes your Unicode handling in SQL Server 2025 easier, more readable, and more maintainable — especially when dealing with emojis, multilingual text, or symbols.
This blog post explores the new PRODUCT function in SQL Server 2025, which calculates the product of a set of numeric values — similar to how SUM and AVG work for addition and averaging, but for multiplication.
Prior to SQL Server 2025, SQL Server lacked a built-in way to compute the product of values in a set. You had to use workarounds like looping or user-defined aggregates. With PRODUCT, this is now a simple one-line expression.
PRODUCT supports both aggregate and analytic (windowed) forms and works with both ALL values (default) and DISTINCT values. Nulls are ignored, and the function is compatible with all numeric types except bit.
Compute Product of Prices for Each Product
The first example illustrates how to use the new PRODUCT aggregate function in SQL Server 2025 to calculate the cumulative product of prices for each product across multiple orders. It also shows how to compute the product considering only distinct price values.
CREATETABLE OrderDetail (
OrderId int,
ProductId int,
Price decimal(10,4)
)
INSERTINTO OrderDetail
(OrderId, ProductId, Price)VALUES
(1,101,136.87),
(1,102,29.57),
(1,103,396.85),
(2,101,136.87),
(2,102,29.57),
(3,101,136.87),
(3,102,29.57),
(4,101,149.22),
(4,102,29.57)
-- Compute product of all prices and distinct prices for each ProductId
SELECT
ProductId,
ProductOfPrices = PRODUCT(Price),
ProductOfDistinctPrices = PRODUCT(DISTINCT Price)
FROM
OrderDetail
GROUPBY
ProductId
Result:
ProductId
ProductOfPrices
ProductOfDistinctPrices
101
382606053.829162
20423.741400
102
764548.953348
29.570000
103
396.850000
396.850000
Alternative using OVER (PARTITION BY ...)
This version computes the product for each row using a windowed aggregate (that is, using OVER rather than GROUP BY). This allows you to retain the detail rows (which were lost in the previous GROUP BY query) while also showing the total product per partition.
SELECT
ProductId,
OrderId,
Price,
ProductOfPrices = PRODUCT(Price) OVER (PARTITION BY ProductId)
FROM
OrderDetail
ORDERBY
ProductId,
OrderId
Result:
ProductId
OrderId
Price
ProductOfPrices
101
1
136.8700
382606053.829162
101
2
136.8700
382606053.829162
101
3
136.8700
382606053.829162
101
4
149.2200
382606053.829162
102
1
29.5700
764548.953348
102
2
29.5700
764548.953348
102
3
29.5700
764548.953348
102
4
29.5700
764548.953348
103
1
396.8500
396.850000
Compounded Return from Periodic Rates
The next example uses PRODUCT to compute the compounded return for financial instruments over multiple time periods.
The above query calculates the compounded return for each instrument by taking the product of (1 + RateOfReturn) for all periods and then subtracting 1 to return the CompoundedReturn column. The CompoundedReturnPercentage column shows the same value formatted for display as a percentage with one decimal place.
Using BOND1 as an example, the calculation would be:
(1 + 0.035) = 1.035
*
Period 1 return
(1 + 0.0275) = 1.0275
*
Period 2 return
(1 + 0.0325) = 1.0325
=
Period 3 return
1.098026
– 1 =
Growth factor (includes the original principal $1)
0.098026
=
Compounded return (i.e., the percentage gain)
9.8%
Isolated profit/loss percentage
Alternative using OVER (PARTITION BY ...)
Like the first example, this version uses windowing with OVER to calculate the compounded return for each individual row.
SELECT
InstrumentId,
Period,
RateOfReturn,
CompoundedReturn = PRODUCT(1+ RateOfReturn) OVER (PARTITION BY InstrumentId)-1,
CompoundedReturnPercentage = FORMAT((PRODUCT(1+ RateOfReturn) OVER (PARTITION BY InstrumentId)-1)*100,'N1')||'%'
FROM
Instrument
ORDERBY
InstrumentId,
Period
Result:
InstrumentId
Period
RateOfReturn
CompoundedReturn
CompoundedReturnPercentage
BOND1
1
0.0350
0.098026
9.8%
BOND1
2
0.0275
0.098026
9.8%
BOND1
3
0.0325
0.098026
9.8%
ETF1
1
0.0800
0.093284
9.3%
ETF1
2
-0.0450
0.093284
9.3%
ETF1
3
0.0600
0.093284
9.3%
STOCK1
1
0.1250
0.371077
37.1%
STOCK1
2
0.0950
0.371077
37.1%
STOCK1
3
0.1130
0.371077
37.1%
Summary
The new PRODUCT function in SQL Server 2025 brings native multiplicative aggregation to T-SQL, eliminating the need for workarounds when calculating the product of a set of numeric values. It supports standard aggregation with GROUP BY, including DISTINCT, as well as analytic calculations using OVER (PARTITION BY ...) to preserve individual detail rows. As we demonstrated with product prices and compounded investment returns, PRODUCT makes calculations that depend on multiplying values across a set simpler and more expressive.
Base64 encoding is a method of converting binary data into an ASCII string format by translating it into a radix-64 representation. Base64 decoding is the reverse process, converting an ASCII string back into binary data. Encoding is often used to safely transmit binary data over text-based protocols, such as HTTP or email, though note that encoding binary data increases its size by approximately 33%.
This blog post demonstrates how to use the new BASE64_ENCODE and BASE64_DECODE functions in T-SQL. The examples include both standard Base64 encoding (which may include characters like + and / that are not URL-safe) and URL-safe Base64 encoding (which replaces + with - and / with _).
Encoding with BASE64_ENCODE and Decoding with BASE64_DECODE
First let’s perform standard Base64 encoding and decoding. Run this code snippet to encode a binary value into a string using BASE64_ENCODE:
DECLARE @Binary varbinary(max)=0xCAFECAFE
SELECT StandardEncoded = BASE64_ENCODE(@Binary)
Result:
yv7K/g==
Now use BASE64_DECODE to convert the encoded string back to its original binary form:
DECLARE @StandardEncoded varchar(max)='yv7K/g=='
SELECTBinary= BASE64_DECODE(@StandardEncoded)
Result:
0xCAFECAFE
Notice how the encoded string for the same binary content contains characters like / and +, which are not safe for use in URLs.
URL-Safe Base64 Encoding
To create a URL-safe version, use the second parameter of BASE64_ENCODE (where 1 means to perform URL-safe encoding):
DECLARE @Binary varbinary(max)=0xCAFECAFE
SELECT UrlSafeEncoded = BASE64_ENCODE(@Binary,1)
Result:
yv7K_g
Notice that the URL-safe encoded string replaces / with _ (it would also replace + with -). And now, use BASE64_DECODE to convert the URL-safe encoded string back to its original binary form:
DECLARE @UrlSafeDecoded varchar(max)='yv7K_g'
SELECTBinary= BASE64_DECODE(@UrlSafeDecoded)
Result:
0xCAFECAFE
You can see that both the standard and URL-safe encoded strings decode back to the same original binary data.
So then, why not always use URL-safe Base64 encoding? Although BASE64_DECODE can handle both standard and URL-safe Base64 formats in SQL Server, standard Base64 remains the default because it aligns with established standards (RFC 4648) and ensures compatibility with most systems, libraries, and protocols that expect the traditional +, /, and = characters. The URL-safe variant should be used only when the encoded data will appear in contexts like URLs, filenames, or cookies that restrict those characters. In short, use standard Base64 for interoperability and URL-safe Base64 only when required by the target environment.
Practical Examples
Here is a more practical example of using Base64 encoding and decoding in T-SQL. In this case, we will construct a JSON object that includes an embedded image. With the binary image content embedded as a Base64-encoded string, the JSON object can be easily transmitted or stored in text-based formats. In this case, the JSON object could be used in web applications, REST APIs, or other scenarios where images need to be included in JSON responses. Note that the same approach can be used for embedding images in HTML or XML documents, all using T-SQL.
Here is another example, where we construct a binary token for use in a URL. The token is first created as a binary value, then encoded using URL-safe Base64 encoding, and finally embedded into a URL string. This approach is useful for securely transmitting tokens in web applications via a URL, such as for authentication or authorization purposes.
Observe that the resulting URL contains a token that is safe for inclusion in URLs, thanks to the URL-safe Base64 encoding. Also notice the use of the ANSI SQL standard concatenation operator (||) to build the URL string, as you learned about in the previous lab.
Summary
The new BASE64_ENCODE and BASE64_DECODE functions are small additions that solve a very practical problem. They make it easy to convert binary values into portable text and back again, directly in T-SQL.
Use standard Base64 when you need conventional encoded output, and use URL-safe Base64 when the encoded value will appear in a URL, token, route segment, or query string. Just remember that Base64 is not encryption, and that encoding increases the size of the data.
Regular expression support has been one of those “how do we still not have this?” features in T-SQL for a very long time. SQL Server developers have always been able to do basic pattern matching with LIKE, and slightly more advanced wildcard searches with PATINDEX, but neither of those features provides true regex capabilities.
That limitation has historically forced developers into awkward workarounds: chains of CHARINDEX and SUBSTRING, complex LIKE predicates, CLR functions, application-side validation, ETL cleanup steps, or other approaches that were harder to read, harder to maintain, and often less expressive than a regular expression.
SQL Server 2025 and Azure SQL Database now include native regular expression functions for matching, counting, extracting, locating, replacing, returning matches as rows, and splitting text into rows. Microsoft’s documentation lists these functions as applying to SQL Server 2025, Azure SQL Database, Azure SQL Managed Instance, and SQL database in Microsoft Fabric.
The examples below use a simple Review table to demonstrate the new regex support. I’ll keep the regex explanations inside the SQL comments, so the walkthrough can focus on what each query is doing and what output to expect.
Create the sample table and data
CREATETABLE Review(
ReviewId intIDENTITYPRIMARYKEY,
Name varchar(50)NOTNULL,
Email varchar(150),
Phone varchar(20),
ReviewText varchar(1000)
)
GO
INSERTINTO Review
(Name, Email, Phone, ReviewText)VALUES
('John Doe','john@contoso.com','123-4567890','This product is excellent! I really like the build quality and design. #excellent #quality'),
('Alice Smith','alice@fabrikam@com','234-567-81','Good value for money, but the software is terrible.'),
('Mary Jo Anne Erickson','mary.jo.anne@acme.co.uk','456-789-1234','Poor battery life, bad camera performance, and poor build quality. #poor'),
('Max Wong','max@fabrikam.com',NULL,'Excellent service from the support team, highly recommended!'||char(9)||'#goodservice #recommended'),
('Bob Johnson','bob.fabrikam.net','345-678-9012','The product is good, but delivery was delayed.'||char(13)||char(10)||'Overall, decent experience.'),
('Terri S Duffy','terri.duffy@acme.com','678-901-2345','Battery life is weak, camera quality is poor. #aweful'),
('Eve Jones',NULL,'456-789-0123','I love this product, it''s great! #fantastic #amazing'),
('Charlie Brown','charlie@contoso.co.in','587-890-1234','I hate this product, it''s terrible!')
This establishes the sample data used throughout the rest of the walkthrough.
REGEXP_LIKE
REGEXP_LIKE is used to test whether a value matches a regular expression pattern. It is especially useful in WHERE clauses.
'i'-- case insensitive flag (match uppercase or lowercase vowels)
)
FROM
Review
Name
VowelCount
John Doe
3
Alice Smith
4
Mary Jo Anne Erickson
7
Max Wong
2
Bob Johnson
3
Terri S Duffy
3
Eve Jones
4
Charlie Brown
4
Count specific “sentiment” words from each review
SELECT
Name,
ReviewText,
GoodSentimentWordCount = REGEXP_COUNT(
ReviewText,
'\b(excellent|great|good|love|like)\b',
/*
\b start of word boundary
(excellent|great|good|love|like) match any of the words in the parentheses
\b end of word boundary
*/
1,-- start position
'i'-- case insensitive flag (match uppercase or lowercase words)
),
BadSentimentWordCount = REGEXP_COUNT(
ReviewText,
'\b(bad|poor|terrible|hate)\b',
/*
\b start of word boundary
(bad|poor|terrible|hate) match any of the words in the parentheses
\b end of word boundary
*/
1,-- start position
'i'-- case insensitive flag (match uppercase or lowercase words)
)
FROM
Review
Name
GoodSentimentWordCount
BadSentimentWordCount
John Doe
3
0
Alice Smith
1
1
Mary Jo Anne Erickson
0
4
Max Wong
1
0
Bob Johnson
1
0
Terri S Duffy
0
1
Eve Jones
2
0
Charlie Brown
0
2
CHECK constraints
Regex support is also useful for enforcing data quality rules with CHECK constraints. Before those constraints can be added, existing invalid data has to be removed or corrected.
Attempt to add constraints before cleaning the data
-- Cannot add check constraints to ensure valid email addresses and phone numbers in the Review table
If executed, these constraints would fail against the existing data, because the current table still contains invalid email addresses and phone numbers.
Delete rows with invalid email addresses and phone numbers
Let’s use the REGEXP_LIKE function in the WHERE clause of a DELETE statement to remove all rows with invalid email addresses or phone numbers:
Both of these statements fail, because the inserted values violate the regex-based CHECK constraints.
However, data that satisfies the check constraints is valid:
INSERTINTO Review
(Name, Email, Phone, ReviewText)VALUES
('John Doe','john@fabrikam.com','123-456-7890','This product is excellent! I really like the build quality and design. #excellent #quality'),
('Alice Smith','alice.smith@fabrikam.co.uk','234-567-8195','Good value for money, but the software is terrible.'),
('Bob Johnson','bob@fabrikam.com','345-678-9012','The product is good, but delivery was delayed. Overall, decent experience.'),
('Stuart Green','stuart.green@acme.com','456-789-0123','Pretty good product, I am enjoying it!')
These rows satisfy the regex-based constraints, so the insert succeeds. The following SELECT * is included in the code, but the output is not repeated here because it is just the table contents after the insert.
REGEXP_SUBSTR
REGEXP_SUBSTR extracts a substring that matches a regex pattern.
Extract the domain name of each valid email address
-- Extract the domain name of each valid email address
SELECT
ReviewId,
Name,
Email,
DomainName = REGEXP_SUBSTR(
Email,
'@(.+)$',-- @ = literal at-symbol; (.+)$ = capture everything after the at-symbol
1,-- start position
1,-- return the first occurrence
'c',-- enable capture group indexing
1)-- return the first capture group, which is the domain name
FROM
Review
ReviewId
Name
Email
DomainName
3
Mary Jo Anne Erickson
mary.jo.anne@acme.co.uk
acme.co.uk
4
Max Wong
max@fabrikam.com
fabrikam.com
6
Terri S Duffy
terri.duffy@acme.com
acme.com
7
Eve Jones
8
Charlie Brown
charlie@contoso.co.in
contoso.co.in
9
John Doe
john@fabrikam.com
fabrikam.com
10
Alice Smith
alice.smith@fabrikam.co.uk
fabrikam.co.uk
11
Bob Johnson
bob@fabrikam.com
fabrikam.com
12
Stuart Green
stuart.green@acme.com
acme.com
Show how many email addresses there are for each domain
;WITH DomainNameCte AS(
SELECT
DomainName = REGEXP_SUBSTR(
Email,
'@(.+)$',-- @ = literal at-symbol; (.+)$ = capture everything after the at-symbol
1,-- start position
1,-- return the first occurrence
'c',-- enable capture group indexing
1)-- return the first capture group, which is the domain name
FROM
Review
)
SELECT
DomainName,
DomainCount =COUNT(*)
FROM
DomainNameCte
GROUPBY
DomainName
ORDERBY
DomainName
DomainName
DomainCount
1
acme.co.uk
1
acme.com
2
contoso.co.in
1
fabrikam.co.uk
1
fabrikam.com
3
REGEXP_INSTR
REGEXP_INSTR returns the position of a regex match.
Find the position of the @ character and the first . after it
SELECT
ReviewId,
Name,
Email,
At= REGEXP_INSTR(Email,'@'),-- match the at-symbol; simple scenario (could also achieve with CHARINDEX)
DotAfterAt = REGEXP_INSTR(Email,
'@[^@]*?(\.)',-- @ = match the at-symbol; [^@]*? = match everything after the at-symbol until the first dot; (\.) = capture the first dot after the at-symbol
1,-- start position
1,-- return the first occurrence
0,-- return the position of the match (not the psition after it)
'c',-- enable capture group indexing
1-- return the position of the first capture group, which is the dot
)
FROM
Review
/*
1 2
12345678901234567890123456
Example: alice.smith@fabrikam.co.uk
^ ^
| |
| +-- match first dot after @ = 21
+-- match starts at @
*/
ReviewId
Email
At
DotAfterAt
3
mary.jo.anne@acme.co.uk
13
18
4
max@fabrikam.com
4
13
6
terri.duffy@acme.com
12
17
7
8
charlie@contoso.co.in
8
16
9
john@fabrikam.com
5
14
10
alice.smith@fabrikam.co.uk
12
21
11
bob@fabrikam.com
4
13
12
stuart.green@acme.com
13
18
REGEXP_REPLACE
REGEXP_REPLACE replaces text matched by a regex pattern.
Strip middle names
SELECT
ReviewId,
Name,
ShortName = REGEXP_REPLACE(
Name,-- scan the Name column
'^(\S+)\s+.*\s+(\S+)$',-- ^(\S+) = capture the first word; .* = match everything in the middle; (\S+)$ = capture the last word
'\1 \2',-- replace the whole name with first + last
1,-- start position
1,-- replace only the first occurrence
'i'-- case insensitive flag (optional, but safe to include)
)
FROM
Review
ReviewId
Name
ShortName
3
Mary Jo Anne Erickson
Mary Erickson
4
Max Wong
Max Wong
6
Terri S Duffy
Terri Duffy
7
Eve Jones
Eve Jones
8
Charlie Brown
Charlie Brown
9
John Doe
John Doe
10
Alice Smith
Alice Smith
11
Bob Johnson
Bob Johnson
12
Stuart Green
Stuart Green
REGEXP_MATCHES
REGEXP_MATCHES returns regex matches as rows, including match position and captured substrings.
Extract words starting with A followed by any two characters
SELECT*
FROM REGEXP_MATCHES(
'ATE ABOVE ACT',
'\b(A)(..)\b'-- \b = word boundary; (A) = the letter A; (..) = any two characters after A
'#([A-Za-z0-9_]+)'-- # = hash symbol; ([A-Za-z0-9_]+) = followed by 1 or more characters or underscores
)
match_id
start_position
end_position
match_value
substring_matches
1
10
18
#AzureSQL
[{“value”:”AzureSQL”,”start”:11,”length”:8}]
2
20
30
#AzureSQLDB
[{“value”:”AzureSQLDB”,”start”:21,”length”:10}]
Extract hashtags from the review text in the database
SELECT
r.ReviewId,
r.ReviewText,
m.*
FROM
Review AS r
CROSS APPLY REGEXP_MATCHES(r.ReviewText,'#([A-Za-z0-9_]+)')AS m
ReviewId
match_value
3
#poor
4
#goodservice
4
#recommended
6
#aweful
7
#fantastic
7
#amazing
9
#excellent
9
#quality
REGEXP_SPLIT_TO_TABLE
REGEXP_SPLIT_TO_TABLE splits a string into rows using a regex delimiter.
Extract individual words from text using whitespace as the delimiter
SELECT*
FROM
REGEXP_SPLIT_TO_TABLE(
'the quick brown fox jumped'||char(9)||'over the lazy'||char(13)||char(10)||'dog',
'\s+'-- \s+ = match one or more whitespace characters (spaces, tabs, newlines)
)
ordinal
value
1
the
2
quick
3
brown
4
fox
5
jumped
6
over
7
the
8
lazy
9
dog
Extract individual words from review text
SELECT
r.ReviewId,
r.ReviewText,
WordText = s.value,
WordPosition = s.ordinal
FROM
Review AS r
CROSS APPLY REGEXP_SPLIT_TO_TABLE(r.ReviewText,'\s+')AS s
This returns one row per token from each review. Each row includes the original review text, the token value, and the token position within that review.
CROSS APPLY REGEXP_SPLIT_TO_TABLE(r.ReviewText,'\s+')AS s
This version is similar, but removes punctuation from each token.
Final thoughts
Native regex support dramatically improves the T-SQL developer experience. Instead of relying on fragile combinations of LIKE, PATINDEX, CHARINDEX, and procedural cleanup code, you can now express many validation, extraction, replacement, and tokenization tasks directly and clearly in SQL.
For text-heavy workloads, data quality checks, ETL processing, review analysis, and general string manipulation, these functions are a very welcome addition to SQL Server 2025 and Azure SQL Database.
Fuzzy string matching is the process of finding strings that are approximately equal, rather than exact matches. This is a critical capability for data cleansing, deduplication, primitive natural language search, and matching user input against known values.
Until now, SQL Server’s fuzzy options have been limited to phonetic comparisons. But now, SQL Server 2025 (and Azure SQL Database) introduces a set of modern string similarity functions you can run directly in T-SQL with far more precision.
Note: This post is based on SQL Server 2025 CTP 2.1. Syntax and behavior are subject to subtle changes by the time the product is released. Fuzzy string matching will ultimately be supported across all SKUs of SQL Server, including SQL Server 2025 for Windows, SQL Server 2025 for Linux, Azure SQL Database, and Managed Instance.
Legacy Options: SOUNDEX and DIFFERENCE
These two functions have been around for decades:
SOUNDEX: Produces a code representing the phonetic sound of a word (e.g., “Green” → G650, “Greener” → G656).
DIFFERENCE: Compares SOUNDEX codes on a 1–4 scale (4 ≈ exact).
While these work marginally well for quick phonetic checks, they are not suited for long strings or nuanced comparisons.
New in SQL Server 2025: Four Modern Fuzzy Matching Functions
SQL Server 2025 now has these well-known fuzzy matching algorithms built into the engine:
Function Name
Returns
Use Cases
EDIT_DISTANCE
Number of edits (insert/delete/substitute) between two strings (aka Levenshtein distance)
You want a raw “how many changes?” counter or to sort by degree of change
This sample include a mix of near-matches (British vs. American spellings), slight variations (“Green” and “Greener”), one intentionally exact pair (“Practice” and “Practice”), and one intentionally bad pair (“Orange” vs. “Purple”).
Now let’s score each pair using the new and legacy functions:
SELECT
  *,
  -- New SQL Server 2025 fuzzy matching functions
  LevenshteinDistance     = EDIT_DISTANCE(Word1, Word2),
  LevenshteinSimilarity   = EDIT_DISTANCE_SIMILARITY(Word1, Word2),
  JaroWrinklerDistance    = JARO_WINKLER_DISTANCE(Word1, Word2),
  JaroWrinklerSimilarity  = JARO_WINKLER_SIMILARITY(Word1, Word2),
  -- Legacy SQL Server fuzzy matching functions
  Soundex1                = SOUNDEX(Word1),
  Soundex2                = SOUNDEX(Word2),
  Difference              = DIFFERENCE(Word1, Word2)
FROM
  WordPair
ORDER BY
  LevenshteinSimilarity DESC
This query exercises the four new functions alongside the two legacy functions for every row. The results are sorted by EDIT_DISTANCE_SIMILARITY descending (0–100; 100 = exact), which yields a quick and easy comparison.
Run the query, and observe:
The exact match on “Practice/Practice” floats to the very top (similarity 100, distance 0).
Close pairs like “Grey/Gray” and “Colour/Color” cluster near the top with high similarity and small edit distances.
The outlier (“Orange/Purple”) drops to the bottom with low similarity and large distance.
You’ll see that legacy SOUNDEX/DIFFERENCE sometimes overrate or underrate certain pairs, while the newer metrics capture nuance (insertions, substitutions, transpositions, prefix weight).
Clean up the example table
DROP TABLE WordPair
Real-World Deduping (Customer Records)
Now let’s detect potential duplicates in a customer table by scoring first names, last names, and addresses, then combining them.
While minimal, this structure will suffice to keep focus on fuzzy matching. Now populate the table with sample data, including a mix of exact duplicate and near duplicate values across the first name, last name, and address fields.
INSERT INTO Customer VALUES
 ('Johnathan',  'Smith',    '123 North Main Street'),
 ('Jonathan',   'Smith',    '123 N Main St.'),
 ('Johnathan',  'Smith',    '456 Ocean View Blvd'),
 ('Johnathan',  'Smith',    '123 North Main Street'),
 ('Daniel',     'Smith',    '123 N. Main St.'),
 ('Danny',      'Smith',    '123 N. Main St.'),
 ('John',       'Smith',    '123 Main Street'),
 ('Jonathon',   'Smyth',    '123 N Main St'),
 ('Jon',        'Smith',    '123 N Main St.'),
 ('Johnny',     'Smith',    '124 N Main St'),
 ('Ethan',      'Goldberg', '742 Evergreen Terrace'),
 ('Carlos',     'Rivera',   '456 Ocean View Boulevard'),
 ('Carlos',     'Rivera',   '456 Ocean View Blvd'),
 ('Carl',       'Rivera',   '456 Ocean View Boulevard'),
 ('Carlos',     'Rivera',   '456 Ocean View Boulevard')

SELECT * FROM Customer
Score First Name Similarity
We’ll compute pairwise first-name similarity across all row combinations using JARO_WINKLER_SIMILARITY (great for short strings and prefix sensitivity).
;WITH PairwiseSimilarityCte AS (
  SELECT
    CustomerId1         = c1.CustomerId,
    CustomerId2         = c2.CustomerId,
    FirstName1          = c1.FirstName,
    FirstName2          = c2.FirstName,
    FirstNameSimilarity = JARO_WINKLER_SIMILARITY(c1.FirstName, c2.FirstName)
  FROM
    Customer AS c1
    INNER JOIN Customer AS c2 ON c2.CustomerId < c1.CustomerId
)
SELECT
  *,
  FirstNameQuality = CASE
    WHEN FirstNameSimilarity = 1    THEN 'Exact'
    WHEN FirstNameSimilarity >= .85 THEN 'Very Strong'
    WHEN FirstNameSimilarity >= .75 THEN 'Strong'
    WHEN FirstNameSimilarity >= .4  THEN 'Weak'
                                    ELSE 'Very Weak'
    END
FROM
  PairwiseSimilarityCte
ORDER BY
  FirstNameSimilarity DESC
How it works:
The self-join c2.CustomerId < c1.CustomerId generates unique unordered pairs (no duplicates, no self-pairs).
The CTE computes similarity for each pair; the outer query labels it with human-friendly buckets.
What to expect:
Exact repeats (e.g., identical first names) show FirstNameSimilarity = 1 and label Exact.
Variants like Johnathan/ Jonathan and Jon/ John cluster as Very Strong or Strong.
Unrelated names (e.g., Daniel / Johnathan) drop into Weak/Very Weak.
Score Last Name Similarity
Same pattern, now focused on last names. This will show phonetic look-alikes like Smith/Smyth scoring high.
;WITH PairwiseSimilarityCte AS (
  SELECT
    CustomerId1         = c1.CustomerId,
    CustomerId2         = c2.CustomerId,
    LastName1           = c1.LastName,
    LastName2           = c2.LastName,
    LastNameSimilarity  = JARO_WINKLER_SIMILARITY(c1.LastName, c2.LastName)
  FROM
    Customer AS c1
    INNER JOIN Customer AS c2 ON c2.CustomerId < c1.CustomerId
)
SELECT
  *,
  LastNameQuality = CASE
    WHEN LastNameSimilarity = 1     THEN 'Exact'
    WHEN LastNameSimilarity >= .85  THEN 'Very Strong'
    WHEN LastNameSimilarity >= .75  THEN 'Strong'
    WHEN LastNameSimilarity >= .4   THEN 'Weak'
                                    ELSE 'Very Weak'
    END
FROM
    PairwiseSimilarityCte
ORDER BY
    LastNameSimilarity DESC
What to expect:
All Smith/Smith pairs rank Exact.
Smith/Smyth should score Very Strong (tiny spelling change).
Completely different surnames (e.g., Goldberg / Smith) fall low.
Score Address Similarity
Addresses are noisy (abbreviations, punctuation, ordering). JARO_WINKLER_SIMILARITY handles short transpositions and prefix overlaps well.
;WITH PairwiseSimilarityCte AS (
  SELECT
    CustomerId1         = c1.CustomerId,
    CustomerId2         = c2.CustomerId,
    Address1            = c1.Address,
    Address2            = c2.Address,
    AddressSimilarity   = JARO_WINKLER_SIMILARITY(c1.Address, c2.Address)
  FROM
    Customer AS c1
    INNER JOIN Customer AS c2 ON c2.CustomerId < c1.CustomerId
)
SELECT
  *,
  AddressQuality = CASE
    WHEN AddressSimilarity = 1      THEN 'Exact'
    WHEN AddressSimilarity >= .85   THEN 'Very Strong'
    WHEN AddressSimilarity >= .75   THEN 'Strong'
    WHEN AddressSimilarity >= .4    THEN 'Weak'
                                    ELSE 'Very Weak'
  END
FROM
  PairwiseSimilarityCte
ORDER BY
  AddressSimilarity DESC
What to expect:
Exact duplicates top the list.
Variants like “123 North Main Street” vs “123 N Main St.” score Very Strong/Strong.
Unrelated addresses (e.g., “742 Evergreen Terrace” vs “123 N. Main St.”) land low.
Combine All Three: A Composite Match Score
A high first-name score plus a low address score probably isn’t a true duplicate. Let’s average the three similarities into a FinalCombinedScore for better overall ranking.
;WITH PairwiseSimilarityCte AS (
  SELECT
    CustomerId1         = c1.CustomerId,
    CustomerId2         = c2.CustomerId,
    FirstName1          = c1.FirstName,
    FirstName2          = c2.FirstName,
    FirstNameSimilarity = JARO_WINKLER_SIMILARITY(c1.FirstName, c2.FirstName),
    LastName1           = c1.LastName,
    LastName2           = c2.LastName,
    LastNameSimilarity  = JARO_WINKLER_SIMILARITY(c1.LastName, c2.LastName),
    Address1            = c1.Address,
    Address2            = c2.Address,
    AddressSimilarity   = JARO_WINKLER_SIMILARITY(c1.Address, c2.Address)
  FROM
    Customer AS c1
    INNER JOIN Customer AS c2 ON c2.CustomerId < c1.CustomerId
),
FinalCombinedScoreCte AS (
  SELECT
    *,
    FinalCombinedScore = (FirstNameSimilarity + LastNameSimilarity + AddressSimilarity) / 3.0
  FROM
    PairwiseSimilarityCte
)
SELECT
  *,
  FinalQuality = CASE
    WHEN FinalCombinedScore = 1     THEN 'Exact'
    WHEN FinalCombinedScore >= .85  THEN 'Very Strong'
    WHEN FinalCombinedScore >= .75  THEN 'Strong'
    WHEN FinalCombinedScore >= .4   THEN 'Weak'
                                    ELSE 'Very Weak'
  END
FROM
  FinalCombinedScoreCte
ORDER BY
  FinalCombinedScore DESC
How it works:
The first CTE computes three similarities for each pair.
The second CTE averages them into FinalCombinedScore.
The outer query labels and sorts by that combined metric.
What to expect:
True duplicates (identical first, last, address) appear right at the top (Exact).
Pairs like “Jonathon Smyth, 123 N Main St” and “Johnathan Smith, 123 North Main Street” rank high because names and addresses are all very similar.
Pairs that share a name but differ in address (e.g., Johnathan Smith at 456 Ocean View Blvd vs 123 North Main) rank lower—exactly what you want when deduping.
Final Thoughts
The new fuzzy string functions in SQL Server 2025 finally give T-SQL first-class similarity scoring. Whether you’re cleaning legacy data, merging customer lists, or building typo-tolerant features, you can now do it natively, efficiently, and with the granularity you always wanted.
Welcome back! In this second part of my two-part series covering the new Change Event Streaming (CES) feature in SQL Server 2025, I’ll show you how to consume events generated by CES. In Part 1, we provisioned an Azure event hub, generated a SAS token to access the event hub, created the CesDemo sample database, and enabled Change Event Streaming (CES) on the database. We then added tables to an event stream group with deliberate choices for @include_old_values and @include_all_columns. So at this point, CES is now emitting DML changes (inserts, updates, and deletes) from those tables into the event hub.
Note: This post is based on SQL Server 2025 CTP 2.1. Syntax and behavior are subject to subtle changes by the time the product is released. Change Event Streaming (CES) will ultimately be supported across all SKUs of SQL Server, including SQL Server 2025 for Windows, SQL Server 2025 for Linux, Azure SQL Database, and Managed Instance.
Now we’re ready to build a client application to consume generated events. But before we start coding, let’s establish some context so the steps make sense.
First, CES merely writes into Event Hubs. It doesn’t know (or care) who’s listening. It’s up to your client application(s) to subsequently consume those events. Our sample C# application will use the Event Hubs client SDK (specifically, EventProcessorClient) to listen for events.
Every CES client needs somewhere to record progress, as it processes events. This is called a checkpoint, which works like a “bookmark”. Using checkpoints, client applications can stop and later resume where they left off, and not reprocess events that have already been processed. The SDK uses Azure Blob Storage for this purpose.
You’ll also encounter the term consumer group. Think of a consumer group as a “view” of the stream with its own checkpoint. By utilizing multiple consumer groups (one per client application), each application can maintain its own checkpoint for bookmarking its place in the event stream. The Basic tier allows for only one consumer group. Moving to (and paying for) a higher tier than Basic will allow you to manage multiple client applications that consume events simultaneously from the same event hub, each at their own pace, without stepping on each other.
Create a Blob Storage Container
You’ll need a blob container in Azure Storage so that the Event Hubs client SDK can manage checkpoints for your consumer groups.
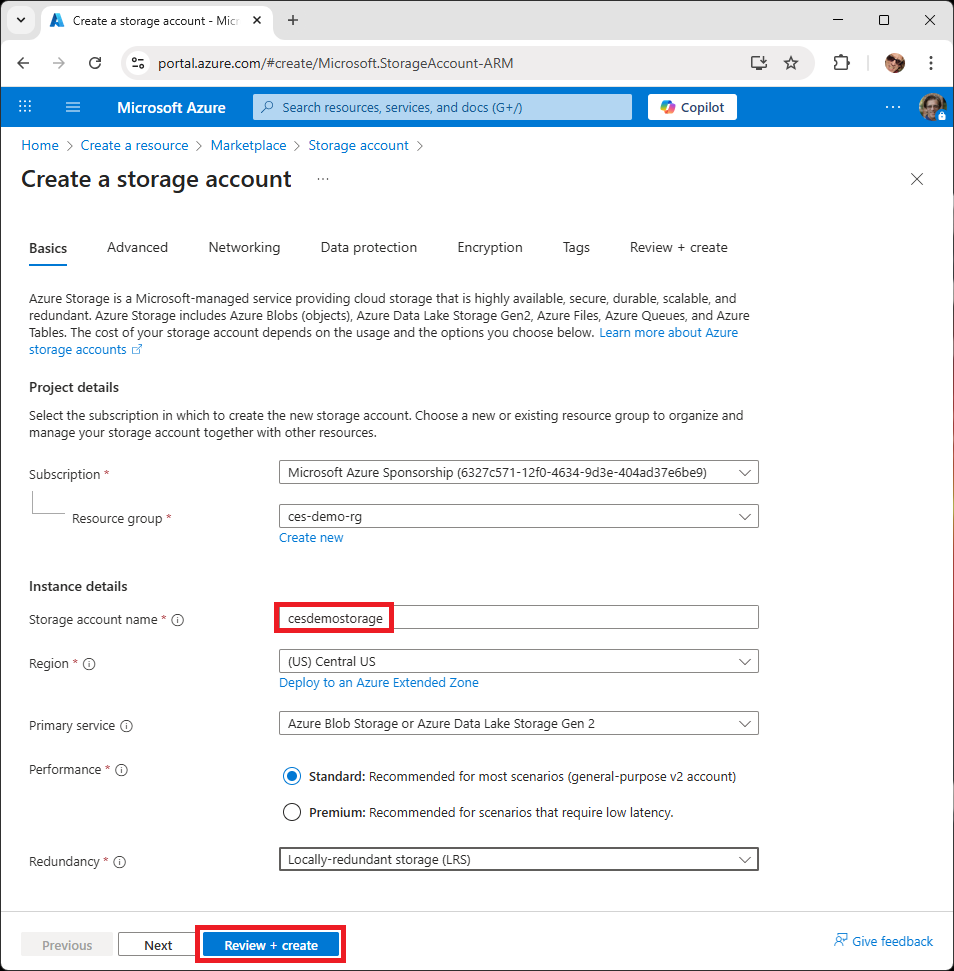
Create a Storage Account
A blob container lives within a storage account. To create a new storage account:
In the Azure portal, create a new resource.
From the Marketplace, create a new Storage Account resource.
Provide a name for a new storage account in either a new or existing resource group (dashes not permitted).
For the Primary service, choose Azure Blob Storage or Azure Data Lake Storage Gen 2.
For Redundancy, choose Locally-redundant storage (LRS) (sufficient for development and testing).
Click Review + create, and then Create.
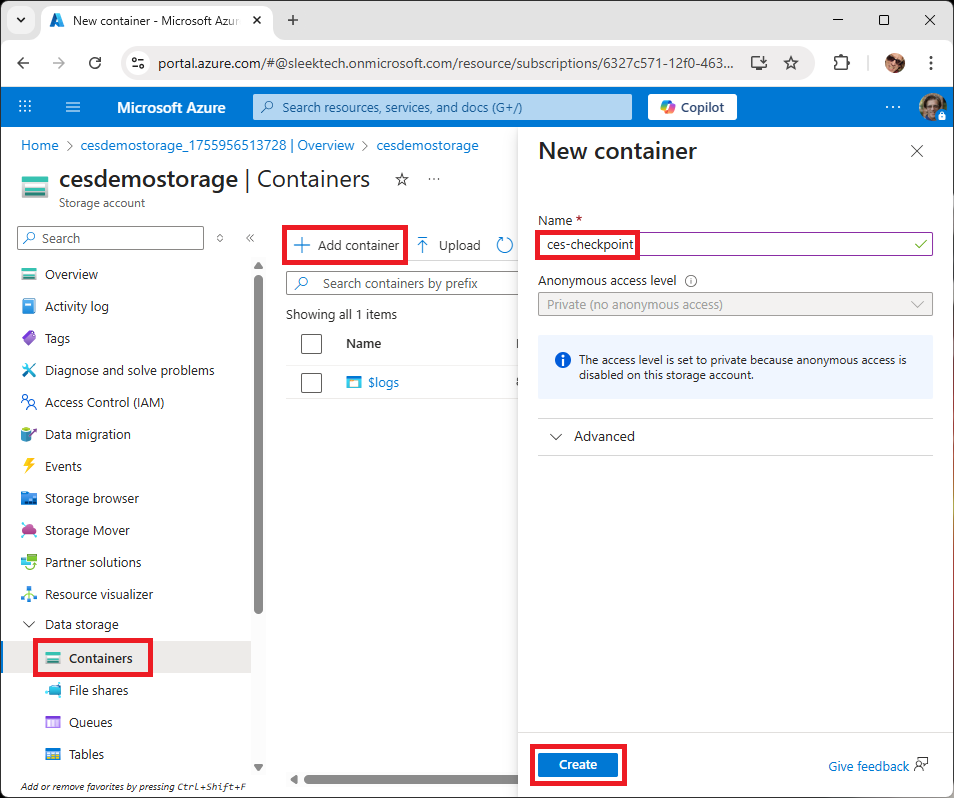
Create a Blob Container
Now you can create a new blob container within the new storage account:
Under Data Storage on the left, click Containers.
Click + Add container.
Provide a name for the new container.
Click Create.
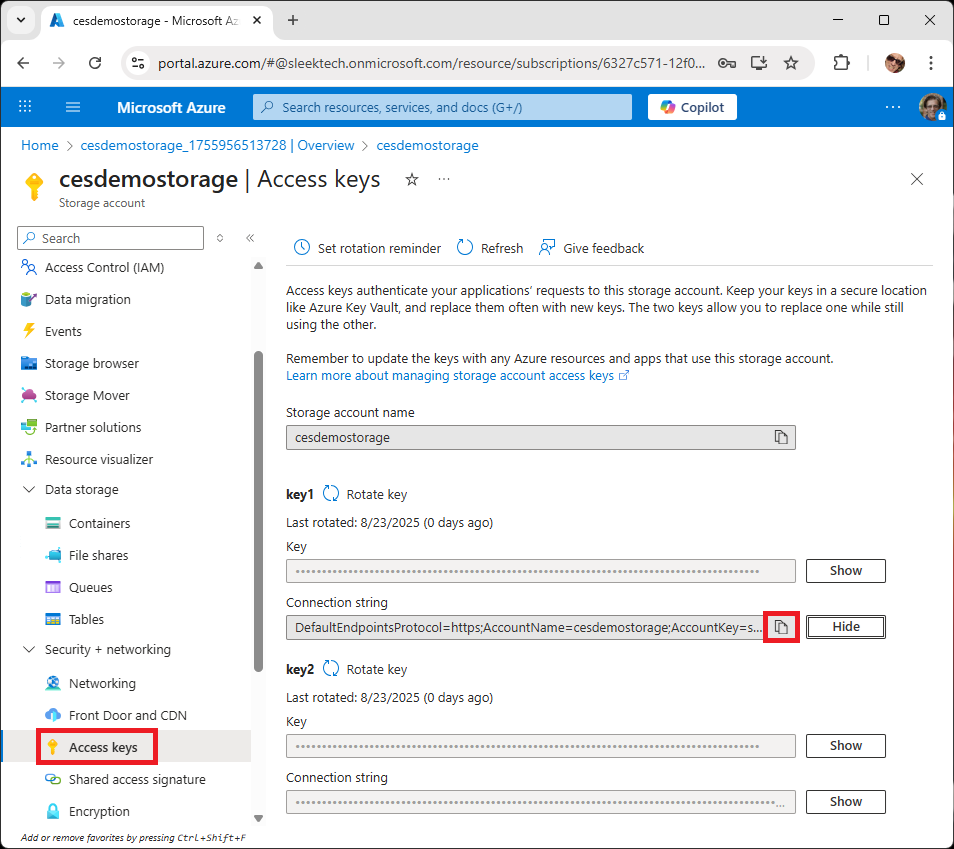
Now get the connection string for the storage account:
Under Security + Networking on the left, click Access Keys.
Click Show under the Connection String for key1.
Click the Copy icon to copy the connection string to the clipboard.
Paste the connection string into Notepad; it will be needed for the client application configuration.
Create the Visual Studio Project
Alright, we’re ready to roll. We’ll build our consumer client as a simple console app, keeping the the focus on wiring up the stream, deserializing events, and showing what’s happening.
Note: CES consumers can also be built with Azure Functions (I’ll cover that in a later post). Azure Functions hide much of the boilerplate with an Event Hubs trigger, run serverlessly, and scale out automatically. In contrast, building a client “manually” as we’re doing here, gives you maximum control over connection behavior, batching, retry policies, and diagnostics.
Let’s get started!
Launch Visual Studio 2022. Then select Create a new project and choose Console App (C#). Name the project CESClient, click Next, and then click Create.
Install NuGet Packages
First, we’ll need three NuGet packages to support our application. Right-click the CESClient project and choose Manage NuGet Packages. Click the Browse tab, and then locate and install the following packages:
Azure.Messaging.EventHubs.Processor
Includes the Event Hubs client and processor, as well as Azure Blob Storage for checkpoint support.
Microsoft.Extensions.Configuration.Json
Supports external configuration in appsettings.json rather than using hard-coded configuration.
Newtonsoft.Json
Allows us to deserialize the CloudEvent payload received from the event hub, which is supplied as JSON.
Add a Configuration File
Now create the appsettings.json file where we’ll keep our configuration. This includes connection details and secrets (SAS token, Blob connection string).
For the EventHub property, note the HostName property specifies our event hub namespace name ces-namespace as the host name prefix, the Name property specifies our event hub name ces-hub, and the SasToken property holds the SAS token generated for accessing the event hub. All three of these values were established during setup and configuration in Part 1.
For the BlobStorage property, paste in values for the ConnectionString and ContainerName for the Azure Storage blob container that you just created.
To ensure this file gets copied to the output directory when we build the project, click appsettings.json in the Solution Explorer panel. Then, in the Properties panel set Copy to Output Directory to Copy if newer.
Add the Code
Now supply the following code in Program.cs:
using Azure;
using Azure.Messaging.EventHubs;
using Azure.Messaging.EventHubs.Processor;
using Azure.Messaging.EventHubs.Consumer;
using Azure.Storage.Blobs;
using Microsoft.Extensions.Configuration;
using System;
using System.Collections.Generic;
using System.IO;
using System.Text.Json;
using System.Threading.Tasks;

namespace CESClient
{
  public class Program
  {
    private static int _eventCount;

    // Add methods here

  }
}
This imports all the namespaces we’ll be referencing and defines a private field as a simple event counter that we’ll increment with each received event.
Next plug in the Main method:
public static async Task Main(string[] args)
{
  // Say hello
  Console.WriteLine("SQL Server 2025 Change Event Streaming Client");
  Console.WriteLine();
  Console.Write("Initializing... ");

  // Load configuration from appsettings.json
  var config = new ConfigurationBuilder()
      .SetBasePath(Directory.GetCurrentDirectory())
      .AddJsonFile("appsettings.json", optional: false, reloadOnChange: true)
      .Build();

  // Create a blob container client that the event processor will use for checkpointing
  var blobStorageConnectionString = config["BlobStorage:ConnectionString"];
  var blobStorageContainerName = config["BlobStorage:ContainerName"];

  var storageClient = new BlobContainerClient(blobStorageConnectionString, blobStorageContainerName);

  // Create an event processor client to process events in the event hub
  var eventHubHostName = config["EventHub:HostName"];
  var eventHubName = config["EventHub:Name"];
  var sasToken = config["EventHub:SasToken"];

  var processor = new EventProcessorClient(
      storageClient,                                        // checkpoint store
      EventHubConsumerClient.DefaultConsumerGroupName,      // Basic tier: one consumer group (e.g., $Default)
      eventHubHostName,
      eventHubName,
      new AzureSasCredential(sasToken)
  );

  // Register handlers for processing events and errors
  processor.ProcessEventAsync += ProcessEventHandler;
  processor.ProcessErrorAsync += ProcessErrorHandler;

  // Start listening for events
  Console.Write("starting... ");
  _eventCount = 0;

  await processor.StartProcessingAsync();

  Console.WriteLine("waiting... press any key to stop.");
  Console.ReadKey(intercept: true);

  // Stop listening for events
  await processor.StopProcessingAsync();

  Console.WriteLine("Stopped");
}
This code loads the configuration from appsettings.json, creates the blob container client (for saving checkpoints), spins up the Event Hubs processor with the default consumer group, and attaches handlers for processing events and errors. Finally, it starts and stops cleanly when the user presses any key.
Process Events
Now add the ProcessEventHandler method. This method first parses the outer CloudEvent envelope, then the inner payload, prints helpful metadata, and routes to the insert/update/delete handlers. Finally (and critically), it updates the checkpoint so restarts will resume from the next event. (I explain the CloudEvent payload structure in Part 1.)
private static async Task ProcessEventHandler(ProcessEventArgs eventArgs)
{
  try
  {
    // Deserialize the event data
    using var doc = JsonDocument.Parse(eventArgs.Data.Body.ToArray());
    var root = doc.RootElement;
    var dataJson = root.GetProperty("data");

    using var innerDoc = JsonDocument.Parse(dataJson.GetString());
    var data = innerDoc.RootElement;

    Console.WriteLine($"Processing event... #{++_eventCount}");

    // Deserialize the "current" and "old" fields in the eventrow property of the event data to dictionaries
    var operation = root.GetProperty("operation").GetString();
    var cols = data.GetProperty("eventsource").GetProperty("cols").EnumerateArray();
    var current = JsonSerializer.Deserialize<Dictionary<string, string>>(data.GetProperty("eventrow").GetProperty("current").GetString());
    var old = JsonSerializer.Deserialize<Dictionary<string, string>>(data.GetProperty("eventrow").GetProperty("old").GetString());

    DisplayEventMetadata(eventArgs, root, data);

    switch (operation)
    {
      case "INS":
        ProcessInsert(cols, current);
        break;
      case "UPD":
        ProcessUpdate(cols, current, old);
        break;
      case "DEL":
        ProcessDelete(cols, old);
        break;
    }

    Console.WriteLine();
    Console.WriteLine(new string('-', 80));
    Console.WriteLine();

    // Persist progress so we don't reprocess this event on restart
    await eventArgs.UpdateCheckpointAsync();
  }
  catch (Exception ex)
  {
    Console.ForegroundColor = ConsoleColor.Red;
    Console.WriteLine(ex.Message);
    Console.ResetColor();
  }
}
Display Event Metadata
This method renders a quick “context dump” for each event: it first prints the sequence number and offset from ProcessEventArgs so you can pinpoint the event’s exact position within the event hub (useful for ordering and replay). It then surfaces key CloudEvent fields from the outer envelope; spec/version, the event type, the DML operation (INS, UPD, DEL), timestamp, unique ID, logical ID, and the data content type. Finally, it drills into the inner CES payload to show the database, schema, and table that produced the event. Together, these details make it easy to correlate what you’re seeing in the console with the emitting source and to troubleshoot issues like unexpected operations or schema mismatches.
For inserts, a full “after” image is easiest to read and is a quick way to validate the @include_all_columns setting we established in Part 1.
private static void ProcessInsert(JsonElement.ArrayEnumerator cols, Dictionary<string, string> current)
{
  Console.WriteLine("Operation: Insert");
  Console.ForegroundColor = ConsoleColor.Green;

  foreach (var col in cols)
  {
    var name = col.GetProperty("name").GetString();
    Console.WriteLine($"\t{name}: {current[name]}");
  }

  Console.ResetColor();
}
Handle Updates
For tables where we’ve enabled @include_old_values in Part 1, you’ll get a great side-by-side view; otherwise you’ll just see the “after” image.
private static void ProcessUpdate(JsonElement.ArrayEnumerator cols, Dictionary<string, string> current, Dictionary<string, string> old)
{
  Console.WriteLine("Operation: Update");

  foreach (var col in cols)
  {
    var name = col.GetProperty("name").GetString();

    if (old.Count > 0 && current[name] != old[name])
    {
      Console.ForegroundColor = ConsoleColor.Yellow;
      Console.WriteLine($"\t{name}: {current[name]} (old: {old[name]})");
      Console.ResetColor();
    }
    else
    {
      Console.WriteLine($"\t{name}: {current[name]}");
    }
  }
}
Handle Deletes
Deletes only have the “before” image, which are useful for auditing and reconciliation purposes.
private static void ProcessDelete(JsonElement.ArrayEnumerator cols, Dictionary<string, string> old)
{
  Console.WriteLine("Operation: Delete");
  Console.ForegroundColor = ConsoleColor.Red;

  foreach (var col in cols)
  {
    var name = col.GetProperty("name").GetString();
    Console.WriteLine($"\t{name}: {old[name]}");
  }

  Console.ResetColor();
}
Process Errors
Finally, we need to tolerate errors without crashing the application. Should an error occur, this method displays the exception details. Of course, a real-world scenario would require proper error handling; for example, saving the event details to a queue for automatic retry or manual intervention.
The moment of truth is here! Go ahead and run the application. The client console window should open, and you should see:
SQL Server 2025 Change Event Streaming Client
Initializing... starting... waiting... press any key to stop.
If errors appear, double-check configuration values and NuGet package installs.
Generate and Monitor Change Events
Let’s exercise inserts, updates, deletes, as well as trigger-driven changes, based on the database schema we setup in Part 1. This will allow us to observe the events being captured in real-time, and examine the CloudEvent payloads as we receive them.
Start SSMS and open a query window to the CesDemo database. Then tile the SSMS and client console windows side-by-side. This way, you can examine the events in the client console window as you generate them from the SSMS window.
Create an Order
In SSMS, run the stored procedure to create a new order:
EXEC CreateOrder @CustomerId = 1
In the client console window, you should observe an INS event for the Order table.
Expect two corresponding INS events for OrderDetail. And because the OrderDetail trigger adjusts Product.ItemsInStock, also expect UPD events for Product reflecting stock decrements (2 for product 1; 1 for product 2).
Delete an Order
Now call the stored procedure that deletes an entire order, along with the order details.
EXEC DeleteOrder @OrderId = 1
Expect DEL events for the order and its details, and UPD events for Product as stock is restored.
Update a Customer
Now change a customer’s city to Chicago:
UPDATE Customer SET City = 'Chicago' WHERE CustomerId = 1
Expect a UPD event for Customer. Recall that in Part 1, we chose not to include old values for this table, so you’ll see only the “after” values.
Bulk Update Products
Let’s apply a 20% discount on the price of all cameras:
UPDATE Product SET UnitPrice = UnitPrice * 0.8 WHERE Category = 'Camera'
Expect UPD events for each matching row. In Part 1, we included old values and only changed columns for Product, so you’ll see the old and new UnitPrice (and the primary key, which is always included).
Update a Table Without a Primary Key
This last example demonstrates the need for always having a primary key defined on a table:
UPDATE TableWithNoPK SET ItemName = 'Stove' WHERE Id = 3
Expect a UPD event without key columns. So you’ll see that an item name was changed to Stove in some row, but you won’t know which row, rendering this event data as useless information.
Conclusion
That’s a wrap! In this two-part blog post series, you have successfully built out an end-to-end CES pipeline. First you configured SQL Server 2025 to stream changes into Azure Event Hubs with the appropriate SAS credential, event stream group, and table settings. Then you built a C# consumer that reads the CloudEvent-wrapped payloads and uses Azure Blob Storage for checkpoints. Our demo ran with the default consumer group (Basic tier) for a single application, but higher tiers support multiple groups for multiple independent clients. You now have a clean, real-time path from database changes to actionable events!
Change Event Streaming (CES) is one of the most exciting new features coming in SQL Server 2025. It allows you to continuously stream row-level changes from your tables directly into Azure Event Hubs, where multiple consumer applications can subscribe to the event data in real time.
Note: This post is based on SQL Server 2025 CTP 2.1. Syntax and behavior are subject to subtle changes by the time the product is released. Change Event Streaming (CES) will ultimately be supported across all SKUs of SQL Server, including SQL Server 2025 for Windows, SQL Server 2025 for Linux, Azure SQL Database, and Managed Instance.
In this two-part series, I’ll show you how to set up and configure CES (Part 1), and then how to build a consumer application to process the streamed changes (Part 2).
Let’s dive in!
Step 1: Create an Event Hub
Before SQL Server can stream changes, you need a target destination. CES is designed to stream directly into Azure Event Hubs.
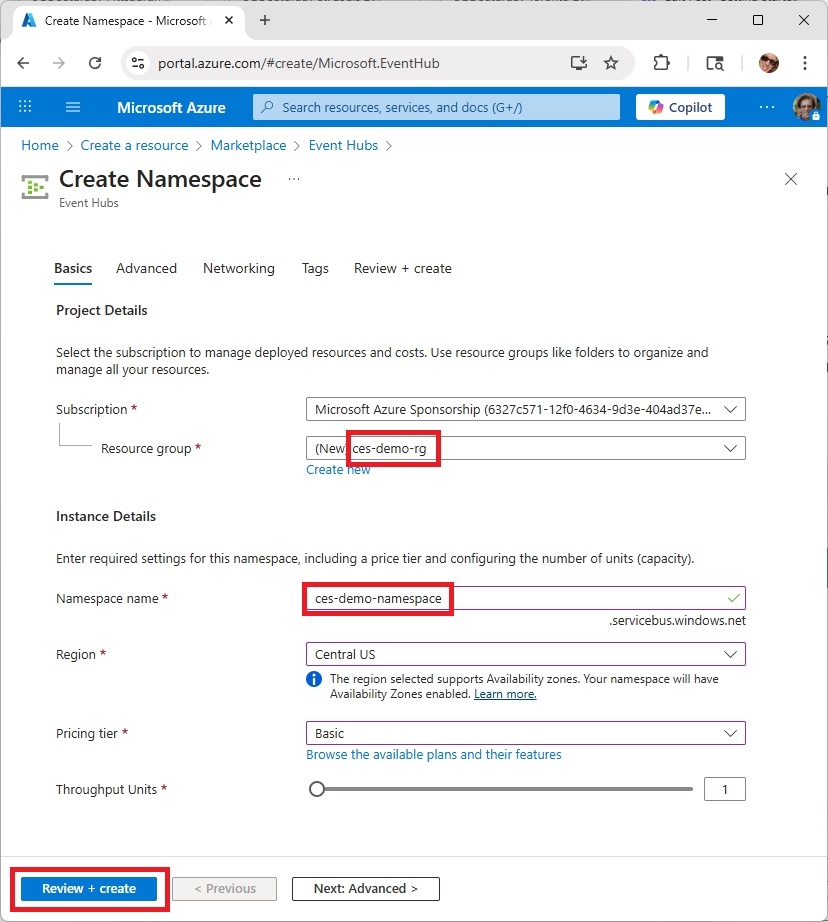
Create an Event Hub Namespace
An event hub lives within an event namespace. To create a new event hub namespace:
In the Azure portal, create a new resource.
From the Marketplace, create a new Event Hubs resource.
Provide a name for a new Event Hubs namespace in either a new or existing resource group.
Choose the Basic pricing tier with 1 throughput unit (sufficient for development and testing).
Click Review + create, and then Create.
Create an Event Hub
Now you can create a new event hub within the new event hub namespace:
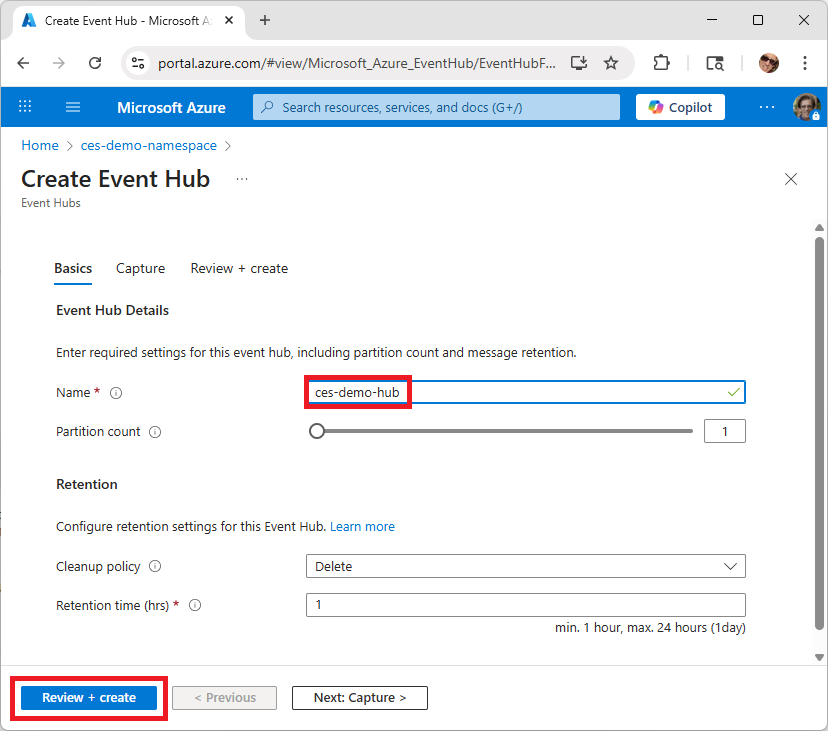
On the namespace Overview page, click + Event Hub.
Provide a name for the new event hub, and leave all other options at their default settings.
Click Review + create, and then Create.
Create an Event Hub Policy
Now create a policy that allows managing the event hub:
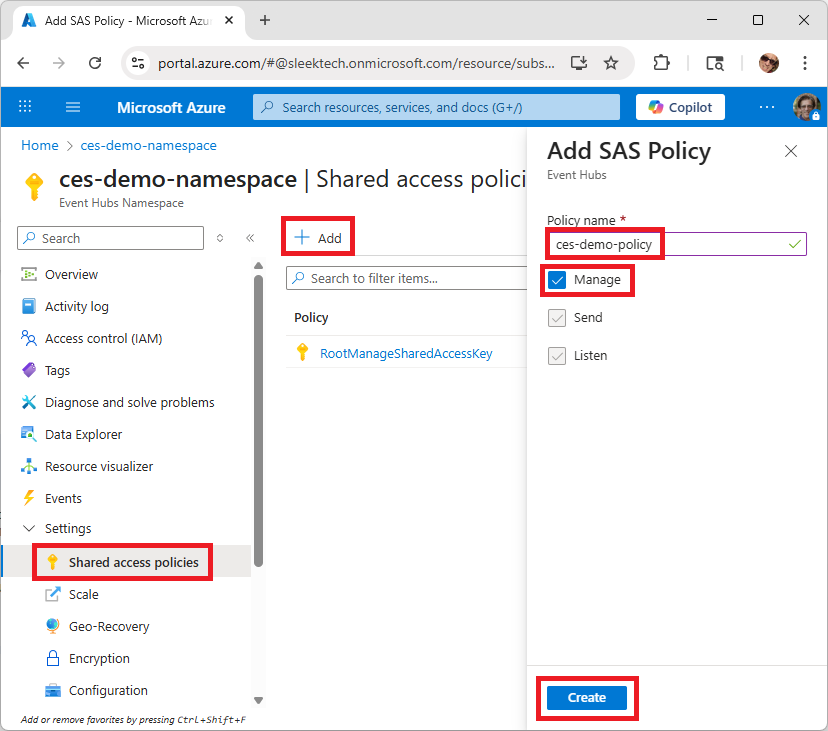
Under Settings on the left, click Shared Access Policies.
Click + Add to create a new policy.
Provide a name for the policy.
Check Manage (which automatically includes Send and Listen).
Click Create.
Generate a SAS Token
Finally, you’ll need a Shared Access Signature (SAS) token for SQL Server and other clients to authenticate against the Event Hub. Unfortunately, the Azure portal does not provide a GUI for generating SAS tokens for Event Hub, so you must generate one programmatically using PowerShell, Azure CLI, or the Azure SDK. In this walkthrough, we’ll use PowerShell.
Install PowerShell Modules
Run PowerShell as an administrator and install the necessary modules.
Note: You only need to install these modules once on a machine. If you’ve already installed them previously, you can skip this step.
# Install the general Azure cmdlets (this can take up to 20 minutes)
Install-Module -Name Az -Scope CurrentUser -Repository PSGallery -Force

# Install the Event Hub module (runs quickly)
Install-Module -Name Az.EventHub -Scope CurrentUser -Force
function Generate-SasToken {

    # Provide values for the following resources:
    $resourceGroupName  = "ces-demo-rg"
    $namespaceName      = "ces-namespace"
    $eventHubName       = "ces-hub"
    $policyName         = "ces-policy"

    # Login to Azure and select the Azure Subscription
    Connect-AzAccount -InformationAction SilentlyContinue | Out-Null

    # Validate the existence of the specified resource group, event hub namespace, and event hub
    Get-AzResourceGroup -Name $resourceGroupName -ErrorAction Stop | Out-Null
    Get-AzEventHubNamespace -ResourceGroupName $resourceGroupName -Name $namespaceName -ErrorAction Stop | Out-Null
    Get-AzEventHub -ResourceGroupName $resourceGroupName -NamespaceName $namespaceName -Name $eventHubName -ErrorAction Stop | Out-Null

    # Get the event hub authorization policy (it must have Manage rights)
    $policy = Get-AzEventHubAuthorizationRule -ResourceGroupName $resourceGroupName -NamespaceName $namespaceName -EventHubName $eventHubName -AuthorizationRuleName $policyName -ErrorAction SilentlyContinue

    if (-not ("Manage" -in $policy.Rights)) {
        throw "Authorization rule '$policyName' does not exist, or is missing the required 'Manage' right"
    }

    # Get the Primary Key of the Shared Access Policy
    $keys = Get-AzEventHubKey -ResourceGroupName $resourceGroupName -NamespaceName $namespaceName -EventHubName $eventHubName -AuthorizationRuleName $policyName

    if (-not $keys) {
        throw "Could not obtain Azure Event Hub Key"
    }

    if (-not $keys.PrimaryKey) {
        throw "Could not obtain Primary Key"
    }

    $primaryKey = ($keys.PrimaryKey)

    # Define a function to create the SAS token
    function Create-SasToken {
        param ([string]$resourceUri, [string]$keyName, [string]$key)

        $sinceEpoch = [datetime]::UtcNow - [datetime]"1970-01-01"
        $expiry = [int]$sinceEpoch.TotalSeconds + (60 * 60 * 24 * 31 * 6)  # 6 months
        $stringToSign = [System.Web.HttpUtility]::UrlEncode($resourceUri) + "`n" + $expiry
        $hmac = New-Object System.Security.Cryptography.HMACSHA256
        $hmac.Key = [Text.Encoding]::UTF8.GetBytes($key)
        $signature = [Convert]::ToBase64String($hmac.ComputeHash([Text.Encoding]::UTF8.GetBytes($stringToSign)))
        $sasToken = "SharedAccessSignature sr=$([System.Web.HttpUtility]::UrlEncode($resourceUri))&sig=$([System.Web.HttpUtility]::UrlEncode($signature))&se=$expiry&skn=$keyName"

        return $sasToken
    }

    # Construct the resource URI for the SAS token
    $resourceUri = "https://$namespaceName.servicebus.windows.net/$eventHubName"

    # Generate the SAS token using the primary key from the new policy
    $sasToken = Create-SasToken -resourceUri $resourceUri -keyName $policyName -key $primaryKey

    # Output the SAS token
    Write-Host "`n-- Generated SAS Token --" -ForegroundColor Gray
    Write-Host $sasToken -ForegroundColor White
    Write-Host "-- End of generated SAS Token --`n" -ForegroundColor Gray

    # Copy the SAS token to the clipboard
    $sasToken | Set-Clipboard
    Write-Host "The generated SAS token has been copied to the clipboard." -ForegroundColor Green
}

Generate-SasToken
At the top of the script (lines 4 through 7), fill in the values for your resource group, namespace, event hub, and policy. Also, the script generates a token that expires after 6 months. To adjust the expiration, edit the $expiry assignment on line 42.
Run the Script
Before you can execute the script, you must allow PowerShell to run local scripts:
Set-ExecutionPolicy -Scope Process -ExecutionPolicy Bypass
When prompted for confirmation, type A (for “Yes to All”) and press Enter.
Now run the script:
.\Generate-SasToken.ps1
You’ll be prompted to log in to your Microsoft account and select your Azure subscription. The script will then generate the SAS token and display it between the lines:
-- Generated SAS Token --
<your SAS token>
-- End of generated SAS Token --
The script also copies the generated SAS token to the clipboard so that you can paste it into Notepad. You’ll need it later when configuring SQL Server to stream events to Event Hubs, and then again (Part 2) when configuring your consumer applications that subsequently read those events from Event Hubs.
Step 2: Create the Demo Database
We’ll use a small sample database to demonstrate CES. Run this script in SSMS to create the database:
-- Create the demo database
USE master
GO

CREATE DATABASE CesDemo
GO

USE CesDemo
GO

-- Create some demo tables
CREATE TABLE Customer (
  CustomerId    int IDENTITY PRIMARY KEY,
  CustomerName  varchar(50),
  City          varchar(20)
)
GO

SET IDENTITY_INSERT Customer ON
INSERT INTO Customer
  (CustomerId,  CustomerName,               City) VALUES
  (1,           'Shutter Bros Wholesale',   'New York'),
  (2,           'Aperture Supply Co.',      'Los Angeles')
SET IDENTITY_INSERT Customer OFF

CREATE TABLE Product (
  ProductId     int IDENTITY PRIMARY KEY,
  Name          varchar(80),
  Color         varchar(15),
  Category      varchar(20),
  UnitPrice     decimal(8, 2),
  ItemsInStock  smallint
)
GO

SET IDENTITY_INSERT Product ON
INSERT INTO Product
  (ProductId, Name,                                  Color,     Category,       UnitPrice,  ItemsInStock) VALUES
  (1,         'Canon EOS R5 Mirrorless Camera',      'Black',   'Camera',       3899.99,    10),
  (2,         'Nikon Z6 II Mirrorless Camera',       'Silver',  'Camera',       1996.95,    8),
  (3,         'Sony NP-FZ100 Rechargeable Battery',  'Black',   'Accessory',    78.00,      25)
SET IDENTITY_INSERT Product OFF

CREATE TABLE [Order] (
  OrderId       int IDENTITY PRIMARY KEY,
  CustomerId    int REFERENCES Customer(CustomerId),
  OrderDate     datetime2
)
GO

CREATE TABLE OrderDetail (
  OrderDetailId int IDENTITY PRIMARY KEY,
  OrderId       int REFERENCES [Order](OrderId),
  ProductId     int REFERENCES Product(ProductId),
  Quantity      smallint
)
GO

-- This table lacks Primary Key. Combining that with IncludeAllColumns = 0 results in events that
-- have no primary key, which is essentially useless
CREATE TABLE TableWithNoPK (
  Id        int IDENTITY,
  ItemName  varchar(50)
)
GO

INSERT INTO TableWithNoPK (ItemName) VALUES
  ('Camera'),
  ('Automobile'),
  ('Oven'),
  ('Couch')
GO

-- Create a DML trigger on OrderDetail that updates the ItemsInStock column in the Product table
-- based on the Quantity column in the OrderDetail table
CREATE TRIGGER trgUpdateItemsInStock ON OrderDetail AFTER INSERT, UPDATE, DELETE
AS
BEGIN
  -- Handle insert
  IF EXISTS (SELECT * FROM inserted) AND NOT EXISTS (SELECT * FROM deleted)
    UPDATE Product
    SET ItemsInStock = p.ItemsInStock - i.Quantity
    FROM
      Product AS p
      INNER JOIN inserted AS i ON p.ProductId = i.ProductId

  -- Handle update
  ELSE IF EXISTS (SELECT * FROM inserted) AND EXISTS (SELECT * FROM deleted) AND UPDATE(Quantity)
    UPDATE Product
    SET ItemsInStock = p.ItemsInStock + d.Quantity - i.Quantity
    FROM
      Product AS p
      INNER JOIN inserted AS i ON p.ProductId = i.ProductId
      INNER JOIN deleted AS d ON p.ProductId = d.ProductId

  -- Handle delete
  ELSE IF EXISTS (SELECT * FROM deleted) AND NOT EXISTS (SELECT * FROM inserted)
    UPDATE Product
    SET ItemsInStock = p.ItemsInStock + d.Quantity
    FROM
      Product AS p
      INNER JOIN deleted AS d ON p.ProductId = d.ProductId
END
GO

-- Add some procs to handle orders
CREATE OR ALTER PROC CreateOrder
  @CustomerId int
AS
BEGIN
  INSERT INTO [Order](CustomerId, OrderDate)
  VALUES (@CustomerId, SYSDATETIME())

  SELECT OrderId = SCOPE_IDENTITY()
END
GO

CREATE OR ALTER PROC CreateOrderDetail
  @OrderId int,
  @ProductId int,
  @Quantity smallint
AS
BEGIN
  INSERT INTO OrderDetail (OrderId, ProductId, Quantity)
  VALUES (@OrderId, @ProductId, @Quantity)

  SELECT OrderDetailId = SCOPE_IDENTITY()
END
GO

CREATE OR ALTER PROC DeleteOrder
  @OrderId int
AS
BEGIN
  BEGIN TRANSACTION
    DELETE FROM OrderDetail WHERE OrderId = @OrderId
    DELETE FROM [Order] WHERE OrderId = @OrderId
  COMMIT TRANSACTION
END
GO
This database includes:
Customer, Order, OrderDetail, and Product tables
Stored procedures for inserting/deleting rows in the Order and OrderDetail tables.
A trigger on OrderDetail that updates inventory in Product. This is to demonstrate that CES also streams changes to tables that are updated by triggers, not just changes to tables that you issue direct DML statements on.
A TableWithNoPK to illustrate why tables without primary keys can be problematic when used with CES.
Step 3: Configure CES
With the Event Hub and database ready, let’s enable CES.
Create a Database Master Key
You need to store the SAS token in SQL Server as a database scoped credential, and that requires creating a password-protected database master key first so that SQL Server encrypt that SAS token credential.
CREATE MASTER KEY ENCRYPTION BY PASSWORD = 'H@rd2Gue$$P@$$w0rd'
Create a Database Scoped Credential
To store the SAS token securely in SQL Server, run the following statement (paste the SAS token you copied to Notepad into the SECRET parameter—keep the entire string intact).
CREATE DATABASE SCOPED CREDENTIAL SqlCesCredential
WITH
  IDENTITY = 'SHARED ACCESS SIGNATURE',
  SECRET = '<your SAS token>'
Enable CES for the Database
Execute this T-SQL to enable CES for the current database:
EXEC sys.sp_enable_event_stream
Now verify that CES is enabled:
SELECT * FROM sys.databases WHERE is_event_stream_enabled = 1
Create an Event Stream Group
An event stream group defines the Event Hub target for your events. Be sure to provide the correct values for your event hub namespace and event hub names in the @destination_location parameter:
Decide whether to include old values and whether to include all columns. Each table in our demo uses different settings for different reasons; old values and all values are included when we need that extra context, and they are excluded in favor of reduced bandwidth for smaller event payloads when we don’t.
-- Customer: full row in each event, no old values
EXEC sys.sp_add_object_to_event_stream_group
  @stream_group_name = 'SqlCesGroup',
  @object_name = 'dbo.Customer',
  @include_old_values = 0,      -- do not include old values on updates/deletes
  @include_all_columns = 1      -- include all columns even if unchanged

-- Product: only changed columns, include old values (important for inventory diffs)
EXEC sys.sp_add_object_to_event_stream_group
  @stream_group_name = 'SqlCesGroup',
  @object_name = 'dbo.Product',
  @include_old_values = 1,      -- include old values for changed columns
  @include_all_columns = 0      -- only include changed columns

-- Order: only changed columns, include old values (for auditing changes)
EXEC sys.sp_add_object_to_event_stream_group
  @stream_group_name = 'SqlCesGroup',
  @object_name = 'dbo.Order',
  @include_old_values = 1,      -- include old values for changed columns
  @include_all_columns = 0      -- only include changed columns

-- OrderDetail: only changed columns, include old values (quantity updates matter)
EXEC sys.sp_add_object_to_event_stream_group
  @stream_group_name = 'SqlCesGroup',
  @object_name = 'dbo.OrderDetail',
  @include_old_values = 1,      -- include old values for changed columns
  @include_all_columns = 0      -- only include changed columns

-- TableWithNoPK: demonstrates CES limitations without a primary key
EXEC sys.sp_add_object_to_event_stream_group
  @stream_group_name = 'SqlCesGroup',
  @object_name = 'dbo.TableWithNoPK',
  @include_old_values = 0,      -- no old values
  @include_all_columns = 0      -- changed columns only (essentially useless without a PK)
Customer: All columns included for upsert scenarios. Old values aren’t important here.
Product: Old values are essential to calculate stock and pricing diffs.
Order: Old values matter for audit.
OrderDetail: Old and new quantities are needed for downstream stock adjustments.
TableWithNoPK: Included as a demo; in real-world scenarios, CES requires a primary key to make the events useful.
Verify CES on Each Table
Run the following statements to confirm that CES is enabled on all the tables you just added to the event stream group, and to view the associated CES metadata associated with each table:
At this point, CES is fully configured! From here on out, all changes to these tables will be streamed to your Event Hub, where they can be consumed by multiple clients in real-time. Specifically, each event is generated and streamed as a CloudEvent with the following JSON structure:
In this sample, the operation property is UPD, indicating an UPDATE operation on a table. Also notice that there is nested JSON contained in the data property, which you can unpack to get the necessary details of each DML operation:
Here, the eventsource property describes the database, schema, table, columns, primary key, and transaction for the event. And the eventrow property is yet another nested level of JSON within the CloudEvent which provides the actual column values affected by the event as a collection of key/value pairs.
In Part 2, we’ll build a consumer application that listens for events, unpackages the CloudEvent payload, and processes them in real time.
Retrieval-Augmented Generation (RAG) is a compelling architectural pattern for solving a core limitation of large language models (LLMs): their inability to access or reason over your private, domain-specific data. By combining vector search with generative models, RAG enables systems that are both highly accurate and context-aware.
In this post, I’ll walk through the architecture and implementation of a custom RAG solution I built, which integrates Azure OpenAI with a variety of backend databases. It’s designed to be flexible, modular, and production-oriented — and the entire solution is available on GitHub.
Choosing a Domain
To showcase the solution, I selected a domain that’s both approachable and semantically rich: movies. A movie recommendation system makes it easy to demonstrate natural language interaction, embeddings, and similarity search — all in a context most users intuitively understand.
This scenario allows the RAG pattern to shine, enabling queries like:
What are some underrated 90s sci-fi thrillers?
Which movies are similar to Inception but more light-hearted?
Suggest romantic comedies with a time travel twist.
Although the solution uses movies as a demonstration, it was built with extensibility in mind. You’re not limited to the movies dataset — the architecture fully supports plugging in your own domain.
Multi-Backend Architecture
One of the key goals was to design a solution that works across multiple data platforms. Rather than locking into a single backend, I built the system with a provider-based architecture. Each provider handles vector storage and similarity search using the most appropriate method for its platform, while the rest of the pipeline remains consistent.
Currently supported providers include:
SQL Server 2022
SQL Server 2025 (Private Preview)
Azure SQL Database
Azure SQL Database with native vector support (Public Preview)
Azure Cosmos DB for NoSQL
Azure Cosmos DB for MongoDB vCore
This design makes it straightforward to introduce additional platforms in the future.
A Look at the RAG Flow
Here’s how the end-to-end process works in practice.
The system begins by loading a dataset of movies, either from a local file or from Azure Blob Storage. Each movie includes a title, plot, genres, and other metadata.
Once loaded, the data is vectorized using Azure OpenAI’s embedding API. Each movie is transformed into a high-dimensional vector that captures its semantic meaning. These vectors are stored using backend-specific formats — as float arrays in SQL Server, vector types in Azure SQL, or JSON arrays in Cosmos DB.
The system also supports incremental updates. If a movie is added or modified, only the affected entries are re-vectorized, ensuring data remains consistent without redundant processing.
When a user submits a natural language question — such as “What are some action movies with a strong female lead?” — the system generates an embedding for the question, then performs a similarity search to retrieve the most relevant movie vectors.
The top results are summarized into a context string and sent to the Azure OpenAI chat completion API along with the user’s question. The final output is a coherent, conversational response — often detailed, specific, and tailored to the original query.
Optionally, the system can also generate visual content (such as movie posters) using DALL·E, which adds a creative and engaging touch.
Implementation Details
The solution is organized into a set of .NET projects, each with a distinct responsibility:
Each provider implements the IVectorSearchProvider interface to encapsulate the mechanics of storing and querying vectors. This abstraction allows the rest of the system to remain unchanged regardless of backend.
Platform Examples
SQL Server 2022 stores vectors in columnstore tables, and calculates cosine similarity using a scalar T-SQL function.
SQL Server 2025 and Azure SQL Database use the new native vector type and VECTOR_DISTANCE function, and calls Azure OpenAI directly from T-SQL via sp_invoke_external_rest_endpoint.
Azure Cosmos DB for NoSQL stores vectors as JSON arrays indexed with advanced DiskANN indexing, and performs similarity search in C# using the native vector_distance function.
Azure Cosmos DB for MongoDB vCore utilizes IVF indexes to perform approximate nearest-neighbor search directly within queries.
This modularity ensures that every provider can take full advantage of its platform’s capabilities, without compromising the overall design.
Generating Responses
After retrieving the top vector matches, the system constructs a prompt for the chat model. It includes summaries of the retrieved movies and the original user question, like so:
You are a movie expert. Based on the following movies: • Inception – A skilled thief uses dream-sharing technology… • The Matrix – A hacker discovers reality is a simulation…
Answer the question: “What are some mind-bending action movies?”
The generated responses are surprisingly effective — often insightful, detailed, and well-structured.
Pick a backend provider, load the sample data, and run the console application. The configuration is simple — just supply your Azure OpenAI endpoint and API key.
From there, you can begin submitting natural language questions and observing the full RAG pipeline in action.
Adapting the Solution to Your Own Data
To do this, use the Rag.AIClient.Engine.Custom project. It allows you to define your own entity type and implement the IRagClientCustom<T> interface. This gives you full control over how your data is loaded, how embeddings are generated, and how content is summarized before generating a final response.
Whether your use case involves legal case summaries, internal documentation, product descriptions, or support tickets, the engine remains unchanged. You only need to define how your domain data integrates into the pipeline.
This makes the solution ideal for enterprise scenarios, where RAG can be applied to internal knowledge bases, operational data, or other proprietary content.
What’s Next
There are several directions I’d like to explore next — including hybrid search, document chunking for large entries, and support for follow-up questions and conversation history.
Even in its current form, this project has proven to be a powerful and practical demonstration of how RAG can bridge the gap between LLMs and structured or semi-structured data systems. It’s helped me better understand embeddings, vector search, and prompt design — and I hope it helps you too.
We’ve all been there—stuck in the repetitive grind of building APIs over databases, wishing there was a faster, more efficient way to get the job done. That’s exactly the frustration that led to the creation of Data API Builder (DAB). Instead of getting bogged down in the tedium of manually crafting each endpoint, DAB does all the work, allowing you to focus on the parts of your project that truly need your attention and expertise.
Simplifying API Creation
DAB is all about simplicity and efficiency. The entire process revolves around a configuration file where you specify the entities—whether they’re tables, views, or stored procedures—that you want to expose as either REST or GraphQL endpoints (or both). Here’s what that configuration might look like:
Let’s break this down a bit. The data-source section specifies that the database type is mssql for SQL Server, along with the necessary connection string. In the runtime section, you can see that both REST and GraphQL endpoints are enabled, each with their own respective URI paths. The entities section defines which entities should be exposed—in this case, the Book and Author tables. These tables are linked in a many-to-many relationship through the BookAuthor junction table. This configuration file essentially maps out how your API will interact with your database, making it easy to expose the desired data while maintaining control over access and structure.
One of the great things about DAB is that you don’t have to manage this configuration file manually. You get a CLI that lets you to maintain and update the configuration without ever needing to dive into the raw JSON. This makes it even easier to adapt and scale your API as your project grows, ensuring that your endpoints stay in sync with your database structure.
Once the configuration is set and the API is started, clients can issue requests to the REST and GraphQL endpoints. For example, issuing an HTTP GET request to the following REST endpoint retrieves books with more than 500 pages, sorted by the page count, and returns just the title of each book:
When building APIs, the choice between REST and GraphQL often comes down to the structure of your data and the needs of your application. REST is the more traditional approach, where each endpoint is designed to interact with a single entity. For instance, if you need to retrieve an author and their books, you might have to make multiple REST calls: one to get the author details and another to fetch the associated books. While this model is straightforward and well-suited for many applications, it can lead to over-fetching or under-fetching of data, especially in more complex scenarios.
GraphQL, on the other hand, allows for more flexibility and efficiency by enabling clients to specify exactly what data they need in a single request. This is particularly powerful when dealing with related entities. In a GraphQL query, you can request an author along with all their related books in a single call, effectively returning a graph of interconnected data. This not only reduces the number of requests made to the server but also provides a more efficient way to handle complex data structures.
With Data API Builder (DAB), this flexibility is seamlessly integrated. DAB automatically constructs the appropriate SQL statements to join related tables based on the relationships defined in your configuration. This means that whether you’re exposing your data via REST or GraphQL, DAB handles the complexity behind the scenes, allowing you to focus on the higher-level logic of your application.
Why DAB is a Game-Changer for CRUD Operations
When it comes to CRUD operations—Create, Read, Update, Delete—DAB really shines. It takes the hassle out of providing secure, direct access to your database tables (and views) by generating the necessary endpoints automatically. There’s no need to write any code yourself; DAB handles it all, giving you immediate access to your data through a clean, consistent API. This is a massive time-saver, especially for developers who need to quickly spin up APIs for internal tools, prototypes, or even production applications.
Exposing Stored Procedures
If exposing your tables directly doesn’t align with your security needs or architectural preferences, DAB allows you to add a layer of control by using stored procedures. This way, you can shield your tables from direct access and instead expose only the business logic that you want to make available via the API. This approach gives you the best of both worlds: easy API generation with the ability to enforce business rules and data security.
Supporting Multiple Databases
DAB supports multiple database platforms, making it a valuable tool in a variety of environments. For relational databases like SQL Server, Azure SQL Database, and MySQL, DAB delivers a seamless experience. Once you specify the entities in your configuration file, DAB creates REST endpoints that allow for straightforward interaction with your data. Additionally, it generates GraphQL endpoints that can join related rows, enabling you to fetch an entire entity graph in one go, which is especially powerful in complex applications.
On the other hand, if you’re working with Azure Cosmos DB, you might find DAB’s advantages less intriguing. That’s because Cosmos DB already comes with a native REST API, which provides CRUD operations out of the box. Furthermore, because Cosmos DB is a NoSQL database with a denormalized data model, it doesn’t naturally benefit from the joining capabilities that make GraphQL so compelling. In these cases, while DAB can still be used, the value proposition is different, focusing more on standardization and ease of use rather than on adding new capabilities.
Securing Your APIs with DAB
Security is a top concern in any API, and DAB offers robust support for various security models to help you protect your data. One of the most powerful features is its support for Role-Based Access Control (RBAC) with Microsoft Entra ID, which allows you to enforce role-level security. This means you can ensure that users only have access to the data they’re authorized to view, adding an essential layer of protection to your API. Additionally, DAB enables filtering based on user context through database policies. These policies dynamically adjust the data returned based on who is making the request, providing a more tailored and secure API experience.
This configuration enables authentication using Entra ID, specifying the issuer and audience for JWT validation. It ensures that only users authenticated through your Entra ID setup can access the API, providing a secure and manageable way to control access based on organizational roles and policies.
Then you can fine-tune access to specific entities. For example:
This configuration enables readonly access to the Books entity for users assigned to the Book.Reader role. Meanwhile, users in the Book.Librarian role have full read-write access to the Books entity. Unauthenticated users, or those not in these roles, will have no access at all. This granular control over who can perform what actions on which data is crucial for building secure, role-based APIs that align with your business rules and security policies.
Best Practices for Using DAB
While DAB is designed to be easy to use, following best practices can help you avoid common pitfalls and get the most out of the tool. One important best practice is to keep your configuration files organized, especially if you’re working across multiple environments like development, staging, and production. By maintaining separate configuration files for each environment, you can avoid issues that might arise from deploying the wrong settings. This organization helps ensure that your APIs behave consistently across different stages of your development and deployment process.
It’s also crucial to optimize your queries to ensure that you’re only fetching the data you need. Over-fetching data can lead to performance bottlenecks, particularly in high-traffic environments, so fine-tuning your queries is essential. Additionally, leveraging caching, logging, and monitoring can further enhance performance and help you quickly identify and resolve any issues that arise. Paying attention to these details ensures that your APIs not only perform well but also remain secure and easy to maintain. By following these best practices, you can maximize the effectiveness of DAB and ensure that your API development process is as smooth and efficient as possible.
Ready to Learn More?
If you’re eager to get started with DAB, there are some great resources available to help you hit the ground running. The official documentation is a fantastic place to start, offering quickstarts and comprehensive guides. This documentation will walk you through everything from the initial setup to more advanced configurations, ensuring you have a solid understanding of how to make the most of DAB. It’s an invaluable resource whether you’re just getting started or looking to deepen your knowledge.
In addition to the documentation, the GitHub repository is another excellent resource. Here, you can explore the source code, check out sample projects, and even contribute to the ongoing development of DAB. Seeing the code in action can provide valuable insights into how DAB works under the hood and how you can customize it to fit your specific needs. Together, these resources offer a comprehensive toolkit for mastering DAB and integrating it into your development workflow.
Before diving into the hands-on labs, ensure you have the necessary software and databases installed. Follow these steps to set up your environment:
SQL Server 2022: A local instance of SQL Server 2022 is required for the labs. The Developer Edition of SQL Server 2022 is free for development and testing, not for production, and includes all the features of SQL Server 2022. Download and install it from Microsoft’s SQL Server Downloads page. When the installer starts, choose the Basic installation option.
SQL Server Management Studio (SSMS): To interact with SQL Server, including running queries and managing databases, install the latest version of SSMS. This ensures compatibility with SQL Server 2022 and supports features like Always Encrypted that may not be supported in older SSMS versions. Download SSMS from here.
Visual Studio 2022 (any edition) with .NET desktop development workload: Some demos, especially those involving Row-Level Security and Always Encrypted, require Visual Studio 2022. The Community Edition is free for students, open-source contributors, and individuals. Download it from Visual Studio’s Community Edition page. During installation, choose the “.NET desktop development workload.”
AdventureWorks2019 Database: Many demos utilize the AdventureWorks2019 sample database. Download the AdventureWorks2019.bak backup file available here. Then restore the backup file as follows:
Create a temporary folder First, create a temporary folder on your C drive to store the .bak file during the restoration process. In File Explorer, navigate to the C drive (C:). Then right-click in an empty space, select New > Folder, and name the new folder HolDB.
Copy the backup file Navigate to your Downloads folder. Right-click on the AdventureWorks2019.bak file and select Copy. Then go back to the C:\HolDB folder, right-click in an empty space, and select Paste.
Restore the Database using SSMS Now that the backup file is in an accessible location, you can proceed with restoring it to your SQL Server instance.
Open SQL Server Management Studio (SSMS) and connect to your local SQL Server instance.
In the Object Explorer on the left, expand and then right-click on the Databases folder and select Restore Database…
In the Restore Database Dialog, select the Device radio button under the Source section.
Click the ... button on the right to open the Select Backup Devices dialog.
Click on the Add button to open the Locate Backup File dialog.
Navigate to the C:\HolDB folder and select the AdventureWorks2019.bak file, then click OK.
The backup file should now appear in the Select Backup Devices dialog. Click OK to return to the Restore Database dialog.
Now click OK to start the restore process.
The restoration process will begin, and SSMS will display a progress bar. Once the process completes, a message will appear informing you that the database has been successfully restored. Click OK, and the AdventureWorks2019 database will appear in the Databases folder in Object Explorer.
Wide World Importers Database: One lab uses the Wide World Importers sample database. Download the WideWorldImporters.bak backup file file available here. Then restore the database using similar steps you just followed for AdventureWorks2019:
Copy the Backup File Copy the WideWorldImports.bak file from your Downloads folder to the C:\HolDB folder.
Restore the Database using SSMS
In the SSMS Object Explorer, right-click on the Databases folder and select Restore Database…
In the Restore Database Dialog, select the Device radio button under the Source section.
Click the ... button on the right to open the Select Backup Devices dialog.
Click on the Add button to open the Locate Backup File dialog.
Navigate to the C:\HolDB folder and select the WideWorldImports.bak file, then click OK to return to the Select Backup Devices dialog.
Click OK to return to the Restore Database dialog.Click OK to start the restore process.
After the restore completes successfully, the WideWorldImporters database will appear in the Databases folder in Object Explorer.You can now delete the C:\HolDB folder, as well as the two database backup files in your Downloads folder.