

Overview
Network security is your first line of defense against unauthorized access to your Cosmos DB account. Before a client can even attempt to authenticate against your account, it needs to be able to establish a physical network connection to it.
Now Cosmos DB is a cloud database service on Azure, and Azure is a public cloud, so by default, a new Cosmos DB account can be accessed from anywhere on the internet. While this is very convenient when you’re getting started, such exposure is often unacceptable for sensitive mission-critical databases running in production environments.
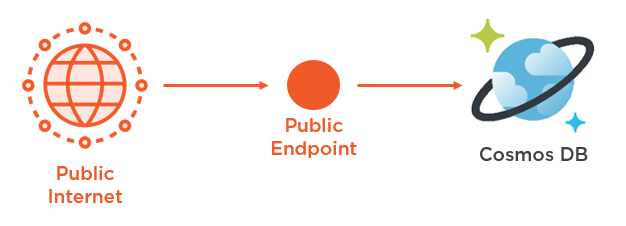
And so, there are several ways for you to lock down network access to your Cosmos DB account.
IP Firewall
First, you can use the IP firewall which is both simple and effective. This works very much like firewalls that you find in other systems, where you maintain a list of approved IP addresses, which could be individual addresses, or address ranges. Network traffic from IP addresses that are not approved, get blocked from the firewall; while traffic from approved addresses are allowed to pass through the firewall, and reach your account by its public IP address.
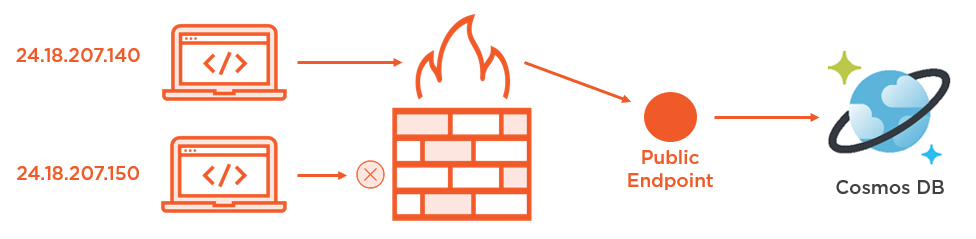
So here I’ve got my Cosmos DB account, which can be reached by its public endpoint, and that’s a public IP address on the internet. And we’ve got two clients hanging out on the internet, each on their own public IP address. Now by default, both clients can reach our account, but if we enable the IP firewall, then we can add the IP address for the first one, with the IP address ending in 140, so that incoming traffic from that client is allowed access to the account’s public endpoint. Meanwhile, since we haven’t added the IP address for the second client ending in 150, that client gets blocked and can’t access the account.
In the Azure Portal, head on over to Firewall and Virtual Networks, where by default, any client can access the account. But if you choose selected networks, then you can configure the firewall.
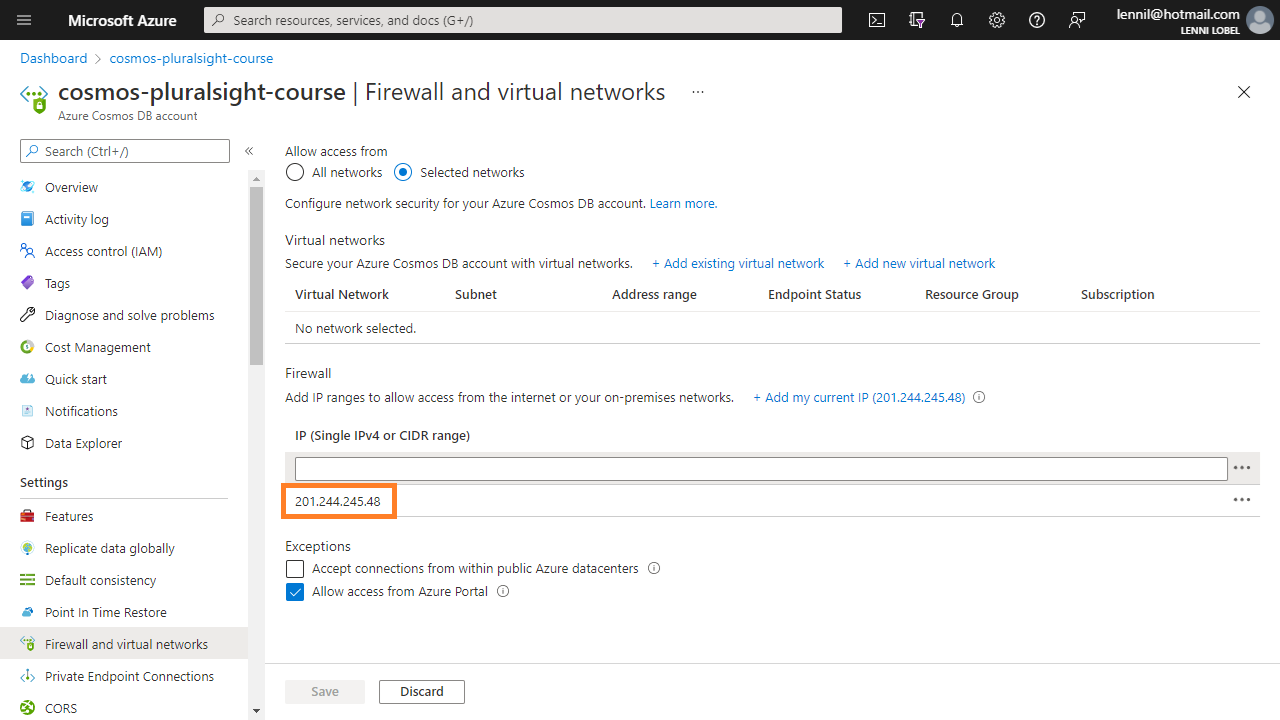
There are actually two sections to this page, and right now we’re focused on the bottom section, Firewall. Here you can add IP addresses, or IP address ranges, one at a time, for approved clients, while clients from all other IP addresses are unapproved and get blocked by the firewall.
To make it easier to connect through the firewall from you own local machine, you can click on Add My Current IP, where the portal automatically detects your local machine’s IP address. You can see I’ve done this in the previous screenshot, where my local IP address has been added to the firewall as an approved client.
Also take note of the bottom two checkboxes for exceptions. First, you may reluctantly want to select the first checkbox, which accepts connections from within public Azure data centers. You would only do this if you need access to your account from a client running on Azure that can’t share its IP address or IP address range. And these can be VMs, functions, app services; any kind of client. Again, this is why you want to be cautious with this checkbox, because selecting it would accept connections from any other customer that’s running a VM.
The second checkbox, which is selected by default, makes sure that the account can always be reached by the Cosmos DB portal IPs; so you’ll want to keep this setting if you want to use portal features – notably the Data Explorer, with your account.
When you click Save, be prepared to wait a bit for the changes to take effect. With the distributed nature of the Cosmos DB service, it can take up to 15 minutes for the configuration to propagate, although it usually less time than that. And then, the firewall is enabled, blocking network traffic from all clients except my local machine.
VNet Through Service Endpoint
Using the IP firewall is the most basic way to configure access control, but it does carry the burden of having to know the IP addresses of all your approved clients, and maintaining that list.
With an Azure virtual network, or a VNet, you can secure network access to all clients hosted within that VNet, without knowing or caring what those client IP addresses are. You just approve one or more VNets, and access to your account’s public endpoint is granted only to clients hosted by those VNets. Like the IP firewall, all other clients from outside approved VNets are blocked from your account’s public endpoint.
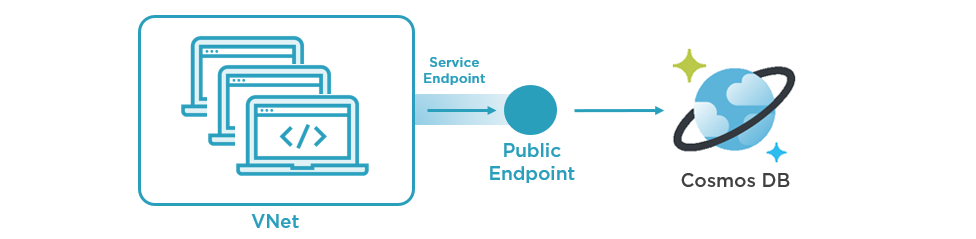
So once again, we have our Cosmos DB account with its public endpoint. And we’ve got a number of clients that need to access our account. But rather than approve each of them to the firewall individually by their respective IP addresses, we simply host them all on the same virtual network. Then, when we approve this VNet for our account, that creates a service endpoint which allows access to our account only from clients that the VNet is hosting.
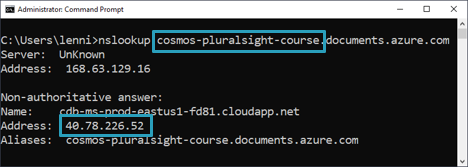
If you run an NSLookup to the fully qualified domain name for your account, from within the VNet, you can see that this resolves to a public IP address, for your account’s public endpoint:
You can approve individual VNets from the top section of the same page we were using to configure the IP firewall, where you use these links to choose a new or existing vnet.
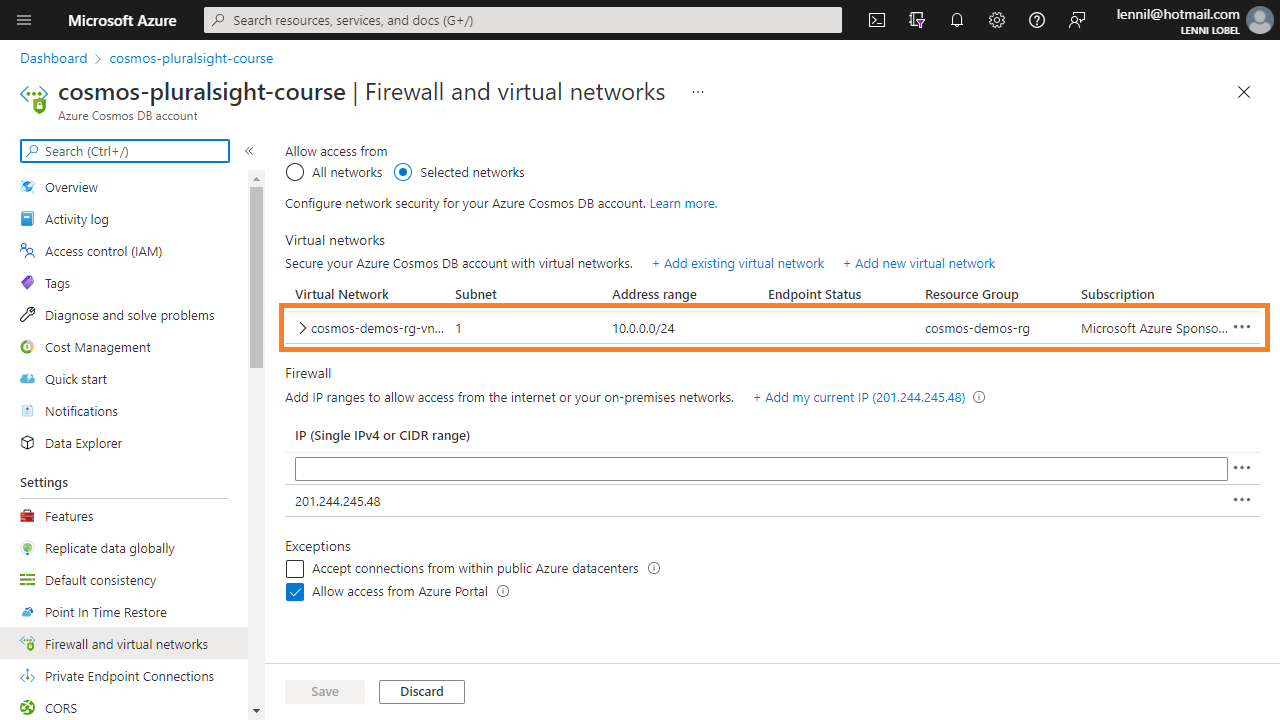
Here I’ve added an existing VNet which I’ve named cosmos-demos-rg-vnet, and you can see the VNet is added as approved. Also notice that you can mix-and-match, combining VNet access with the IP firewall, so you can list both approved IP addresses and approved VNets on this one page in the Azure portal, like you see above.
VNet Through Private Endpoint
VNet access using service endpoints is very convenient, but there’s still a potential security risk from within the VNet. Because as I just showed you, the Cosmos DB account is still being accessed by its public endpoint through the VNet’s service endpoint, and that means that the VNet itself can connect to the public internet. So a user that’s authorized to access the VNet could, theoretically, connect to your Cosmos DB account from inside the VNet, and then export it out to anywhere on the public internet.
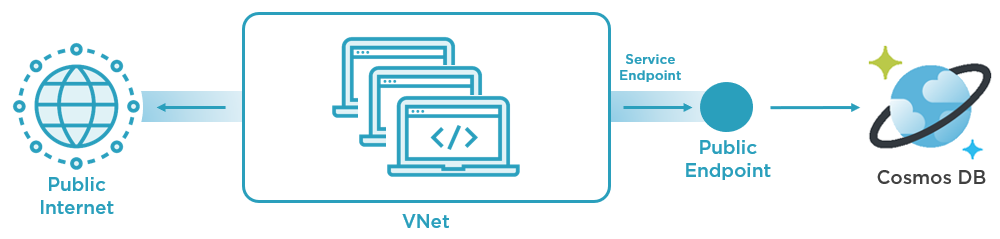
This security concern known as exfiltration, and can be addressed using your third option, VNet access using private endpoints.
This is conceptually similar to using VNets with service endpoints like we just saw, where only approved VNets can access your account. However now, the VNet itself has no connection to the public internet. And so, when you enable private endpoints, you’ll see that your Cosmos DB account itself is accessible only through private IP addresses that are local to the VNet. This essentially brings your Cosmos DB account into the scope of your VNet.

So again here’s our Cosmos DB account which, technically still has a public endpoint, but that public endpoint is now completely blocked to public internet traffic. Then we’ve got our clients that, like before, all belong to the same VNet that we’ve approved for the account. However, now the VNet has no public internet access, and communicates with your Cosmos DB account using a private IP address accessible only via the private endpoint that you create just for this VNet.
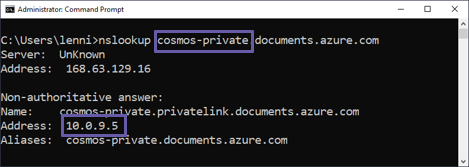
So if you run NSLookup from within a VNet secured with a private endpoint, you can see that your account’s fully qualified domain name now resolves to a private IP address. And so, there’s simply no way for a malicious user that may be authorized for access to the VNet, to exfiltrate data from your account out to the public internet.
It’s fairly straightforward to configure a private endpoint for your VNet. Start by clicking to open the Private Endpoint Connections blade, and then to create a new one. This is actually a new resource that you’re adding to he same resource group as the VNet that you’re securing.
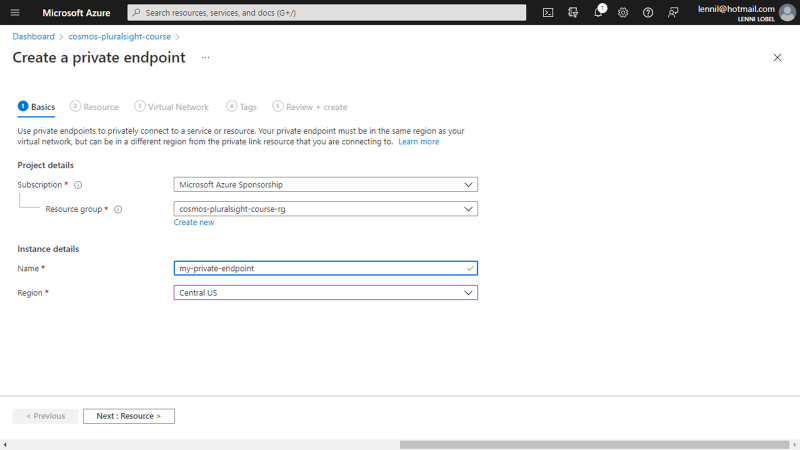
Just give your new private endpoint a name, and click Next to open the Resource tab.
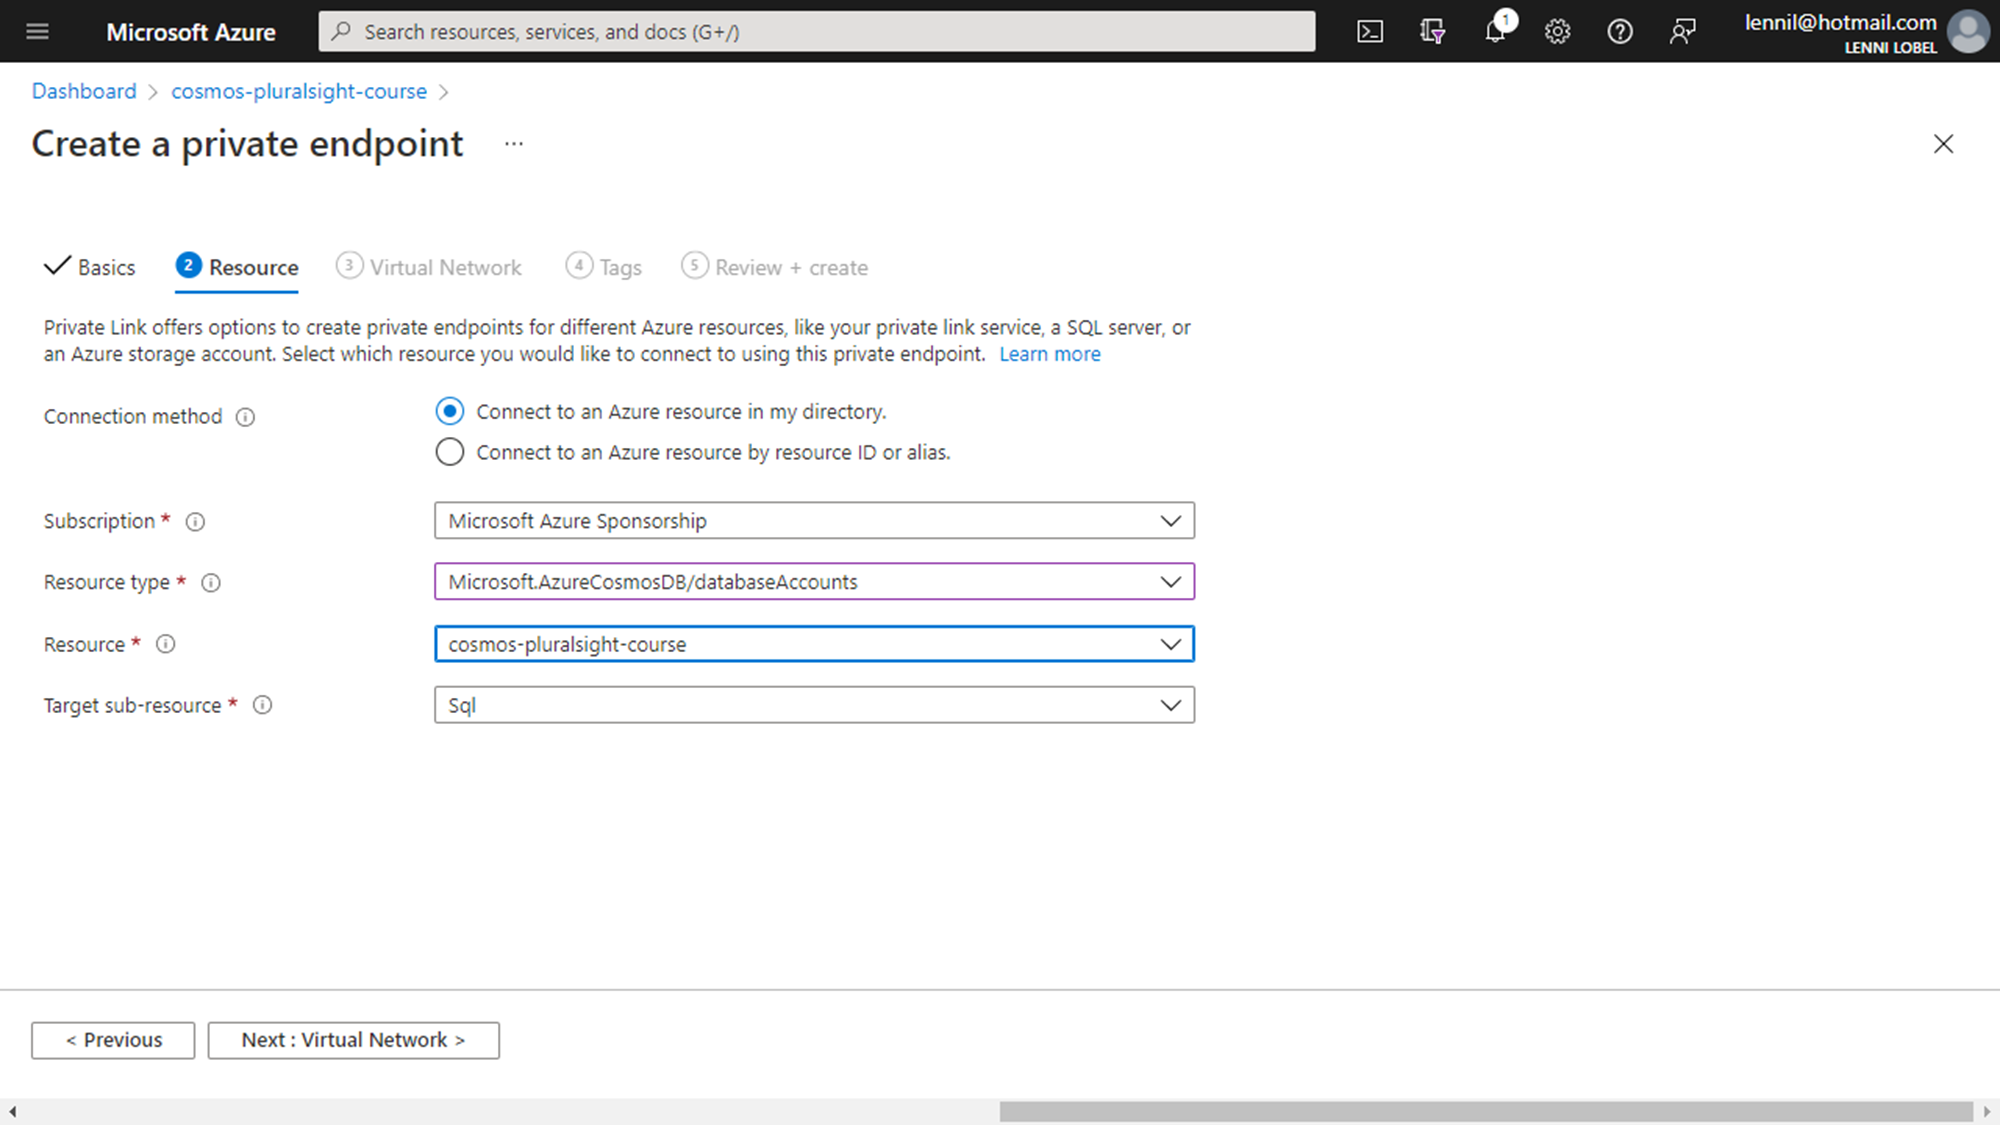
Here you select the resource type, which is Microsoft Azure Cosmos DB slash Database Accounts, and the resource itself, which is the Cosmos DB account you are connecting to with this new private endpoint. Then there’s the target sub-resource, which is just the API that you’ve chosen for the account, and that’s the SQL API in this case.
Then click Next for the Virtual Network tab, where you can choose the VNet and its subnet for the new private endpoint.
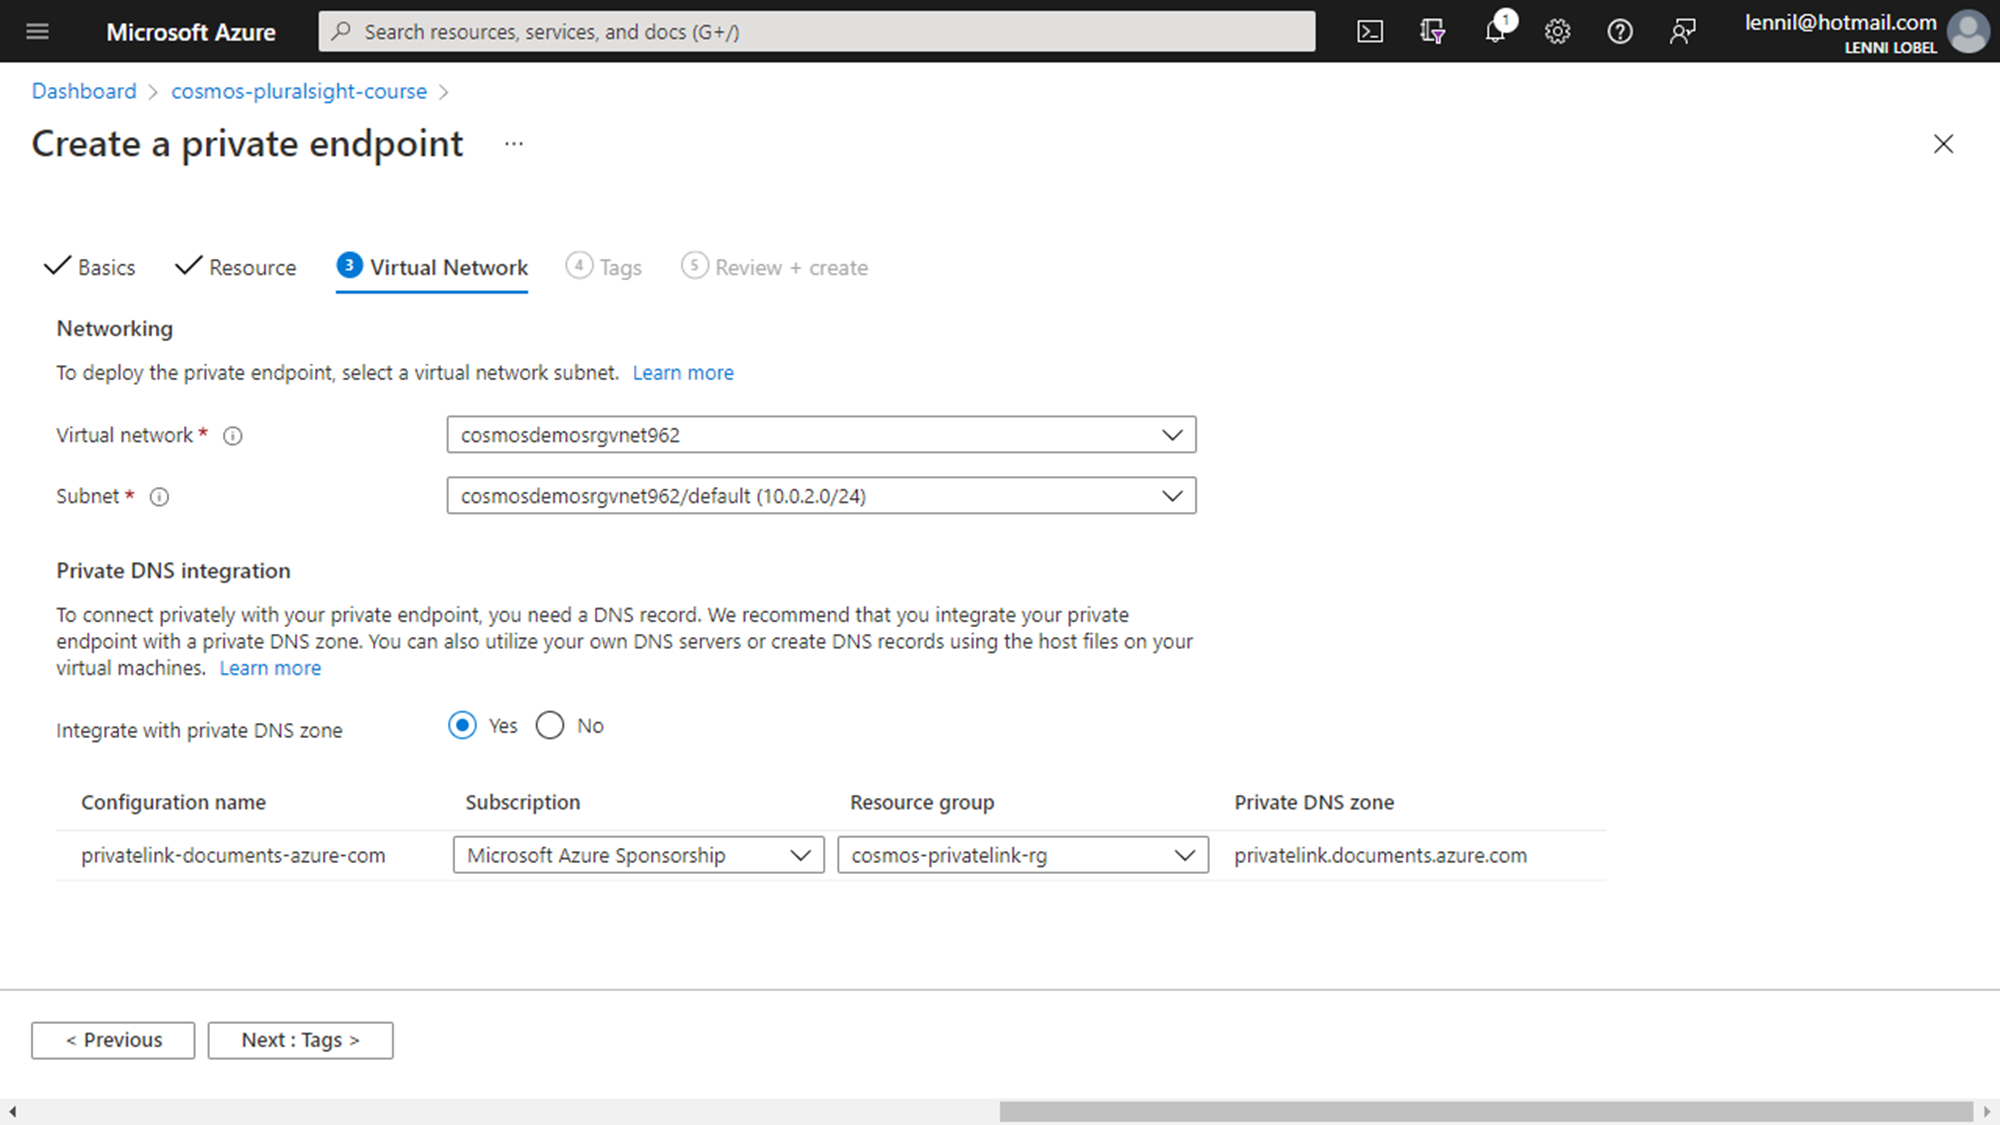
Notice that Private DNS Integration option is turned on by default, and this is what transparently maps your account’s fully qualified domain name to a private IP address. So, really without you having to do anything different in terms of how you work with your Cosmos DB account, this makes the account accessible only from the private endpoint in this VNet, which itself is accessible only through private IP addresses, and no access to the public internet.
And that’s pretty much it. Of course, you can assign tags to the private endpoint just like with any Azure resource, and then just click Create. It takes a few moments for Azure to create and deploy the new private endpoint, and then you’re done.
Summary
This post examined three different ways to secure network access to your Cosmos DB account. You can approve IP addresses and IP address ranges with the IP firewall, or approve specific virtual networks using service endpoints. Both of these options carry the risk of exfiltration, since the Cosmos DB account is still accessible via its public endpoint. However, you can eliminate that risk using your third option, which is to use private endpoints with virtual networks that are completely isolated from the public internet.



Leave a Reply