
SQL Server 2008 FILESTREAM Part 3 of 3: Using the OpenSqlFilestream API

This is the final installment in a 3-post series covering the new FILESTREAM feature in SQL Server 2008. In part 1, I explained how FILESTREAM works at a high level, and part 2 showed you the step-by-step procedure for enabling and using this awesome new feature. In this post, I’ll show you how to use the OpenSqlFilestream function exposed by the SQL Server Native Client API to achieve the maximum FILESTREAM performance possible in your .NET applications.

IMPORTANT UPDATE: I’ve just blogged on SqlFileStream, a managed code wrapper around OpenSqlFilestream that offers a simpler implementation of the mechanism described in this post. Read it here: https://lennilobel.wordpress.com/2011/08/22/using-sqlfilestream-in-c-to-access-sql-server-filestream-data/

What Is OpenSqlFilestream?

OpenSqlFilestream is a function provided by the SQL Server Native Client API, sqlncli10.dll, and gets installed on your development machine when you install the SQL Server 2008 client tools. This function can be called at the point in time that you want to store and retrieve BLOBs from varbinary(max) FILESTREAM columns, where SQL Server will “step aside,” and allow you to call OpenSqlFilestream to obtain a file handle. With the file handle returned by OpenSqlFilestream, you can stream directly against the file system—a native environment optimized for streaming. Contrast such direct file system access with storing and retrieving BLOBs against varbinary(max) FILESTREAM columns the “old-fashioned” way (either by embedding/extracting byte arrays, or in-lining binary streams as hexadecimal values in T-SQL as I demonstrated in part 2), which carries the additional overhead of the FILESTREAM abstraction layer. Using OpenSqlFilestream instead will give you lightning-fast BLOB performance. Let’s dive in!

Creating the Database

Before getting started, be sure that FILESTREAM is enabled for remote file system access at both the Windows Service and SQL Server instance levels (as explained in part 2). Then create a FILESTREAM-enabled database as follows (be sure to create the directory, C:\DB in this example, before creating the database):

CREATE DATABASE PhotoLibrary
 ON PRIMARY
  (NAME = PhotoLibrary_data,
   FILENAME = 'C:\DB\PhotoLibrary_data.mdf'),
 FILEGROUP FileStreamGroup CONTAINS FILESTREAM
  (NAME = PhotoLibrary_blobs,
   FILENAME = 'C:\DB\Photos')
 LOG ON
  (NAME = PhotoLibrary_log,
   FILENAME = 'C:\DB\PhotoLibrary_log.ldf')

Next, use the database and create a table for BLOB storage as follows:

USE PhotoLibrary
GO

CREATE TABLE PhotoAlbum(
 PhotoId int PRIMARY KEY,
 RowId uniqueidentifier ROWGUIDCOL NOT NULL UNIQUE DEFAULT NEWSEQUENTIALID(),
 Description varchar(max),
 Photo varbinary(max) FILESTREAM DEFAULT(0x))

In this table, the Photo column is declared as varbinary(max) FILESTREAM, and will hold pictures that will be stored in the file system behind the scenes. This is virtually the same CREATE TABLE statement as shown in my last post (refer to part 2 for a complete explanation of the varbinary(max) FILESTREAM and ROWGUIDCOL columns). The only thing different here is the default value for the BLOB column. The value 0x represents a zero-length binary stream, which is different than NULL. Think of it as the difference between a zero-length string and a null string in .NET; the two are not the same. Similarly, you won’t be able to use OpenSqlFilestream against NULL instances of varbinary(max) FILESTREAM columns, and you’ll soon see why.

Storing BLOBs Using OpenSqlFilestream

I’ll walk you through the complete steps for building a C# data access class in Visual Studio that demonstrates how to use OpenSqlFilestream. In order to keep things simple for demonstration purposes, we won’t be following best practices; namely, we’ll be executing direct T-SQL statements instead of using stored procedures (as you should be using in production code).

Start Visual Studio and create a new Class Library project named PhotoLibraryDAL with a single class file named PhotoData.cs, and add the following public static method to the class named InsertPhoto:

public static void InsertPhoto(int photoId, string desc, string filename)
{
  const string InsertCmd =
   "INSERT INTO PhotoAlbum(PhotoId, Description)" +
   " VALUES(@PhotoId, @Description)";

  using(SqlConnection conn = new SqlConnection(ConnStr))
  {
    conn.Open();

    using(SqlTransaction txn = conn.BeginTransaction())
    {
      using(SqlCommand cmd = new SqlCommand(InsertCmd, conn, txn))
      {
        cmd.Parameters.Add("@PhotoId", SqlDbType.Int).Value = photoId;
        cmd.Parameters.Add("@Description", SqlDbType.VarChar).Value = desc;
        cmd.ExecuteNonQuery();
      }

      SavePhotoFile(photoId, filename, txn);
      txn.Commit();
    }

    conn.Close();
  }
}

Client applications call the InsertPhoto method to insert a new photo into the PhotoAlbum table by passing in a photo ID, description, and filename pointing to a local file containing the actual photo image. It then opens a connection, begins a transaction, and executes an INSERT statement. Notice that the INSERT statement supplies values only for the PhotoId and Description columns. What about the RowId and Photo columns? Because we’ve omitted them, the defaults we established in the table definition are applied. The RowId column gets assigned the next available GUID by the GETSEQUENTIALID function. And for the PhotoId BLOB column, the default 0x (zero-length binary stream) applies.

The result of supplying a zero-length binary stream value for the Photo column is that SQL Server creates an empty file in the file system that is linked to the Photo column of the row just inserted. However, because we’ve begun a transaction, SQL Server has automatically initiated an NTFS file system transaction over the empty file added to the file system. So now we have a new row inserted in the table—but not committed, and we have a new empty file created in the file system—but not committed. This only works because we specified (albeit by default) a zero-length binary stream (0x) rather than NULL when inserting the varbinary(max) FILESTREAM value. If an exception occurs, or if the database transaction rolls back, or if any other condition occurs in which the database transaction doesn’t commit successfully, the NTFS file system transaction will get rolled back automatically as well. In that case, both the inserted row in the table and the empty file in the file system go away.

Now is that “point in time” that we’d like SQL Server to “step aside” so we can call OpenSqlFilestream to store the BLOB for the photo image. To do that, we call the SavePhotoFile method, which is coded as follows:

private static void SavePhotoFile(int photoId, string filename, SqlTransaction txn)
{
  const int BlockSize = 1024 * 512;
  FileStream source = new FileStream(filename, FileMode.Open, FileAccess.Read);
  SafeFileHandle handle = GetOutputFileHandle(photoId, txn);
  using(FileStream dest = new FileStream(handle, FileAccess.Write))
  {
    byte[] buffer = new byte[BlockSize];
    int bytesRead;
    while((bytesRead = source.Read(buffer, 0, buffer.Length)) > 0)
    {
      dest.Write(buffer, 0, bytesRead);
    }
    dest.Close();
  }
  source.Close();
}

There’s actually nothing magical about this method. You can see that it simply streams, in 512K chunks at a time, from a source stream to a destination stream. This is just the way you’d implement a simple, conventional, file-copy routine. Getting a handle on the source stream is also a no-brainer; since the source file is local, you simply invoke the System.IO.FileStream constructor that accepts a filename and enumerations specifying that the file should be opened for read access. So the question then becomes, how do we get a handle on the destination stream, which is a direct channel to the empty and not-yet-committed file on the server’s NTFS file system that SQL Server associates with the Photo column? The answer lies in the GetOutputFileHandle method which we call to obtain a SafeFileHandle object to the destination file:

private static SafeFileHandle GetOutputFileHandle(int photoId, SqlTransaction txn)
{
  const string GetOutputFileInfoCmd =
    "SELECT GET_FILESTREAM_TRANSACTION_CONTEXT(), Photo.PathName()" +
    " FROM PhotoAlbum" +
    " WHERE PhotoId = @PhotoId";

  SqlCommand cmd = new SqlCommand(GetOutputFileInfoCmd, txn.Connection, txn);
  cmd.Parameters.Add("@PhotoId", SqlDbType.Int).Value = photoId;

  string filePath;
  byte[] txnToken;

  using(SqlDataReader rdr = cmd.ExecuteReader(CommandBehavior.SingleRow))
  {
    rdr.Read();
    txnToken = rdr.GetSqlBinary(0).Value;
    filePath = rdr.GetSqlString(1).Value;
    rdr.Close();
  }

  SafeFileHandle handle =
    NativeSqlClient.GetSqlFilestreamHandle
    (filePath, NativeSqlClient.DesiredAccess.ReadWrite, txnToken);

  return handle;
}

This code is at the heart of the matter. In order to call OpenSqlFilestream, we need to obtain two key pieces of information. First, we need a logical path name to the destination file. We obtain that by selecting back the not-yet-committed row we just inserted, and invoking the PathName method on the Photo column. Nobody else can access this row because it hasn’t been committed yet (that would be a dirty read); it will never actually come into existence if the transaction rolls back. But we can read it because we’re inside the transaction, and so we can easily get the path name. No, the path name returned by PathName is not a UNC path to the physical file system on the server, so just lay that security concern to rest. It’s just a bogus path that has meaning only in the context of this transaction which SQL Server can use to map to the real file in the file system. Secondly, we need a token that identifies the NTFS file system transaction that SQL Server initiated behind the scenes, which we obtain with the GET_FILESTREAM_TRANSACTION_CONTEXT function.

Armed with these two key pieces of information, we can call OpenSqlFilestream. Because OpenSqlFilestream is a native code function, I’ve place it in a separate GetSqlFilestreamHandle method in a separate NativeSqlClient class to keep the DllImport and other native code details isolated from our .NET data access class (yes, I’m a neat freak when it comes to code, and you should be too):

using System;
using System.Runtime.InteropServices;

using Microsoft.Win32.SafeHandles;

namespace PhotoLibraryFilestreamDemo
{
  public class NativeSqlClient
  {
    public enum DesiredAccess : uint
    {
      Read,
      Write,
      ReadWrite,
    }

    [DllImport("sqlncli10.dll", SetLastError = true, CharSet = CharSet.Unicode)]
    private static extern SafeFileHandle OpenSqlFilestream(
      string path,
      uint access,
      uint options,
      byte[] txnToken,
      uint txnTokenLength,
      Sql64 allocationSize);

    [StructLayout(LayoutKind.Sequential)]
    private struct Sql64
    {
      public Int64 QuadPart;
      public Sql64(Int64 quadPart)
      {
        this.QuadPart = quadPart;
      }
    }

    public static SafeFileHandle GetSqlFilestreamHandle
     (string filePath, DesiredAccess access, byte[] txnToken)
    {
      SafeFileHandle handle = OpenSqlFilestream(
        filePath,
        (uint)access,
        0,
        txnToken,
        (uint)txnToken.Length,
        new Sql64(0));

      return handle;
    }
  }
}

As you can see, the GetSqlFilestreamHandle method accepts the transaction context token and the path obtained by the GET_FILESTREAM_TRANSACTION_CONTEXT function and PathName method respectively. It also accepts an enumeration that specifies the desired access mode, which can be Read, Write, or ReadWrite. The OpenSqlFilestream function requires other parameters that are not generally applicable for standard FILESTREAM usage, such as the unsigned 32-bit options and 64-bit allocation size arguments. These simply get passed in as 0. The SafeFileHandle returned by OpenSqlFilestream is defined by the .NET framework in the core library assembly mscorlib.dll, so no special reference needs to be set to access this class. Control then gets passed back up the call stack, to the SavePhotoFile method, which calls an overloaded version of the System.IO.Filestream constructor that accepts a SafeFileHandle object. After the source stream is copied entirely to the destination stream (overwriting the empty file on the server), control returns to the InsertPhoto method and the database transaction is finally committed. At that point, both the inserted row and the file in the file system are permanently saved, and the connection is closed. And that’s the way to stream BLOBs into varbinary(max) FILESTREAM columns in SQL Server 2008!

Retrieving BLOBs Using OpenSqlFilestream

Reading FILESTREAM data back out from the database to your application follows a very similar pattern. You open a connection and start a transaction. Note that this is normally not be considered best practice, as you should always try to have your read operations execute outside the context of a transaction. But to implement OpenSqlFilestream for read operations, this is exactly what you do. Then you use OpenSqlFilestream in the very same was we did for writing the BLOB to the database. The exact implementation depends on where you want to stream the content to.

For example, to stream a photo into an Image object for display in a Windows Forms PictureBox control, you can implement a SelectPhoto method like this:

public static Image SelectPhoto(int photoId, out string desc)
{
  const string SelectCmd =
    "SELECT Description, Photo.PathName(), GET_FILESTREAM_TRANSACTION_CONTEXT()" +
    " FROM PhotoAlbum" +
    " WHERE PhotoId = @PhotoId";

  Image photo;

  using(SqlConnection conn = new SqlConnection(ConnStr))
  {
    conn.Open();

    using(SqlTransaction txn = conn.BeginTransaction())
    {
      string filePath;
      byte[] txnToken;

      using(SqlCommand cmd = new SqlCommand(SelectCmd, conn, txn))
      {
        cmd.Parameters.Add("@PhotoId", SqlDbType.Int).Value = photoId;

        using(SqlDataReader rdr = cmd.ExecuteReader(CommandBehavior.SingleRow))
        {
          rdr.Read();
          desc = rdr.GetSqlString(0).Value;
          filePath = rdr.GetSqlString(1).Value;
          txnToken = rdr.GetSqlBinary(2).Value;
          rdr.Close();
        }
      }

      photo = LoadPhotoImage(filePath, txnToken);

      txn.Commit();
    }

    conn.Close();
  }

  return photo;
}

private static Image LoadPhotoImage(string filePath, byte[] txnToken)
{
  Image photo;

  SafeFileHandle handle =
    NativeSqlClient.GetSqlFilestreamHandle
     (filePath, NativeSqlClient.DesiredAccess.Read, txnToken);

  using(FileStream fs = new FileStream(handle, FileAccess.Read))
  {
    photo = Image.FromStream(fs);
    fs.Close();
  }

  return photo;
}

Because the Image class has a static FromStream method that consumes the stream passed as a parameter to the method, this code essentially firehouses the stream at the fastest possible speed directly from the file system on SQL Server into the Image object.

Or, to stream a photo over HTTP from an ASP.NET service:

using System;
using System.Data;
using System.Data.SqlClient;
using System.Data.SqlTypes;
using System.IO;
using Microsoft.Win32.SafeHandles;

namespace PhotoLibraryHttpService
{
 public partial class PhotoService : System.Web.UI.Page
 {
  private const string ConnStr =
    "Data Source=.;Integrated Security=True;Initial Catalog=PhotoLibrary;";

  protected void Page_Load(object sender, EventArgs e)
  {
   int photoId = Convert.ToInt32(Request.QueryString["photoId"]);
   if (photoId == 0)
   {
    return;
   }

   const string SelectCmd =
    "SELECT Photo.PathName(), GET_FILESTREAM_TRANSACTION_CONTEXT()" +
    " FROM PhotoAlbum" +
    " WHERE PhotoId = @PhotoId";

   using (SqlConnection conn = new SqlConnection(ConnStr))
   {
    conn.Open();

    using (SqlTransaction txn = conn.BeginTransaction())
    {
     string filePath;
     byte[] txnToken;

     using (SqlCommand cmd = new SqlCommand(SelectCmd, conn, txn))
     {
      cmd.Parameters.Add("@PhotoId", SqlDbType.Int).Value = photoId;

      using (SqlDataReader rdr = cmd.ExecuteReader(CommandBehavior.SingleRow))
      {
       rdr.Read();
       filePath = rdr.GetSqlString(0).Value;
       txnToken = rdr.GetSqlBinary(1).Value;
       rdr.Close();
      }
     }

     this.StreamPhotoImage(filePath, txnToken);

     txn.Commit();
    }

    conn.Close();
   }
  }

  private void StreamPhotoImage(string filePath, byte[] txnToken)
  {
   const int BlockSize = 1024 * 512;
   const string JpegContentType = "image/jpeg";

   SafeFileHandle handle =
     NativeSqlClient.GetSqlFilestreamHandle
      (filePath, NativeSqlClient.DesiredAccess.Read, txnToken);

   using (FileStream source = new FileStream(handle, FileAccess.Read))
   {
    byte[] buffer = new byte[BlockSize];
    int bytesRead;
    Response.BufferOutput = false;
    Response.ContentType = JpegContentType;
    while ((bytesRead = source.Read(buffer, 0, buffer.Length)) > 0)
    {
     Response.OutputStream.Write(buffer, 0, bytesRead);
     Response.Flush();
    }
    source.Close();
   }
  }
  }
}

Have Fun with FILESTREAM!

This concludes my 3-part series on using FILESTREAM in SQL Server 2008, which explains everything you need to know to get the most out of this truly awesome new feature. I hope you enjoyed it, and look forward to hearing your FILESTREAM success stories!
SQL Server 2008 FILESTREAM Part 2 of 3: Enabling and Using FILESTREAM

This is the second installment in a 3-post series covering the new FILESTREAM feature in SQL Server 2008. In part 1, I explained how FILESTREAM works at a high level, and in this post I’ll show you the step-by-step procedure for enabling and using this awesome new feature.

Enabling FILESTREAM

You need to enable FILESTREAM before you can use it, and that’s true of most “extra” features—which are disabled until you need them, as part of the overall “secure by default” strategy in SQL Server. Enabling FILESTREAM is slightly more involved than enabling other features because it involves two steps:

Enabling FILESTREAM for the Windows Service

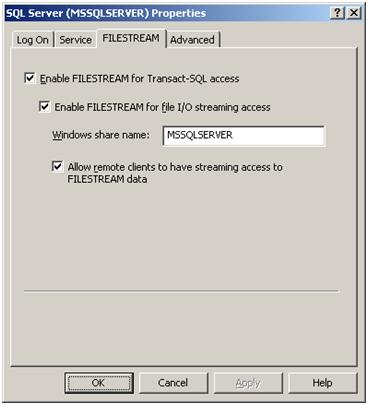
First you need to enable FILESTREAM at the Windows service level. You can perform this step during the SQL Server 2008 setup process, or any time after SQL Server 2008 is installed by using the SQL Server Configuration Manager (click the Start menu and choose All Programs > Microsoft SQL Server 2008 > Configuration Tools > SQL Server Configuration Manager). The Properties dialog box for the MSSQLSERVER process has a FILESTREAM tab that lets you choose between four FILESTREAM access levels.

 Enabling FILESTREAM for Windows Service

1) Disabled: With all three checkboxes cleared, FILESTREAM is completely disabled. This is the default setting.

2) Enabled for T-SQL only: Checking the first checkbox enables FILESTREAM in “total transparency” mode. This means that you’ll be able to treat varbinary(max) columns decorated with the FILESTREAM attribute as conventional varbinary(max) columns that appear to be “in-line” columns; either by in-lining binary streams using T-SQL, or by embedding and extracting BLOBs as byte arrays to and from your tables.

3) Enabled for T-SQL and file streaming: Checking the second checkbox also enables direct streaming between the file system and your application running on the same machine as SQL Server. With this option selected, a share name is also specified to enable direct streaming using the OpenSqlFilestream function exposed by the SQL Server 2008 Native Client API, which I’ll cover in my third and final FILESTREAM post.

4) Enabled for T-SQL and file streaming to remote clients: This is the same as the previous option, but allows applications running on remote machines to use OpenSqlFilestream. Since applications rarely run on the same box as SQL Server, you’ll typically always choose this option if you’ll be using OpenSqlFilestream (which, again, I’ll cover in my next post).

Enabling FILESTREAM for the SQL Server instance

Next you need to enable FILESTREAM at the SQL Server instance level. Basically, there is a separation of security concerns here between the Windows and database administrators, and the same access level set for the Windows service needs to be set for the SQL Server instance. That’s easy if one person wears both hats, but otherwise, these guys need to get along and they need to agree.

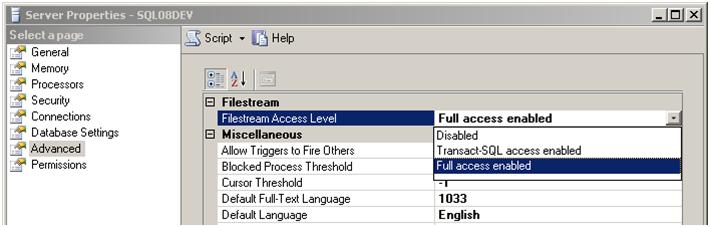
You can use SQL Server Management Studio (SSMS) perform this step from the Advanced page in the Server Properties dialog:

Enabling FILESTREAM for SQL Server Instance

Although there are only three options in this dropdown, they are essentially the same options I described for the Windows service configuration; where “Full access enabled” means direct streamed access to the file system from local clients only, or both local and remote clients, depending on the corresponding setting made at the Windows service level.

As an alternative to using SSMS, you can programmatically set this access level by using the following T-SQL statements (specify n as 0, 1, or 2 for disabled, T-SQL access enabled, full access enabled, respectively):

EXEC sp_configure filestream_access_level, n
RECONFIGURE

Creating a FILESTREAM-Enabled Database

Once you’ve enabled FILESTREAM, you can create a FILESTREAM-enabled database by using the new FILEGROUP…CONTAINS FILESTREAM clause, such as the one in this otherwise ordinary CREATE DATABASE statement:

CREATE DATABASE PhotoLibrary
 ON PRIMARY
  (NAME = PhotoLibrary_data,
   FILENAME = 'C:\DB\PhotoLibrary_data.mdf'),
 FILEGROUP FileStreamGroup CONTAINS FILESTREAM
  (NAME = PhotoLibrary_blobs,
   FILENAME = 'C:\DB\Photos')
 LOG ON
  (NAME = PhotoLibrary_log,
   FILENAME = 'C:\DB\PhotoLibrary_log.ldf')

When you execute this statement, SQL Server will create the PhotoLibrary_data.mdf and PhotoLibrary_log.ldf files as usual, and will also create a Photos folder inside of which it will transparently store individual files for each BLOB stored in varbinary(max) FILESTREAM columns in the PhotoLibrary database.

Creating and Using FILESTREAM Columns

As I already mentioned, you only need to append the FILESTREAM attribute to the varbinary(max) data type on the column(s) you want SQL Server to store in the file system. But as it turns out, there’s an additional requirement to include a single column of type uniqueidentifier (GUID) decorated with the ROWGUIDCOL attribute. This column must not allow nulls, and needs to either be the primary key or have a unique constraint enforced on it. SQL Server absolutely requires this ROWGUIDCOL column in order to transparently link BLOBs in the file system with their corresponding rows in the database tables.

Only one ROWGUIDCOL-attributed column is permitted in any table, but once that column is defined, you can then define any number of varbinary(max) FILESTREAM columns for that table that you’d like. Furthermore, by establishing a default value for that column to automatically generate GUID values using either the GETID or GETSEQUENTIALID functions, you can satisfy the requirement to include this column without incurring any additional burden of maintaining it.

The following statement creates a table in the PhotoLibrary database that uses FILESTREAM to store BLOBs of images in a varbinary(max) FILESTREAM column named Photo:

CREATE TABLE PhotoAlbum(
 PhotoId int PRIMARY KEY,
 RowId uniqueidentifier ROWGUIDCOL NOT NULL UNIQUE DEFAULT NEWSEQUENTIALID(),
 Description varchar(max),
 Photo varbinary(max) FILESTREAM)

At this point, you can treat the Photo column as an ordinary varbinary(max) column for BLOB storage. This means you can embed or extract byte arrays directly to and from this column from your client application exactly as you did before. Or, for BLOBs that aren’t too large, you can even express the binary stream in T-SQL as follows:

INSERT INTO PhotoAlbum(PhotoId, Description, Photo)
 VALUES(2, 'Document icon', 0x4749463839610C000E00B30000FFFFFFC6DEC6C0C0C000008
  0000000D3121200000000000000000000000000000000000000000000000000000000000021F9
  0401000002002C000000000C000E0000042C90C8398525206B202F1820C80584806D1975A29AF
  48530870D2CEDC2B1CBB6332EDE35D9CB27DCA554484204003B)

This statement appears to insert a BLOB directly into the table’s Photo column, in-line with the other columns (PhotoId and Description). And it certainly appears the same way when retrieving the row back out of the table:

SELECT PhotoId, Description, Photo
 FROM PhotoAlbum
 WHERE PhotoId = 2

FILESTREAM Query Result

Peeking Behind the Scenes

As is often the case with powerful abstraction layers, the result is somewhat anti-climactic, since everything appears to work the same as it did in earlier versions of SQL Server using the varbinary(max) data type. However, if we start exploring under the covers, we can see the effect that FILESTREAM has on the file system behind the scenes.

But first, understand that normally “thou shalt not” do what we’re about to do; that is, interact directly with the file system. The manner in which SQL Server decides to create and organize subdirectories and files in the folder designated as the FILESTREAM file group is none of our business, just as the internal structure and content of .mdf and .ldf files are none of our business—it’s all managed exclusively by SQL Server. Accepting that, we can still dig into the file system to prove that things are working behind the scenes as expected.

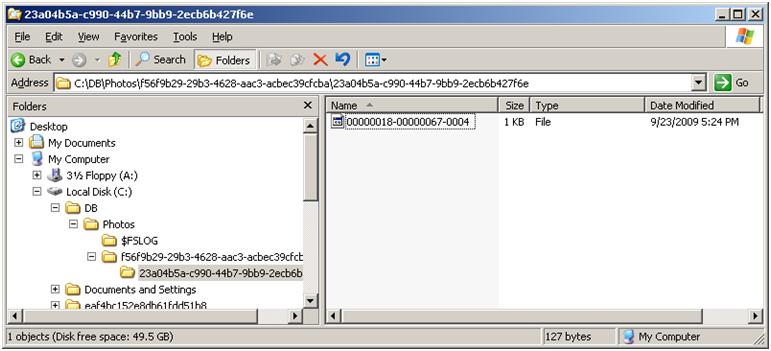
Using Windows Explorer, navigate to the C:\DB\Photos folder created by SQL Server for FILESTREAM storage. The directory names and structure are certainly not intuitive, nor will they necessarily match the ones on my system. But if you start peeking around, you’ll encounter a file whose date/time coincides with the date/time that we inserted the row:

FILESTREAM in the File System

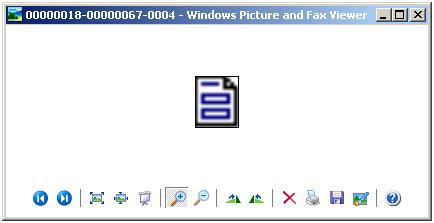
Knowing that the BLOB we inserted is an image, right-click on the file, choose Open, and then select Windows Picture and Fax Viewer to display the image (which I’ve magnified in the following screenshot):

FILESTREAM File

If you really want to prove the point (and let me warn you again, this is a real no-no), you can even replace this file with some other image and verify that the SELECT statement returns a different BLOB. It should also be fairly obvious that you’d want to lock down the folder designated for FILESTREAM storage just as you lock down the .mdf and .ldf files, so that only SQL Server itself has direct access to the file system.

As explained in part 1, FILESTREAM delivers full transactional integrity over BLOB data in the file system. If you wrap the above INSERT statement inside a transaction, then SQL Server will automatically initiate an NTFS file system transaction over the file added to the file system behind the scenes. In this case, rolling back the database transaction (or any other condition in which the database transaction does not commit successfully) automatically rolls back the NTFS file system transaction so that both the row and the file disappear.

Direct File System Access

Hopefully, you’re reasonably impressed with FILESTREAM thus far. But there’s a much better way to stream content into and out of varbinary(max) FILESTREAM columns. The fact remains that the varbinary(max) data type is not optimized for streaming, even though FILESTREAM uses the file system instead of your relational tables to persist BLOBs. How are you going to achieve the maximum BLOB access performance? By streaming directly into and out of the file system, which is a native environment optimized for streaming. You can do that by using the OpenSqlFilestream function exposed by the SQL Server Native Client API, which I’ll cover in the third and last post. So stay tuned!

Download VSLive Orlando SQL Server 2008 R2 Workshop Materials

I just returned from a very successful VSLive conference in Orlando. The slides and code for the workshop I gave with Andrew Brust on SQL Server 2008 R2 can be downloaded from Andrew’s Skydrive, at: http://bit.ly/SQL2008R2Links.

You’ll find my code under ‘Lenni’s code’ (duh), along with ‘Workshop Slides’ and all of Andrew’s BI stuff. Enjoy!

SQL Server 2008 FILESTREAM Part 1 of 3: Introducing FILESTREAM

I’ve just returned from VSLive! Orlando and gave a great full day workshop on SQL Server 2008 R2 with Andrew Brust. Once again, I find that FILESTREAM stands out as one of my favorite new features in the relational database engine. So, I’ve decided to post a 3-part series on this awesome new feature. In this first post, I’ll explain FILESTREAM and how it works. In part two, I’ll walk you through the steps to enable and use FILESTREAM. In my third and last post of this series, I’ll show you how to maximize FILESTREAM performance using the OpenSqlFilestream feature exposed by the SQL Server Native Client API.

The Need To Stream

Storing unstructured BLOB (large binary object) data that is somehow associated with structured data in a relational database is certainly not a new problem. But these days, the proliferation of unstructured content is accelerating rapidly, and increasingly, we find ourselves dealing with more and more Word documents, Excel spreadsheets, PDF files, emails with attachments, audio/video files, and the list goes on and on. There has been no native solution in SQL Server for handling BLOB storage, until now.

Before FILESTREAM in SQL Server 2008, we’ve had basically two choices for handling BLOBs: Store them in the database as varbinary(max) columns (or, in older versions of SQL Server, using the image data type), or store them outside the database (typically, in the file system or dedicated BLOB store). Both of these approaches have advantages and disadvantages, making neither of them ideal.

Pros and Cons of Traditional BLOB Storage Techniques

Storing BLOBs in the database is fine if your BLOB requirements are modest. Just by using the varbinary(max) data type, you’ll be able to easily embed and extract byte arrays representing BLOBs directly into and out of your database tables. You’ll also enjoy transactional integrity over BLOB updates, as well as integrated management benefits (for example, a single database backup includes the BLOB data). However, if you have many BLOBs, and/or they are very large, then a disproportionate amount of disk space allocated to your structured relational tables will be consumed by BLOB data. Query performance will suffer as a result, and in most cases the performance hit will be so bad that you’ll need to consider a different option.

To maximize database performance, you can instead store the BLOBs outside the database. Files belong in the file system, right? Structured relational data belongs in tables, right? Right! And if you’ve ever had to build a system that associates files in the file system with rows in database tables, you know the pain involved in implementing this solution. Because SQL Server has no awareness of the coupling between the table data and the BLOB data in the file system, it’s your job to establish and maintain those references. When a row is deleted from the table, your application needs to determine which files in the file system store data for that deleted row, and then delete those files as well. You also lose transactional scope, since rolling back a database transaction will in no way undo changes made to the file system. It’s now also another administrative burden to back up your data, since a database backup is no longer a “complete” backup of your database, without you also performing a separate file system backup for the BLOB data.

Enter: FILESTREAM

In SQL Server 2008, the new FILESTREAM feature gives us the best of both worlds. The beauty of FILESTREAM is its transparency. Contrary to what you may have heard or read, FILESTREAM is not a new data type in SQL Server 2008. Rather, it is an attribute that you apply to the varbinary(max) data type–which (as mentioned) is the same data type traditionally used to store BLOBs directly in your tables. From your perspective, a varbinary(max) FILESTREAM column is no different than a conventional varbinary(max) column. So you can embed/extract byte arrays to/from the varbinary(max) column, or even inline small binary streams in T-SQL, just as you did before. Updates made to BLOB data in a varbinary(max) FILESTREAM column while inside a database transaction will roll back when the database transaction rolls back. And a single database backup protects the entire database, including its BLOB data.

The magic? Behind the scenes, simply applying the FILESTREAM attribute to the varbinary(max) data type for defining a BLOB columns enables a highly efficient storage abstraction layer over that varbinary(max) column.

Specifically, SQL Server will store and retrieve BLOB data assigned to varbinary(max) FILESTREAM columns to and from the file system behind the scenes automatically.

How Does FILESTREAM Work?

FILESTREAM works by integrating with the NTFS file system. As you’ll see in part 2 of this blog post series, FILESTREAM storage for a database is defined in the CREATE DATABASE statement simply by declaring another file group that points to a physical location in the file system. Because it’s just another file group, SQL Server now considers the data in the file system to be an integral part of the overall database. So, unless you explicitly exclude the file group when backing up the database, the BLOB data in the file system will be included in your normal full and incremental database backups.

Because SQL Server is now intimately involved with the file system behind the scenes, you enjoy the performance benefit of keeping BLOB storage outside your structured table file groups, without worrying about programmatically maintaining the link references between rows in tables and corresponding files in the file system. And because the NTFS file system is a transactional file system, SQL Server is able to transactionalize BLOB updates made to the file system. When you initiate a database transaction and then proceed to update BLOB data stored in varbinary(max) FILESTREAM columns, SQL Server will initiate an NTFS transaction over the file system. When you commit or roll back your database transaction, SQL Server will then commit or roll back the NTFS file system transaction for you automatically.

If all of this is starting to get you excited, then that’s the point! Be sure to stay tuned for part 2, which will show you how to enable and use FILESTREAM, and part 3, which explores the OpenSqlFilestream feature that delivers ultra-high streaming performance against varbinary(max) FILESTREAM columns.

Using the New Date and Time Features in SQL Server 2008

In this post, I’ll cover the new date and time support provided by SQL Server 2008. This is an area in which any single enhancement may not rock your world, but collectively, I think you’ll agree that Microsoft has done a very good job overhauling the date and time support in SQL Server.

Separate Date and Time Data Types

We database developers have long been clamoring for the ability to store dates and times as separate types, and SQL Server 2008 now finally delivers. (Small thing, but what took them so long?) If you just need a date, use the new date data type. If you just need a time, use the new time data type. It’s as simple as that:

DECLARE @DOB date
DECLARE @MedsAt time

SET @DOB = '2008-03-24'
SET @MedsAt = '13:00:00'

SELECT @DOB AS DOB, @MedsAt AS MedsAt

And the output:

DOB        MedsAt
---------- ----------------
2008-03-24 13:00:00.0000000

New and Obsolete Data Types

In total, there are four new data types for dates and times in SQL Server 2008:

  • date
  • time
  • datetime2
  • datetimeoffset

The new datetime2 data type is intended to replace the traditional datetime data type. For all new database development, you should no longer use datetime; you should use datetime2 instead. In addition, the smalldatetime data type is also considered obsolete, and should no longer be used for new development.

More Portable Dates

The new date, datetime2, and datetimeoffset all support a greater range of values than the old datetime and smalldatetime data types. Specifically, they are now aligned with .NET, Windows, and the SQL standard, being capable of storing any date in the range of 1/1/0001 through 12/31/9999. This is the same range of dates available in .NET, from DateTime.MinValue to DateTime.MaxValue.

The old datetime data type, in contrast, cannot store dates earlier than the year 1753. This means that date values can now move back and forth between the database and your .NET application without needing to worry about the potential for errors occurring with dates earlier than 1753. Even better, despite the greater range, dates in the new types are compacted to fit in only 3 bytes, where 4 bytes are needed to store the smaller range of dates in the old datetime data type.

More Portable Times

The new time, datetime2, and datetimeoffset all support greater fractional second precision than the old datetime and smalldatetime data types. Specifically, they are now aligned with the .NET, Windows, and the SQL standard, and can store times with up to 7 digits of fractional second precision (accurate to within 100ns, or one 10-millionth of a second). This is the same degree of fractional second precision offered by time values in .NET.

The old datetime data type, in contrast, supports only 3 digits of fractional second precision. This means that your time values are preserved with full fidelity (no data loss) as they pass back and forth between the database and your .NET application. (The old smalldatetime data type doesn’t even store seconds, and is accurate only to the minute.)

Time Zone Awareness

If you’ve ever built applications that need to cope with multiple time zone, you’re just going to love this new feature. The datetimeoffset data type provides the same range of dates (1/1/0001 through 12/31/9999) and fractional second precision (100ns) as the new datetime2 data type, and also includes a time zone portion. Specifically, datetimeoffset stores an offset ranging from -14:00 through +14:00 in addition to the date and time value. This allows you to store local dates and times in different regions of the world, and let SQL Server handle the differences automatically. Values appear to go in and come out as local dates and times, but internally, they are all stored in UTC (Universal Coordinated Time). This means that comparisons, sorting, and indexing all work as you’d expect (for example, 9am in NY is treated as later than 7am in California). All you do is append the time zone as part of the local date and time value to be stored in the datetimeoffset data type, and SQL Server normalizes and denormalizes the value between UTC and the specified local time zone for you automatically as you store and retrieve the data!

Two new functions are provided to work with time zone awareness. They are TODATETIMEOFFSET and SWITCHOFFSET. The TODATETIMEOFFSET function converts a datetime or datetime2 (time zone-less) value to a datetimeoffset (time zone-aware) value, based on the offset (time zone between -14:00 and +14:00) passed to the function. The SWITCHOFFSET function converts the local date/time value stored in a datetimeoffset value to any other time zone, passed in as an offset to the function.

Here’s an example that demonstrates how SQL Server recognizes and accounts for time zone differences in datetimeoffset data type instances:

-- Time zone awareness
DECLARE @Time1 datetimeoffset
DECLARE @Time2 datetimeoffset
DECLARE @MinutesDiff int

SET @Time1 = '2007-11-10 09:15:00-05:00'  -- NY time is GMT -05:00
SET @Time2 = '2007-11-10 10:30:00-08:00'  -- LA time is GMT -08:00
SET @MinutesDiff = DATEDIFF(minute, @Time1, @Time2)

SELECT @MinutesDiff

And the output:

MinutesDiff
-----------
255

A 255-minute difference between the two times amounts to 4 hours and 15 minute difference, so SQL Server clearly accounted for the three hour time difference between the NY and LA time zones.

One pain point remains, unfortunately. The datetimeoffset data type is not DST (Daylight Savings Time) aware. You’ll still need to handle DST on your own at the application level. The murmur around Redmond at the time I was writing Programming Microsoft SQL Server 2008 was that DST support is planned for a future version of SQL Server.

Date/Time Accuracy and Storage

As I already mentioned, date values are stored in 3 bytes, which is 1 byte less than the 4-byte date portion of the old datetime data type. So we’re offered a greater range of values that get stored in less space than before. Hey, that doesn’t happen every day!

What about times? Well, they’re variable. Meaning that even though SQL Server now supports full 7-digit fractional second precision, it’s not compulsory. You can choose any number of digits of fractional second precision that you require, from 0 (none) to 7 (100ns), referred to as the scale. (If not specified, the default scale is 7.) So if you’re OK with losing fractional second precision of .NET times that get stored in your database, you can choose a scale of 0, and only 3 bytes will be required to store the time. You specify the scale in parentheses after the data type name. For example:

DECLARE @NoPrecision time(0)
DECLARE @SomePrecision time(4)
DECLARE @MaxPrecision time(7)

SET @NoPrecision = '13:25'
SET @SomePrecision = '13:25'
SET @MaxPrecision = '13:25'

SELECT @NoPrecision AS NoPrecision, @SomePrecision AS SomePrecision, @MaxPrecision AS MaxPrecision

Although we didn’t hard-code any fractional seconds (or seconds, for that matter), the output indicates that SQL Server honors the specified precision scale:

NoPrecision      SomePrecision    MaxPrecision
---------------- ---------------- ----------------
13:25:00         13:25:00.0000    13:25:00.0000000

Extracting Dates and Times

It’s also nice to know that you can use CAST and CONVERT to extract just the date or time portion of an indexed datetime2 column, without losing the benefit of the index. For example:

CREATE TABLE dbo.Search(MyDate datetime2)
CREATE CLUSTERED INDEX idx1 ON dbo.Search(MyDate)

-- Insert some rows into dbo.Search...

SELECT MyDate FROM dbo.Search
 WHERE CONVERT(date, MyDate) = '2005-04-07'

That means no more ugly queries where you need to check for the inclusive range of times in any date of interest (that is, from 0:00:00.0000000 to 23:59:59.9999999). In preceding query, SQL Server is able to leverage the index created on the MyDate column, and doesn’t need to resort to a sequential table scan instead.

New and Changed Functions

It should come as no surprise that all the traditional functions, including DATEADD, DATEDIFF, DATEPART, and DATENAME all work just the same with the new data types as the old ones. Furthermore, DATEPART and DATENAME now support additional new date parts targeting new SQL Server 2008 date/time components; specifically, mcs (microseconds), ns (nanoseconds), and tz (time zone).

There are also three new functions that return the current date and time on the server clock. Two of them, SYSDATETIME and SYSUTCDATETIME are equivalent to GETDATE and GETUTCDATE respectively, except that they return a datetime2 value instead of a datetime value. The new SYSDATETIMEOFFSET function also returns the current server date/time, but as a datetimeoffset data type which actually is DST-aware, based on the DST setting in the Control Panel Date and Time applet (for example, it returns -4:00 for NY during DST, even though NY is actually at -5:00 GMT).

Summary

Dates and times have gotten a huge boost in SQL Server 2008. In this post, I explained the four new date/time data types, and the new functions provided to support them. These new types are first-class citizens, and are supported across ODBC, OLE-DB, ADO.NET, SSIS (Integration Services), SSAS (Analysis Services), SSRS (Reporting Services), and replication. So stop using datetime and smalldatetime, and start enjoying the power of the new SQL Server 2008 date and time data types!

Sample Code from my O’Reilly WebCast on SQL08 Beyond Relational

Download the sample code from today’s Webcast on Programming the Beyond Relational Features in SQL Server 2008 from here: http://bit.ly/96Pimf

Using SQL Server 2008 Change Data Capture

Change Data Capture (CDC) is a powerful new feature in SQL Server 2008 (Enterprise edition only) that lets you easily and quickly capture all data changes made to tables in your database (it’s great for incrementally updating large data warehouses). Without resorting to triggers or specialized stored procedures, and without requiring any programming or code changes to your application, CDC will create change tables, monitor your database for all DML operations (inserts, updates, and deletes), and record the modified data into the change tables. CDC also provides special table-valued functions (TVFs) that enable easy querying of the change tables.

In this post, I’ll explain everything you need to know to use CDC, including a complete walkthough.

CDC Architecture

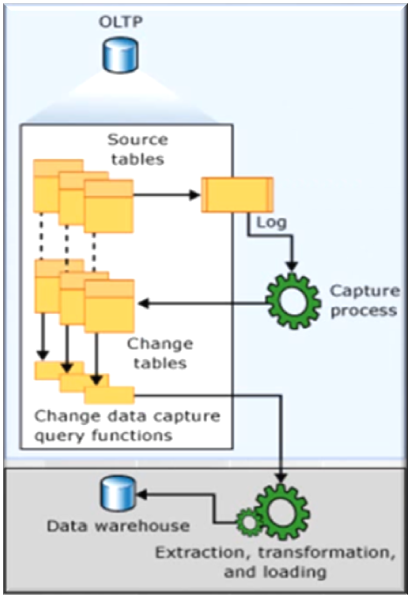
CDC is driven by a SQL Server Agent job that recognizes changes by monitoring the SQL Server transaction log. This provides much better performance than using triggers—and there’s no code to write or maintain with CDC (the tradeoff is somewhat more latency, which is often perfectly acceptable).

The following illustration taken from SQL Server Books Online depicts a high-level view of CDC architecture:

The first time sp_cdc_enable_table is executed on any table in a database, SQL Server also creates two SQL Server Agent jobs. The first is a change-capture job, which performs the actual transaction log monitoring to apply changes on the tracked table to the corresponding change table. The second is a cleanup job, which deletes rows from change tables after a configurable interval (three days, by default) and removes all CDC artifacts if the tracked table is dropped. Therefore, SQL Server Agent must be running the first time this procedure is run to CDC-enable a table on any database in the server instance. Subsequently, if SQL Server Agent stops running, changes to tracked tables will accumulate in the transaction log but not be applied to the change tables until SQL Server Agent is restarted.

Enabling CDC

Several new system stored procedures and TVFs are provided to enable, monitor, and consume database changes. To begin, you execute the sp_cdc_enable_db procedure to enable CDC on the current database. (You must be in the sysadmin role to do this.) When you run this procedure, a new cdc user, cdc schema, and CDC_admin role are created. These names are hard-coded, so in the event that you already have a user or schema named cdc, you will need to rename it before using CDC.

Once the database is CDC-enabled, you enable CDC on a given table by executing sp_cdc_enable_table. (You must be in the db_owner role to do this.) When you do that, several objects are created in the cdc schema: a change table and at least one (but possibly two) TVFs. Let’s look at each of these objects in turn.

When CDC is enabled on a table, SQL Server creates a change table in the cdc schema corresponding to the table on which CDC is being enabled. The change table will be populated with change data automatically by CDC and is assigned a name based on both the schema and the table being tracked. For example, when you enable CDC on the Employee table in the dbo schema (as we’ll do shortly), SQL Server creates a corresponding change table named cdc.dbo_Employee_CT that will record all changes to the dbo.Employee table. The schema of the tracked table (dbo in this case) is part of the change table name so that same-named tables from different schemas can all be unambiguously tracked in the cdc schema.

The sp_cdc_enable_table stored procedure has several optional parameters that give you a lot of flexibility. You can, among other options, specify your own name for the change table (as long as it’s unique in the database), a role that a user must belong to in order to query changes (if not in sysadmin or db_owner), which columns of the table should be tracked (you don’t need to track all of them), the filegroup on which to create the change table, and whether the SWITCH_PARTITION option of ALTER TABLE can be executed against the tracked table (which has very important implications). Consult SQL Server Books Online for more details on sp_cdc_enable_table parameters.

When you no longer require CDC on a particular table, you can call the sp_cdc_disable_table stored procedure on the table. This procedure drops the change table and the TVFs and updates the system metadata to reflect that the table is no longer tracked. When you no longer require CDC on the database, call the sp_cdc_disable_db stored procedure to completely disable CDC for the entire database.

Querying Change Data

While it is certainly possible to query the change table directly for change data, you will not normally do so. Instead, you will call a special TVF to query the change table for you. This TVF is also created for you by SQL Server automatically when the change table is created, and—like the change table—the TVF is also created in the cdc schema with a name based on the schema and table name of the tracked table. So again, if we’re tracking the dbo.Employee table, SQL Server creates a TVF named cdc.fn_cdc_get_all_changes_dbo_Employee that accepts parameters to select all changes that occur to dbo.Employee between any two desired points in time.

If you specify @supports_net_changes=1 when calling sp_cdc_enable_table, a second TVF is created for the change table as well. Like the first TVF, this one allows you to select changes between any two points in time, except that this TVF returns just the net (final) changes that occurred during that time frame. This means, for example, that if a row was added and then deleted within the time frame being queried using this second TVF, data for that row would not be returned—whereas the first TVF would return data that reflects both the insert and the delete. Similarly, if a row was updated several times within the same time frame, the first TVF will return each version while the second one will only return the last (final) version. This second TVF is named in a similar fashion as the first, except using the word net instead of all. So for dbo.Employee, this TVF is named cdc.fn_cdc_get_net_changes_dbo_Employee.

Neither of these TVFs accepts start and end times directly but instead require the range to be expressed as log sequence numbers (LSNs) by first calling sys.fn_cdc_map_time_to_lsn. So to query between two points in time, you call sys.fn_cdc_map_time_to_lsn twice—once for the start time and once for the end time—and then use the LSN values returned by this function as input values to the TVFs for querying change data.

CDC Walkthrough

Enough talking the talk. Now let’s walk the walk through the code for a complete example of using CDC.

CREATE DATABASE CDCDemo
GO

USE CDCDemo
GO

EXEC sp_cdc_enable_db

SELECT name, is_cdc_enabled FROM sys.databases
SELECT * FROM sys.schemas WHERE name = 'cdc'
SELECT * FROM sys.database_principals WHERE name = 'cdc'

After creating our sample database CDCDemo, we enable CDC on that database by calling EXEC sp_cdc_enable_db. The SELECT queries that follow demonstrate how to retrieve various kinds of CDC-related information. The first SELECT query shows how the is_cdc_enabled column in sys.databases returns true (1) or false (0), making it easy to find out which databases are CDC-enabled and which aren’t. The next two SELECT queries show how the new cdc schema and user can be found in sys.schemas and sys.database_principals.

CREATE TABLE Employee(
 EmployeeId    int NOT NULL PRIMARY KEY,
 EmployeeName  varchar(100) NOT NULL,
 EmailAddress  varchar(200) NOT NULL)

-- Enable CDC on the table (SQL Server Agent *should* be running when you run this)
EXEC sp_cdc_enable_table
 @source_schema = N'dbo',
 @source_name = N'Employee',
 @role_name = N'CDC_admin',
 @capture_instance = N'dbo_Employee',
 @supports_net_changes = 1

-- Show CDC-enabled tables
SELECT name, is_tracked_by_cdc FROM sys.tables

This code creates the Employee table (which has only three columns to keep our example simple). CDC is then enabled on the Employee table by calling EXEC sp_cdc_enable_table and passing parameters that identify the Employee table in the dbo schema for change capture. (Remember that SQL Server Agent must be running at this point.) The next SELECT statement shows how to query the is_tracked_by_cdc column in sys.tables to find out which tables are CDC-enabled and which aren’t.

Now let’s insert, update, and delete some data, and watch CDC in action:

-- Insert John, Dan, Jay, and Jeff
INSERT INTO Employee VALUES(1, 'John Smith', 'john.smith@ourcorp.com')
INSERT INTO Employee VALUES(2, 'Dan Park', 'dan.park@ourcorp.com')
INSERT INTO Employee VALUES(3, 'Jay Hamlin', 'jay.hamlin@ourcorp.com')
INSERT INTO Employee VALUES(4, 'Jeff Hay', 'jeff.hay@ourcorp.com')

-- Results from insert
WAITFOR DELAY '00:00:05' -- Let CDC catch up
SELECT * FROM Employee
SELECT * FROM cdc.dbo_employee_ct

-- Delete Jeff
DELETE Employee WHERE EmployeeId = 4

-- Results from delete
WAITFOR DELAY '00:00:05' -- Let CDC catch up
SELECT * FROM Employee
SELECT * FROM cdc.dbo_employee_ct

-- Update Dan and Jay
UPDATE Employee SET EmployeeName = 'Dan P. Park' WHERE EmployeeId = 2
UPDATE Employee SET EmployeeName = 'Jay K. Hamlin' WHERE EmployeeId = 3

-- Results from update
WAITFOR DELAY '00:00:05' -- Let CDC catch up
SELECT * FROM Employee
SELECT * FROM cdc.dbo_employee_ct

The preceding code performs a mix of INSERT, UPDATE, and DELETE operations against the Employee table to simulate database activity and engage the capture process. These operations are accompanied by SELECT statements that query the change table cdc.dbo_employee_ct (deliberate WAITFOR delays are strategically placed to give the CDC job a chance to pick up the changes from the transaction log and dump them into the change table). This is done purely to demonstrate that change data for the Employee table is being captured to the change table. However (as mentioned), you should normally not query the change tables directly in this manner and should instead use the generated TVF(s) to extract change information about the Employee table, as demonstrated by the following code:

-- To access change data, use the CDC TVFs, not the change tables directly
DECLARE @begin_time datetime
DECLARE @end_time datetime
DECLARE @from_lsn binary(10)
DECLARE @to_lsn binary(10)
SET @begin_time = GETDATE() - 1
SET @end_time = GETDATE()

-- Map the time interval to a CDC LSN range
SELECT @from_lsn =
 sys.fn_cdc_map_time_to_lsn('smallest greater than or equal', @begin_time)

SELECT @to_lsn =
 sys.fn_cdc_map_time_to_lsn('largest less than or equal', @end_time)

SELECT @begin_time AS BeginTime, @end_time AS EndTime
SELECT @from_lsn AS FromLSN, @to_lsn AS ToLSN

-- Return the changes occurring within the query window.

-- First, all changes that occurred...
SELECT *
 FROM cdc.fn_cdc_get_all_changes_dbo_employee(@from_lsn, @to_lsn, N'all')

-- Then, net changes, that is, final state...
SELECT *
 FROM cdc.fn_cdc_get_net_changes_dbo_employee(@from_lsn, @to_lsn, N'all')

Recall that enabling CDC on the Employee table creates a TVF for retrieving all changes made to the table between any two points in time. Recall too that by specifying @supports_net_changes = 1, this also creates a second TVF for retrieving only the net changes made between any two points in time. The difference between all changes and net changes is clearly illustrated when we call both of these TVFs and compare their results.

To call either of the generated TVFs, you need to provide a value range that defines the window of time during which the change data you want returned was captured. As already explained, this range is expressed using LSN values, which you can obtain by calling sys.fn_cdc_map_time_to_lsn and passing in the desired start and end points in time. So first we establish a time range for the past 24 hours, which we obtain by assigning GETDATE() – 1 and GETDATE() to the start and end time variables. Then we call sys.fn_cdc_map_time_to_lsn on the start and end time variables to obtain the LSN values corresponding to the last 24 hours. (Note that the starting LSN gets adjusted automatically to compensate for the fact there are no LSNs from 24 hours ago, as does the ending LSN, since there might not be any from a moment ago either.) We then issue two SELECT statements so that we can view the time and LSN range values. Equipped with the LSN range values, we issue two more SELECT statements. The first statement queries the range against the all changes TVF, and the second statement queries the range against the net changes TVF. Comparing the results of these two queries clearly illustrates the difference between the TVFs, as shown here:

BeginTime               EndTime
----------------------- -----------------------
2010-01-08 23:42:55.567 2010-01-09 23:42:55.567

(1 row(s) affected)

FromLSN                ToLSN
---------------------- ----------------------
0x0000001A0000001E0039 0x00000020000000A50001

(1 row(s) affected)

__$start_lsn           __$seqval              __$operation __$update_mask EmployeeId EmployeeName    EmailAddress
---------------------- ---------------------- ------------ -------------- ---------- --------------- -----------------------
0x0000001E0000007C0013 0x0000001E0000007C0012 2            0x07           1          John Smith      john.smith@ourcorp.com
0x0000001E000000800003 0x0000001E000000800002 2            0x07           2          Dan Park        dan.park@ourcorp.com
0x0000001E000000810003 0x0000001E000000810002 2            0x07           3          Jay Hamlin      jay.hamlin@ourcorp.com
0x0000001E000000820003 0x0000001E000000820002 2            0x07           4          Jeff Hay        jeff.hay@ourcorp.com
0x0000001E000000850004 0x0000001E000000850002 1            0x07           4          Jeff Hay        jeff.hay@ourcorp.com
0x0000001E000001AC0004 0x0000001E000001AC0002 4            0x02           2          Dan P. Park     dan.park@ourcorp.com
0x0000001E000001AE0004 0x0000001E000001AE0002 4            0x02           3          Jay K. Hamlin   jay.hamlin@ourcorp.com

(7 row(s) affected)

__$start_lsn           __$operation __$update_mask EmployeeId EmployeeName      EmailAddress
---------------------- ------------ -------------- ---------- ----------------- --------------------------
0x0000001E0000007C0013 2            NULL           1          John Smith        john.smith@ourcorp.com
0x0000001E000001AC0004 2            NULL           2          Dan P. Park       steven.jones@ourcorp.com
0x0000001E000001AE0004 2            NULL           3          Jay K. Hamlin     jay.hamlin@ourcorp.com

(3 row(s) affected)

The first result set includes all the information about all changes made during the specified LSN range, including all interim changes. Thus, the information returned from the first all changes TVF shows every stage of change, or seven changes in total. In our scenario, John was inserted once and then never changed. So only his insert (__$operation value 2) is shown. Dan and Jay were inserted (__$operation value 2) and updated (__$operation value 4), so both changes (insert and update) are returned for each of them. Jeff, on the other hand, was deleted (__$operation value 1) after being inserted, and so both changes (insert and delete) are returned for James. Note also that this TVF also returns a bitmask field in column __$update_mask that you can parse to determine, on a row-by-row basis, which fields were changed and which fields weren’t.

The second result set includes only the final changes made during the specified LSN range. So for the same LSN range, we receive only three change records from the second net changes TVF, each of which provides the final column values in the specified LSN range. John appears only once as in the previous query, since he was inserted only once and never modified or deleted within the LSN range. However, although Dan and Jay were inserted and updated, they each appear only once (with their final values for the LSN range), and not twice as in the previous query. And since Jeff was inserted and deleted within the window of time specified by the LSN range, no change data for Jeff is returned at all by the net changes TVF.

Summary

CDC can be used to address many common scenarios for capturing change data; auditing, history, data warehousing, and so on. The appeal to using CDC is its automatic and transparent operation over any existing database without requiring any changes to database schema or application code. It’s easy and straightforward, and definitely worth investigating!

Windows Virtual PC Quirks and Workarounds

If you’re moving from Microsoft Virtual PC 2007 to Windows Virtual PC on Windows 7, get ready for a few changes, plus some things that just don’t work quite right, especially with undo disks. After experiencing the pain of sorting it all out, I thought I’d write this post in the hopes that others can be spared the same grief.

Don’t get me wrong. Overall, I find Windows Virtual PC has some very nice enhancements over Microsoft Virtual PC 2007—particularly the new Integration Features, which supports guest machine access to host machine resources via a network shares (replacing Virtual Machine Additions that supported drag-and-drop between host and guest machines). But here are a few things that just might trip you up at first…

Shutdown options have been reorganized

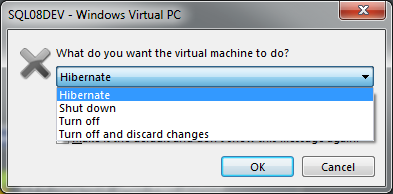
I find the new arrangement annoying, despite claims that it’s now “less confusing” (http://blogs.msdn.com/virtual_pc_guy/archive/2009/08/18/windows-virtual-pc-and-undo-disks.aspx). In any case, you won’t find the option to commit changes to the undo disk when shutting down the virtual machine. Instead, you can choose only to hibernate, shut down (properly, keep undo disk), turn off (pull the plug on the virtual machine, keep undo disk), or turn off and discard changes (pull the plug and delete undo disk), and to make that choice your default for the future:

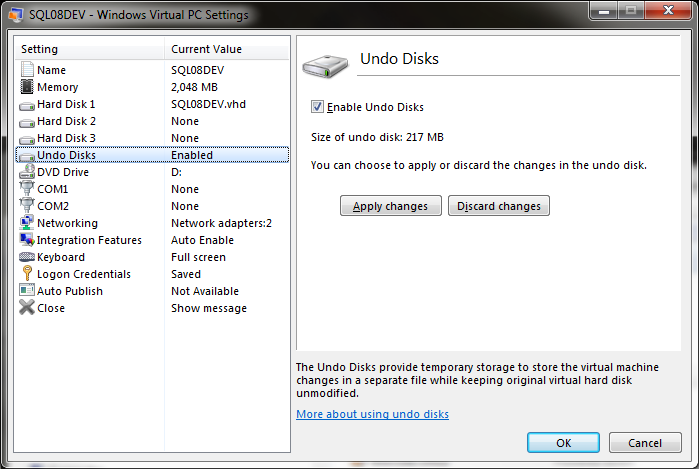
To commit the undo disk changes, you need to revisit the Settings for the virtual machine, open the Undo Disk settings page, and finally click Apply Changes:

Pain in the butt, if you ask me, but such is life. According to Microsoft, this is “easier,” so who am I to argue?

Finding the Undo disk location

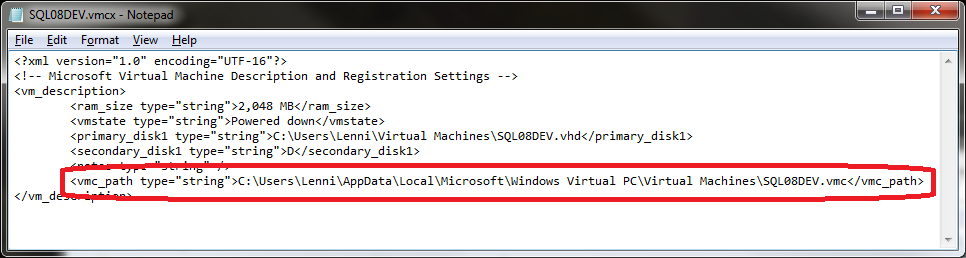
According to the docs, the .vud undo disk file is created and stored in the same folder as the virtual machine configuration file. That’s a bit confusing, because there are actually two virtual machine configuration files: the .vmcx file that is visible in x:\Users\YourName\Virtual Machines, and the .vmc file that is stored in the hidden folder x:\Users\YourName\AppData\Local\Microsoft\Windows Virtual PC\Virtual Machines, and the undo disk is stored in the latter (hidden) location. If you open the .vmcx file in Notepad, you’ll see that it refers to the .vmc file in the hidden folder:

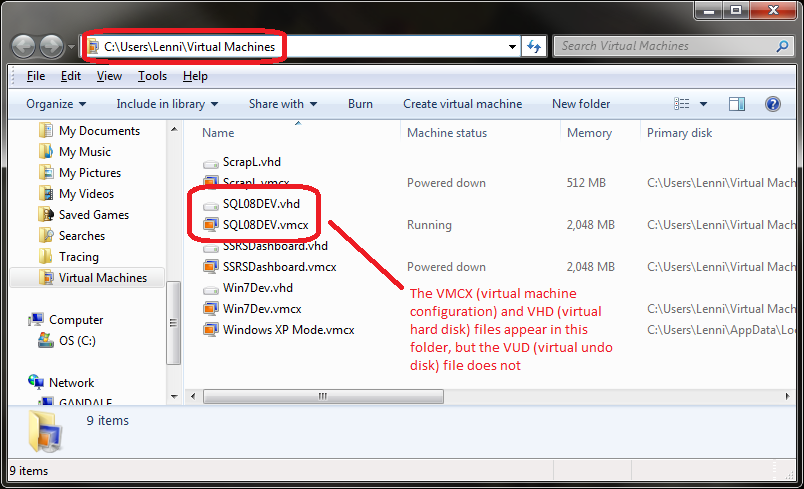
For example, after starting virtual machine SQL08DEV with undo disks enabled, you won’t find the .vud (undo disk) file alongside the .vmcx file in x:\Users\YourName\Virtual Machines:

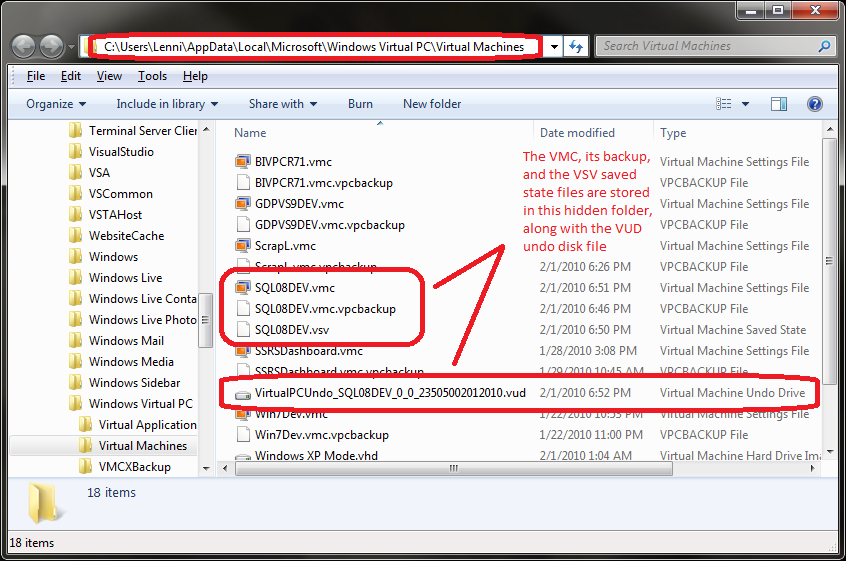
Before banging your head against the wall or jumping to the conclusion that Microsoft’s documentation is wrong (and I did both), just navigate to the real (hidden) directory and you’ll find it there alongside the .vmc file (and the .vmc.vpcbackup [backup] and .vsv [saved state] files):

Undo disks won’t merge if vmcx/vhd files are on separate drives

In Microsoft Virtual PC 2007, you gain superb performance by running your virtual hard disk (.vhd file) on an external hard drive (or even a flash drive), while the VM configuration (.vmc file) remains on the system disk. An undo disk automatically gets created in the same folder as the .vmc file (the system disk). The VM operates in this mode by exclusively reading from the external disk’s .vhd file, while simultaneously writing to the undo disk’s .vud file on the system disk—ipso facto, super-fast.

While this mode is still supported in Windows Virtual PC on Windows 7, there seems to be a bug that prevents you from eventually committing the undo disk changes back to the .vhd file on the external drive. No matter what—even after rebooting—Windows Virtual PC insists that the parent disk is inaccessible, and refuses to perform the merge. Of course if you don’t mind discarding the undo disk, this isn’t a problem (discarding the undo disk is a wonderful strategy for rolling back to a consistent state that sets the stage for a predictable and repeatable environment for presentations, development, or whatever). But when it comes time to merge, you’re hosed! Until they fix this, I’m forced to keep my .vhd files on my system disk (performance isn’t too bad though, on my screaming new Dell M6400 Intel Core Quad 12GB RAID 1 monster). Of course, if you’re not uncomfortable directly editing the XML in the vmc file, you may be able to shuffle the vhd back and forth between external and system disks. Hardly an elegant solution, and certainly not one that I’d recommend.

Integration Features won’t work if the virtual machine user account has no password

Integration Features in Windows Virtual PC has some nice advantages over the VM Additions in Microsoft Virtual PC 2007, but you will run into a problem enabling Integration Features if your virtual machine logs in with an account that has no password. That shouldn’t be a problem in most cases, since user accounts usually have assigned passwords, even on virtual machines. But some virtual machines, such as those used for demos, may have empty passwords. Unfortunately, the error message that Windows Virtual PC throws at you when you try to enable Integration Features on such virtual machines is anything but helpful. It would be nice to get a simple message telling you to just assign a password to your virtual machine user account. But instead, you simply get a failed authentication message with no indication that all will be fine if you just assign the missing password. You can try till you’re blue in the face (like I did), or just assign the password and move on.

Summary

Virtualization is awesome, and overall, Microsoft has done a good job of it with their Virtual PC products. Still, nothing in this life perfect—including software—so you need to watch out for these pitfalls when moving to Windows Virtual PC on Windows 7.

Using Transparent Data Encryption in SQL Server 2008

Happy New Year! 

I’ve got a juicy SQL Server post for you to ring in the new year – Transparent Data Encryption, available only in SQL Server 2008 Enterprise edition. This is good and powerful stuff that works, folks, so check it out here.

Sensitive information (passwords, credit card numbers, salary information, and so on) in your database needs to be encrypted. As of SQL Server 2005, you can encrypt and decrypt sensitive data columns in your tables using symmetric keys. You identify the columns that will hold sensitive information, and then invoke ENCRYPTBYKEY to store data in those columns, and DECRYPTBYKEY to retrieve data from those columns. The process is fairly straightforward, but it does require programming in your application for each encrypted column.

In SQL Server 2008 (Enterprise edition only), Microsoft has added a new feature called Transparent Data Encryption (TDE). This feature automatically encrypts the entire database (data and log files), as well as database backups, without requiring any programming or code changes to your application. The process is entirely transparent, hence the name Transparent Data Encryption. In this blog post, I’ll explain TDE, and demonstrate how to use this new security feature.

(Note that the NTFS file system in Windows Server 2000 and later provides a feature called Encrypted File System [EFS]. This feature also applies transparent encryption to any data stored on the hard drive, but it will not protect databases or backups that have been copied onto a CD or other media. TDE in SQL Server 2008 is based on a certificate that is needed to decrypt or restore any encrypted database, regardless of where the data is transferred.)

When TDE is first enabled for a specific database, SQL Server encrypts the database in the background. During this process, the database remains online and responsive to client requests (similarly, when encryption is disabled, SQL Server decrypts the database in the background). Encryption is performed at the page level, and does not increase the size of the database in any way. Once the entire database is encrypted, new data gets encrypted on the fly as it is written to disk, and all data gets decrypted when read back.  

Multiple Protection Layers

Databases protected with TDE are encrypted with a Database Encryption Key (DEK). You create the DEK and store it in the database, but the DEK itself is associated with a certificate that you create separately in the master database. This means that a backup of the database includes the DEK, but doesn’t include the certificate upon which the DEK is based. Hence, TDE database backups are useless to prying eyes, since they cannot be restored without the certificate. Finally, the certificate itself is encrypted by the Service Master Key (SMK), also contained in the master database.

To get started, you’ll need to create an SMK, if your server doesn’t have one already. Then you can create a certificate for TDE that is encrypted by the SMK which can be used to create one encrypt one or more DEKs. Finally, you create a DEK against the certificate in each database to be encrypted and then enable encryption on the database.

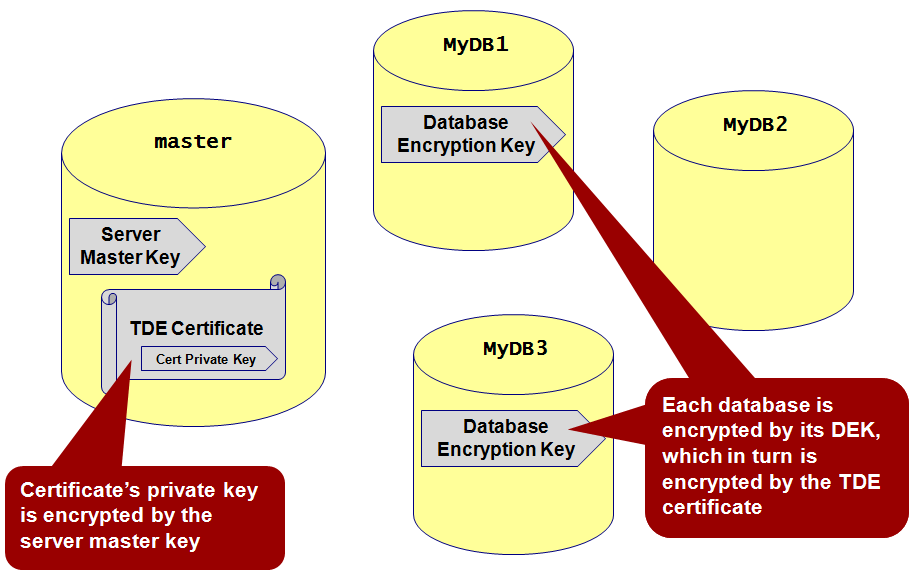
The following diagram illustrates how TDE might be used to encrypt two databases on one server instance:

In this diagram, you can see that the master database holds the SMK (there can be one and only one SMK on any server instance). The master database also holds a certificate whose private key is encrypted by the SMK. The two databases MyDB1 and MyDB3 are each encrypted with DEKs that are, in turn, encrypted by the certificate. The DEKs are entirely dependent on the certificate, so copying or restoring these databases to another server instance without also transferring the certificate upon which the DEKs are based yields a totally unusable database.   

Creating a Service Master Key (SMK)

If your server already has an SMK, you can skip this step. An SMK can only be created in the master database, and there can only be one SMK per server instance. If you don’t already have an SMK, you can create one as follows:   

USE master
GO   

CREATE MASTER KEY
  ENCRYPTION BY PASSWORD = 'Hrd2GessP@$$w0rd!' 

Creating a TDE Certificate

In general, certificates can be created in any database. However, certificates used for TDE must be created in the master database. It should be fairly obvious why the certificates used to encrypt DEKs in each encrypted database are stored outside the encrypted database in master (you wouldn’t want them stored in the encrypted database, as that would defeat the whole protection scheme!)   

USE master
GO 

CREATE CERTIFICATE MyEncryptionCert
  WITH SUBJECT = 'My Encryption Certificate' 

You can then query the sys.certificates view to confirm that the certificate has been created, as follows:   

SELECT name, pvt_key_encryption_type_desc FROM sys.certificates
  WHERE name = 'MyEncryptionCert'

The output confirms that the certificate was created and that its private key is protected by the master key, as shown here:   

name                             pvt_key_encryption_type_desc
-------------------------------- ----------------------------------
MyEncryptionCert                 ENCRYPTED_BY_MASTER_KEY  

(1 row(s) affected) 

Creating a Database Encryption Key (DEK)

Each database to be encrypted requires its own DEK, and each database’s DEK is in turn encrypted by the TDE certificate we just created in the master database. When creating the DEK, you can specify a particular encryption algorithm to be used. Supported algorithms include AES_128, AES_192, AES_256, TRIPLE_DES_3KEY. The DEK protects not only the data and log files, but backups too. Attempting to restore an encrypted database without the certificate is an exercise in futility.   The following T-SQL code creates a DEK for the MyDB database that specifies 128-bit encryption:   

USE MyDB
GO  

CREATE DATABASE ENCRYPTION KEY
  WITH ALGORITHM = AES_128
  ENCRYPTION BY SERVER CERTIFICATE MyEncryptionCert

Notice the ENCRYPTION BY SERVER CERTIFICATE clause that references the TDE certificate MyEncryptionCert we just created in the master database. This means that the MyEncryptionCert certificate must be present and available in the master database of the same server instance as MyDB, or the database will be rendered inaccessible.

(Because we have not yet backed up the TDE certificate, SQL Server issues a warning at this time alerting you to the fact that the certificate being used to encrypt the DEK has not been backed up. This warning should be taken seriously, since you will not be able to access any database encrypted by the DEK without the certificate. Should the certificate be lost or damaged, your encrypted databases will be completely inaccessible. Later in this post, I will show you how to back up and restore the certificate.)

Enabling TDE

With the SMK, certificate, and DEK prepared, you can start transparent data encryption on the database using the ALTER DATABASE…SET ENCRYPTION ON statement. For example:   

ALTER DATABASE MyDB SET ENCRYPTION ON

That’s all there is to it! From this point forward, the database and all of its backups will be encrypted. If an unauthorized party somehow gains access to the physical media holding any backups of MyDB, the backups will be useless without the certificate protecting the DEK.   

Querying TDE Views

You can query the catalog view sys.databases to see which databases are protected by TDE. For example:   

SELECT name, is_encrypted FROM sys.databases

The query results show that MyDB is the only encrypted database on the server:   

name                           is_encrypted
------------------------------ ------------
master                         0
tempdb                         0
model                          0
msdb                           0
ReportServer                   0
ReportServerTempDB             0
MyDB                           1  

(7 row(s) affected)

This output is somewhat misleading, however, since encrypting one or more databases results in the encryption of tempdb as well. This is absolutely necessary since tempdb is shared by all databases, and SQL Server must therefore implicitly protect temporary storage placed into tempdb by databases encrypted by TDE. But because the encryption in tempdb is implicit, is_encrypted is returned as 0 (false) by sys.databases for tempdb (you’ll see next that SQL Server does actually create DEK for tempdb). This can have an undesirable performance impact for unencrypted databases on the same server instance. For this reason, you may wish to consider isolating separate SQL Server instances; one for encrypted databases and one for non-encrypted databases.

You can also query the dynamic management view sys.dm_database_encryption_keys to see all the DEKs and to monitor the progress of encryption (or decryption, when you disable TDE) running on background threads managed by SQL Server. This view returns the unique database ID that can be joined on sys.databases to see the actual database name. For example, if we run the following query after enabling TDE, we can obtain information about the DEK and background encryption process:   

SELECT
   dbs.name,
   keys.encryption_state,
   keys.percent_complete,
   keys.key_algorithm,
   keys.key_length
 FROM
   sys.dm_database_encryption_keys AS keys
   INNER JOIN sys.databases AS dbs ON keys.database_id = dbs.database_id

If this query is executed after we enable TDE but before SQL Server has completed encrypting the entire database in the background, we get results similar to the following:   

name       encryption_state percent_complete key_algorithm    key_length
---------- ---------------- ---------------- ---------------- -----------
tempdb     3                0                AES              256
MyDB       2                78.86916         AES              128   

(2 row(s) affected) 

The value returned by encryption_state tells you the current status of encryption (or decryption), as follows:

1 = Unencrypted
2 = Encryption in progress
3 = Encrypted
4 = Key change in progress
5 = Decryption in progress (after ALTER DATABASE…SET ENCRYPTION OFF)

Certain database operations cannot be performed during any of the “in progress” states (2, 4, or 5). These include enabling or disabling encryption, dropping or detaching the database, dropping a file from a file group, taking the database offline, or transitioning the database (or any of its file groups) to a READ ONLY state. Also note the implicit DEK for tempdb created by SQL Server, which always uses AES_256 encryption.  

Backing Up the Certificate

 It is extremely important to back up the server certificates you use to encrypt your databases with TDE. Without the certificate, you will not be able to access the encrypted database or restore encrypted database backups (which, of course, is the point of TDE). Attempting to restore an encrypted database without the certificate will fail with an error similar to this from SQL Server:   

Msg 33111, Level 16, State 3, Line 1
Cannot find server certificate with thumbprint '0x6B1FEEEE238847DE75D1850FA20D87CF94F71F33'.
Msg 3013, Level 16, State 1, Line 1
RESTORE DATABASE is terminating abnormally. 

Use the following statement to back up the server certificate to a file. In addition to the certificate itself, the certificate’s private key must also be saved to a file and protected with a password: 

BACKUP CERTIFICATE MyEncryptionCert TO FILE='C:\MyEncryptionCert.certbak'
 WITH PRIVATE KEY (
  FILE='C:\MyEncryptionCert.pkbak',
  ENCRYPTION BY PASSWORD='Pr!vK3yP@ssword')

This statement creates two files: MyEncryptionCert.certbak is a backup of the server certificate, and MyEncryptionCert.pkbak is a backup of the certificate’s private key protected with the password Pr!vK3yP@ssword. Password protection is absolutely required when backing up the certificate’s private key. Both of these files and the password will be needed to restore an encrypted database backup onto another server or instance. At the risk of stating the obvious, these backup files and the private key password should be closely safeguarded.

Restoring the Certificate

Before an encrypted database can be restored elsewhere, the server certificate that its DEK is encrypted by must be restored first. And if the target instance does not have a master key, one must be created for it before the server certificate can be restored, as shown here:

USE master

GO
CREATE MASTER KEY ENCRYPTION BY PASSWORD = 'An0thrHrd2GessP@ssw0rd!'

To restore the server certificate from the backup files we made earlier, use an alternative form of the CREATE CERTIFICATE statement, as follows:

CREATE CERTIFICATE MyEncryptionCert
 FROM FILE='C:\MyEncryptionCert.certbak'
 WITH PRIVATE KEY(
  FILE='C:\MyEncryptionCert.pkbak',
  DECRYPTION BY PASSWORD='Pr!vK3yP@ssw0rd')

This statement restores the MyEncryptionCert server certificate from the certificate backup file MyEncryptionCert.certbak and the certificate’s private key backup file MyEncryptionCert.pkbak. Naturally, the password provided in the DECRYPTION BY PASSWORD clause must match the one that was used when the certificate’s private key was backed up or the certificate will fail to restore. With a successfully restored certificate, you can then restore the backup of any encrypted database whose DEK is based on the MyEncryptionCert certificate.   

Summary

With the growing concern about personal data protection and the proliferation of computer viruses, developing a methodology for secure computing continues to be a vital task for developers. With support for Transparent Data Encryption in SQL Server 2008, you can easily implement an additional layer of security by encrypting your entire database without making any code changes in your application. Now go give it a try, and enjoy!

Data/View Separation in Word 2007 using Word XML Data Binding and OpenXML

The OpenXML file format used by Microsoft Office 2007 enables programmatic document manipulation without automating Word, so that Word does not need to be installed alongside your code, which is great for server applications. In this post, I’ll show you how to use OpenXML to implement bi-directional data binding between a Word document and XML data. This new feature in Word 2007 delivers the best data/view separation we’ve seen to date in Microsoft Office. And (for a LINQ junkie such as myself, anyway) the best part is that it works so nicely with LINQ to XML.

We’ll begin by creating a document with content controls. Then we’ll write a small amount of code to embed an XML file into the document and bind the content controls to various elements in the XML.

Before starting, you need to download the OpenXML SDK 2.0. Once the SDK is installed, you’ll have the assemblies you need to programmatically manipulate Office documents using the OpenXML API. You can download the SDK from here: http://www.microsoft.com/downloads/details.aspx?FamilyId=C6E744E5-36E9-45F5-8D8C-331DF206E0D0&displaylang=en

Create the Document

We’ll create a simple document with three content controls that will be bound to the following XML data:

<Customer>
  <Name>John Doe</Name>
  <Expiration>2/1/2010</Expiration>
  <AmountDue>$129.50</AmountDue>
</Customer>

Start a new document in Word 2007, and type the word Dear followed by a space. We now want to inject our first content control for the customer name. You can add content controls to your document from the Developer tab on the ribbon, but since that tab is hidden by default, you’ll need to show it first. Click the Office button and choose Word Options. Then check the “Show Developer tab in the Ribbon” checkbox and click OK.

With the cursor still positioned after the text “Dear “, click in the Developer tab to insert a new Text content control:

We’ll be assigning tag names to identify content controls for data binding in our code. To view the tag names in Word as we setup the content controls, click the Design Mode button in the Developer tab:

With the content control still selected, click Properties:


Set the Tag of the content control to Customer/Name, which is an XPath expression that refers to the <Name> element nested inside the <Customer> element of our XML data.

Click OK to close the dialog box. Notice how Word displays the tag name in the content control in Design Mode:


Continue adding text to the document, and insert two more content controls in a similar fashion for the expiration date and amount due fields. Use the same Text content control for the amount due field like we used for the customer name field, but use a Date Picker content control for the expiration date field:

After setting the tag names of the additional content controls to the appropriate XPath expressions (Customer/Expiration and Customer/AmountDue), your document should look something like this:

Turn off Design Mode to hide the tag names from the content controls:

Save the document as CustomerReminder.docx. We have already established a separation of variable data and fixed document text, and could easily setup document protection at this point to allow manual data entry only for content controls. That’s cool all by itself, but we’re going to take this to the next level and implement automatic data binding between these content controls and a separate XML file. Although Word doesn’t care what values you assign to content control tags, we will now write code to find all tagged content controls, and treat those tags as XPath expressions that point to various XML elements in our XML data.

If you’re not already aware, all Office 2007 documents (including Word docx files) are actually compressed zip files (“packages”) that hold a collection of related XML “parts.” You can see this easily by simply appending .zip to the document filename and then opening it from Windows Explorer:

After examining the contents of the document package, rename the filename extension back to “.docx.”

Write the Code

Start Visual Studio and create a new Windows Forms project. Now set references to the two assemblies you’ll need for OpenXML programming: DocumentFormat.OpenXml and WindowsBase (these can be found on the .NET tab of the Add Reference dialog box). The first assembly exposes the OpenXML object model for document manipulation, and the second assembly provides the support for embedding and extracting parts to and from the document package:

Drop a button onto the form named btnInit and supply code for its Click event handler. You’ll also need a few additional using statements for importing some namespaces. The complete code listing below shows the required using statements and the btnInit_Click event handler.

using System;
using System.IO;
using System.Linq;
using System.Windows.Forms;
using System.Xml.Linq;

using DocumentFormat.OpenXml.Packaging;
using DocumentFormat.OpenXml.Wordprocessing;

namespace OpenXmlWordDataBinding
{
  public partial class Form1 : Form
  {
    public Form1()
    {
      InitializeComponent();
    }

    private void btnInit_Click(object sender, EventArgs e)
    {
      var xml =
        new XElement("Customer",
          new XElement("Name", "John Doe"),
          new XElement("Expiration", "2/1/2010"),
          new XElement("AmountDue", "$129.50"));

      var docxFile = @"..\..\CustomerReminder.docx";

      using (var wpd = WordprocessingDocument.Open(docxFile, true))
      {
        var mainPart = wpd.MainDocumentPart;
        var xmlPart = mainPart.AddNewPart<CustomXmlPart>();
        using (Stream partStream = xmlPart.GetStream(FileMode.Create, FileAccess.Write))
        {
          using (StreamWriter outputStream = new StreamWriter(partStream))
          {
            outputStream.Write(xml);
          }
        }

        var taggedContentControls =
          from sdt in mainPart.Document.Descendants<SdtRun>()
          let sdtPr = sdt.GetFirstChild<SdtProperties>()
          let tag = (sdtPr == null ? null : sdtPr.GetFirstChild<Tag>())
          where tag != null
          select new
          {
            SdtProps = sdtPr,
            TagName = tag.GetAttribute("val", "http://schemas.openxmlformats.org/wordprocessingml/2006/main").Value
          };

        foreach (var taggedContentControl in taggedContentControls)
        {
          var binding = new DataBinding();
          binding.XPath = taggedContentControl.TagName;
          taggedContentControl.SdtProps.Append(binding);
        }

        mainPart.Document.Save();
      }
    }
  }
}

Let’s analyze this code piece by piece. First, we construct the XML data as a graph of XML objects using LINQ to XML functional construction:

var xml =
  new XElement("Customer",
    new XElement("Name", "John Doe"),
    new XElement("Expiration", "2/1/2010"),
    new XElement("AmountDue", "$129.50"));

Next, we invoke WordprocessingDocument.Open to open the Word document for write access using the OpenXML SDK. We do this inside of a using block to ensure proper disposal of unmanaged resources in the event that unhandled exception occurs inside of the block. The boolean true value specified for the second parameter means that we’re opening the document for write access:

var docxFile = @"..\..\CustomerReminder.docx";
using (var wpd = WordprocessingDocument.Open(docxFile, true))

Our code needs to do two things to the document at this point: add a new XML part containing the data to be bound, and assign the appropriate bindings to the content controls. Realize that this is code that will only execute once; subsequently, we’ll only be extracting/embedding the XML part from/to the document package using normal zip compression methods.

Add a New XML Part

With the document open and accessible to our code via the wpd variable, we invoke the AddNewPart<CustomXmlPart> method on wpd.MainDocumentPart to retrieve a new XML part in xmlPart. The new XML part exposes a GetStream method that enables us to stream content into and out of it. We take the generic Stream returned by GetStream and wrap a StreamWriter around it. The XML content can then be sent into the new XML part by writing to the StreamWriter. Again, we use nested using blocks on the stream objects to ensure proper cleanup if an exception occurs:

var mainPart = wpd.MainDocumentPart;
var xmlPart = mainPart.AddNewPart<CustomXmlPart>();
using (Stream partStream = xmlPart.GetStream(FileMode.Create, FileAccess.Write))
{
  using (StreamWriter outputStream = new StreamWriter(partStream))
  {
    outputStream.Write(xml);
  }
}

Now that the XML data is embedded as an XML part inside of the document’s .docx package, it’s available for data binding to content controls. The next and last thing we need to do is to programmatically find the tagged content controls inside the document and assign XML data bindings using the XPath expressions we defined in the content control tags.

Add the Data Bindings

Learning how to program Word with OpenXML is all about exploring the special XML markup language used by Word (a dialect known as WordprocessingML) and discovering the element and attribute names used to represent the document. You can view the document’s markup by examining the word/document.xml part inside of the .docx package. It can take quite a bit of detective work as you undergo the exploration and discovery process, but once you’re armed with the information you need, it’s very simple and straightforward to write a LINQ to XML query to get at what you need to in the document.

For example, here is how the customer name content control is expressed in WordprocessingML:

<w:sdt>
     <w:sdtPr>
           <w:tag w:val="Customer/Name"/>
           <w:id w:val="852281"/>
           <w:placeholder>
                <w:docPart w:val="DefaultPlaceholder_22675703"/>
           </w:placeholder>
           <w:showingPlcHdr/>
           <w:text/>
     </w:sdtPr>
     <w:sdtContent>
           <w:r w:rsidRPr="004E1B99">
                <w:rPr>
                      <w:rStyle w:val="PlaceholderText"/>
                </w:rPr>
                <w:t>Click here to enter text.</w:t>
           </w:r>
     </w:sdtContent>
</w:sdt>

An analysis of this XML shows how Word stores content controls inside a document. Specifically, Word creates a <w:sdt> element (structured document tag) and nests a <w:sdtPr> element (structured document tag properties) inside of it. And nested beneath that, Word stores the content control’s tag name in the w:val attribute of a <w:Tag> element. These element names can be referred to programmatically using the OpenXML API type names SdtRun, SdtProperties, and Tag, respectively. Thus, the following LINQ to XML query retrieves all tagged content controls in our document:

var taggedContentControls =
  from sdt in mainPart.Document.Descendants<SdtRun>()
  let sdtPr = sdt.GetFirstChild<SdtProperties>()
  let tag = (sdtPr == null ? null : sdtPr.GetFirstChild<Tag>())
  where tag != null
  select new
  {
     SdtProps = sdtPr,
     TagName = tag.GetAttribute("val", "http://schemas.openxmlformats.org/wordprocessingml/2006/main").Value
  };

In this query, the from clause uses the Descendants<SdtRun> method to retrieve all the <w:sdt> elements in the document. For each one, the first let clause uses the GetFirstChild<SdtProperties> method to retrieve the nested <w:sdtPr> element beneath it. The second let clause then performs a similar operation to retrieve the <w:tag> element nested beneath that. Since you cannot assume that every <w:sdt> element will always have a nested <w:sdtPr> element, the second let clause tests sdtPr for null before trying to invoke GetFirstChild<Tag> on it. The where clause ultimately filters our all content controls that have not been tagged.

The select clause constructs an anonymous type that returns two properties for each tagged content control. The first is the <w:sdtPr> which will be needed to reference the location at which we’ll inject the XML binding element. The second is the tag name extracted from the <w:tag> element’s <w:val> attribute (the full OpenXML namespace needs to be specified for w to retrieve the attribute value), which supplies the XPath expression for the binding. The LINQ query returns the results in a sequence that we then iterate to set the bindings:

foreach (var taggedContentControl in taggedContentControls)
{
  var binding = new DataBinding();
  binding.XPath = taggedContentControl.TagName;
  taggedContentControl.SdtProps.Append(binding);
}

mainPart.Document.Save();

For each tagged content control, we create a DataBinding object, set its XPath property to the tag name which is known provide an XPath expression referencing the desired XML data, and add the binding as a new element inside of the <w:sdtPr> element. Finally, invoking the Save method saves the modified document back to disk. If you examine the WordprocessingML now, you’ll see that our code added a <w:dataBinding> element with a w:xpath attribute to the <w:sdtPr> element in each content control. For example, the customer name content control now has the following element in its <w:sdtPr> section:

<w:dataBinding w:xpath="Customer/Name" />

Now let’s examine the docx package again. Add the .zip extension to the document filename and crack it open. Notice the new customXML folder that wasn’t there before. This is where all custom XML parts added to the document get stored.

Double-click the customXML folder to reveal the item.xml file contained inside of it:

Now double-click item.xml to view it in IE:

Look familiar? That’s the XML our code injected into the document as a custom XML part!

Now close the zip, rename the file back as .docx, and open it in Word:

All the content placeholders have now been filled in with data from our XML file Does it get better than this? You bet! This thing works bi-directional. So go ahead and change John Doe to Sue Taylor:

Now save the document, and rename it as .zip once again. This time, extract the item.xml file instead of opening it in IE, so that you can edit it in Notepad:

Beautiful. Word pushed the data from the modified content controls in the document back out to the XML file. Let’s now edit the XML; for example, we’ll change the expiration date:

Save the XML file, push it back into the zip package, rename the zip package back to .docx, and re-open it in Word one last time:

Now that’s what I call data/view separation! With XML data binding in Word, your application can easily view and change data elements without ever digging into the document text.

Of course, this only scratches the surface of what’s possible with OpenXML. It’s also worth mentioning that the same thing can be achieved using VSTO (Visual Studio Tools for Office) and the Word object model, but we’ll leave that for a future post. Until then, happy coding!