It’s a File System… It’s a Database Table… It’s SQL Server Denali FileTable!

SQL Server 2008 introduced FILESTREAM, an innovative feature that integrates the relational database engine with the NTFS file system to provide highly efficient storage and management of BLOBs. Now FileTable, a new feature coming in the next version of SQL Server (code-named “Denali”), builds on FILESTREAM and takes database BLOB management to the next level. In this post, I’ll explain FileTable and show you how it works. I also encourage you to experiment with FileTable yourself by downloading and installing SQL Server Denali CTP3 from http://bit.ly/DenaliCTP3 (but be sure to install it on a virtual machine; beta software can be difficult or impossible to uninstall).

Note: FileTable relies on FILESTREAM, so you need to understand FILESTREAM to fully understand FileTable. If you’re new to FILESTREAM, you can get the necessary background by reading my three earlier blog posts Introducing FILESTREAM, Enabling and Using FILESTREAM, and Using SqlFileStream.

FileTable combines FILESTREAM with hierarchyid (another SQL Server 2008 feature) and the Windows file system API to deliver new and exciting BLOB capabilities in SQL Server. (I just love seeing reusability leveraged like this.) Like the two words joined in its name, one FileTable functions as two distinct things simultaneously:

  1. A FileTable is an Ordinary Table
  2. A FileTable is an Ordinary File System

First and foremost, a FileTable is a regular SQL Server database table in every respect, with one exception: The schema of a FileTable is fixed. The columns of a FileTable and their data types are pre-determined by SQL Server. Specifically, every FileTable contains these columns:

Column Name Data Type Description
stream_id uniqueidentifier ROWGUIDCOL Unique row identifier
file_stream varbinary(max) FILESTREAM BLOB content (NULL if directory)
name nvarchar(255) Name of file or directory
path_locator hierarchyid Location of file or directory within the logical file system
creation_time datetimeoffset(7) Created
last_write_time datetimeoffset(7) Last Modified
last_access_time datetimeoffset(7) Last Accessed
is_directory bit 0=file, 1=directory
is_offline bit Storage attributes
is_hidden bit
is_readonly bit
is_archive bit
is_system bit
is_temporary bit

Every FileTable implements a logical folder structure using the path_locator column. This is a hierarchyid value that denotes the location of each file and folder (row) within the logical file system (table). The hierarchyid data type was introduced in SQL Server 2008 as a binary value that, relative to other hierarchyid values in the same tree structure, identifies a unique node position (reminder to self: blog on hierarchyid!). It is implemented as a system CLR type, which means that it’s a .NET framework class, and has a set of methods you can use (e.g., GetAncestor, GetDescendant, GetReparentedValue, IsDescendantOf, etc.) to traverse and manipulate the hierarchy. Thus, it’s perfect for casting the hierarchical structure of a file system over a relational table, as FileTable does.

The path_locator column is defined as the table’s primary key with a non-clustered index. A separate key value is also stored in the stream_id column with a non-clustered unique index. This is the uniqueidentifier ROWGUIDCOL value required by any table with varbinary(max) FILESTREAM columns, so FileTable is no exception. And unlike path_locator, this unique value will never change once it is assigned to a new FileTable row, even if the row is later “reparented” (i.e., moved to another location in the hierarchy). Thus, you should treat stream_id as each row’s “ID,” even though it isn’t the table’s primary key.

Every row in a FileTable corresponds precisely to either a single file or folder, as determined by the bit value in the is_directory column. The file or folder name is stored in the name column as an nvarchar(255) string. All of the other column names are self-describing, and are used to store typical file system information such as various timestamps and storage attributes. The actual file content (the BLOB itself) is stored in the file_stream column, which is a varbinary(max) data type decorated with the FILESTREAM attribute. This means that the binary content in the file_stream column is stored in the NTFS file system that SQL Server is managing behind the scenes, rather than the structured file groups where all the other table data is stored (standard FILESTREAM behavior in SQL Server 2008).

In addition to these fourteen columns, each FileTable includes the following three computed (read-only) columns:

Column Name Data Type Description
parent_path_locator hierarchyid Parent node derived from path_locator
file_type nvarchar(255) Extension derived from name
cached_file_size bigint BLOB byte length derived from file_stream

The parent_path_locator column returns the result of calling GetAncestor(1) on path_locator to obtain the path_locator to the parent folder of any file or folder in the table. The file_type column returns the extension of the filename parsed from the string value in the name column. And the cached_file_size column returns the number of bytes stored in the file_stream column (these are BLOBs stored in SQL Server’s internally-managed NTFS file system behind the scenes).

With this fixed schema in place, every FileTable has what it needs to represent a logical file system. Thus, SQL Server is able to fabricate a Windows file share over any FileTable. This magically exposes the FileTable to any user or application who can then view and update the table using standard file I/O semantics (e.g., drag-and-drop with Windows Explorer, or read/write with System.IO.FileStream). So:

  • Creating a file or directory in the logical file system adds a row to the table
  • Adding a row to the table creates a file or directory in the logical file system

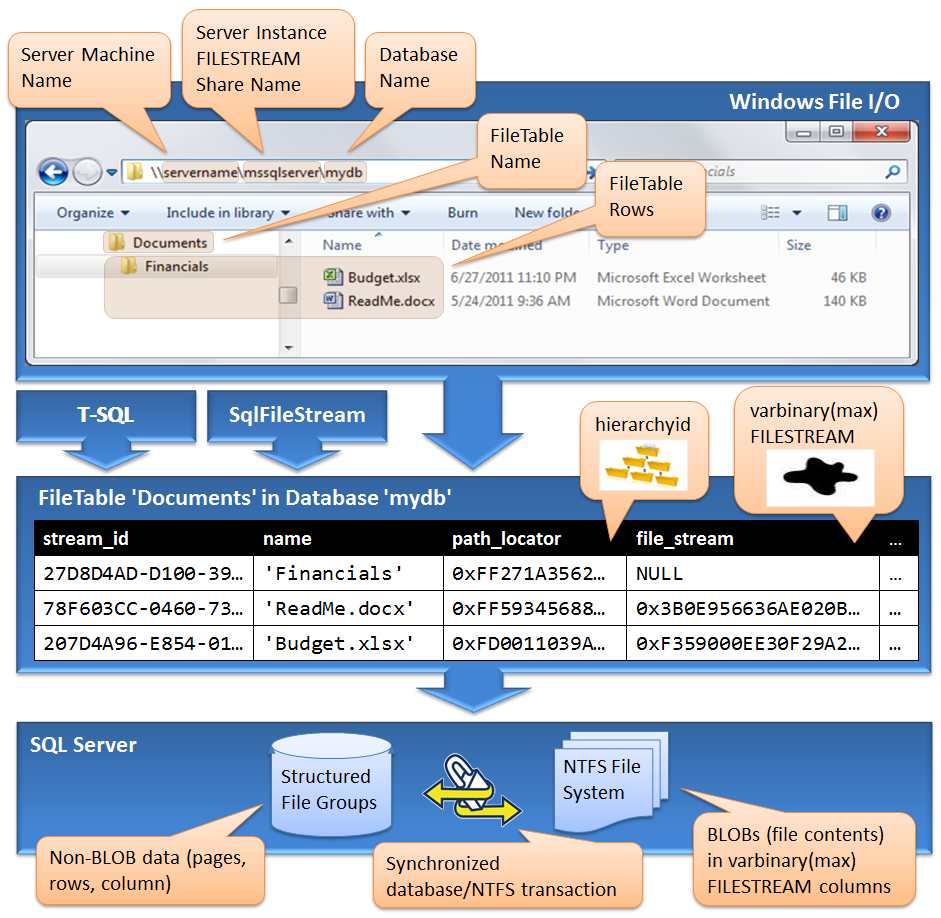
Here’s the total FileTable picture:

Take a moment to digest what’s happening here. In addition to the programmatic FILESTREAM access using either T-SQL or SqlFileStream, Denali now offers a third interface to FILESTREAM: A logical file system. In a sense, this fills the SQL Server 2008 FILESTREAM gap in which the file system itself is completely inaccessible. This is not to say that FileTable lets you directly access SQL Server’s internally managed NTFS file system; certainly not. That remains obfuscated and private, as it continues to function in standard FILESTREAM fashion against BLOB data that just happens to be in a FileTable instead of a regular table. What we do get is an abstraction layer over the FileTable that functions as a standard file system. In this logical file system, everything about each file and folder—except the BLOB content of the files themselves—is stored in the FileTable’s structured file group, while the BLOBs themselves are physically stored in the NTFS file system.

So you can see that there’s really nothing new beneath the FileTable layer; as before, SQL Server synchronizes transactional access between the row in the FileTable and its corresponding BLOB content in the NTFS file system to ensure that integrity is properly maintained between them. As with T-SQL access, this synchronization occurs implicitly when manipulating the FileTable via the exposed Windows file share. And, being an ordinary table in virtually every respect, you also have the option to use SqlFileStream with explicit transaction synchronization for the fastest possible streaming of BLOBs into and out of a FileTable.

I don’t know about you, but I find all of this extremely appealing. We now have total flexibility for BLOB storage in the database. With FileTable, you can easily migrate existing applications that work against physical file systems without writing any custom T-SQL or fancy SqlFileStream code. Just use a FileTable, let the existing applications continue working without modification, and enjoy the benefits of your files becoming an integral part of the SQL Server database.

That’s the whole FileTable story. The rest of this post just walks you through the steps and syntax for getting a FileTable up and running. It’s quite simple and straightforward. Specifically, you’ll need to:

  • Enable FILESTREAM for file system access
  • Create a FileTable-enabled database
  • Create a FileTable

Enable FILESTREAM for File System Access

FILESTREAM must be enabled for file system access at both the service level (either during setup, or later via the SQL Server Configuration Manager) and at the instance level. Complete details can be found in my Enabling and Using FILESTREAM post. Once enabled, SQL Server exposes a file share for all the FileTable-enabled databases you create under the SQL Server instance (by default, the share name is MSSQLSERVER).

The following statement enables FILESTREAM at the instance level for file system access (level 2).

EXEC sp_configure filestream_access_level, 2
RECONFIGURE

Create a FileTable-Enabled Database

Naturally, a FileTable-enabled database must include the FILEGROUP…CONTAINS FILESTREAM clause expected of any FILESTREAM-enabled database. In addition, you must also specify two parameters in the SET FILESTREAM clause of the the CREATE DATABASE (or ALTER DATABASE) statement. The DIRECTORY_NAME specifies the name of the folder that will be created for this database in the root file share associated with the instance. And enabling full non-transacted access with NON_TRANSACTED_ACCESS=FULL exposes every FileTable within the database as a subfolder beneath the database folder of the instance’s file share.

CREATE DATABASE PhotoLibrary
 ON PRIMARY
  (NAME = PhotoLibrary_data,
   FILENAME = 'C:\DB\PhotoLibrary_data.mdf'),
 FILEGROUP FileStreamGroup CONTAINS FILESTREAM
  (NAME = PhotoLibrary_blobs,
   FILENAME = 'C:\DB\Photos')
 SET FILESTREAM(
  (DIRECTORY_NAME='PhotoLibrary',
   NON_TRANSACTED_ACCESS=FULL)
 LOG ON
  (NAME = PhotoLibrary_log,
   FILENAME = 'C:\DB\PhotoLibrary_log.ldf')

Create a FileTable

Not surprisingly, this is the easiest part. Since SQL Server controls the schema of every FileTable, you just use a CREATE TABLE statement with the new AS FileTable clause and don’t include any columns:

CREATE TABLE PhotoFiles AS FileTable

Your FileTable is ready to use. You will find a root PhotoFiles folder for the FileTable beneath the PhotoLibrary folder created for the database in the Windows file share for the instance. You can interact with the FileTable using T-SQL, SqlFileStream, or the logical file system exposed by the Windows file share.

Summary

FILESTREAM + hierarchyid + Windows File Share = FileTable

Genius! Enjoy…

Using SqlFileStream in C# to Access SQL Server FILESTREAM Data

FILESTREAM is a powerful feature in SQL Server that stores varbinary(max) column data (BLOBs) in the file system (where BLOBs belong) rather than in the database’s structured file groups (where BLOBs kill performance). This feature was first introduced in SQL Server 2008, and is now being expanded with the new FileTable feature coming in SQL Server 2012 (code-named “Denali”), which I’ll cover in a near-future post (as well as in my Programming Microsoft SQL Server 2012 book, which I’m writing now).

If you’re not already familiar with FILESTREAM, you can get the necessary background by reading my two earlier blog posts: Introducing FILESTREAM and Enabling and Using FILESTREAM. In this post, I’ll show you how to use the SqlFileStream class to achieve high-performance streaming of SQL Server FILESTREAM data in your C# applications. This is a simplified version of the OpenSqlFilestream code I presented in my Using the OpenSqlFilestream API blog post.

What Is SqlFileStream?

SqlFileStream is a class in the .NET Framework (.NET 3.5 SP1 and higher) that wraps the OpenSqlFilestream function exposed by the SQL Server Native Client API. This lets you stream BLOBs directly between SQL Server and your .NET application written in C#. SqlFileStream is always used within a transaction, just at the point that you want to store and retrieve BLOBs to and from varbinary(max) FILESTREAM columns. At that point in time, SQL Server will “step aside” and let you stream directly against the server’s NTFS file system—a native environment optimized for streaming. This provides you with a streaming “tunnel” between your application and SQL Server’s internally-managed file system. Using SqlFileStream will give your application lightning-fast BLOB performance. Let’s dive in!

Creating the Database

Before getting started, be sure that FILESTREAM is enabled for remote file system access at both the Windows Service and SQL Server instance levels (as explained in Enabling and Using FILESTREAM). Then create a FILESTREAM-enabled database as follows (be sure to create the directory, C:\DB in this example, before creating the database):

CREATE DATABASE PhotoLibrary
 ON PRIMARY
  (NAME = PhotoLibrary_data,
   FILENAME = 'C:\DB\PhotoLibrary_data.mdf'),
 FILEGROUP FileStreamGroup CONTAINS FILESTREAM
  (NAME = PhotoLibrary_blobs,
   FILENAME = 'C:\DB\Photos')
 LOG ON
  (NAME = PhotoLibrary_log,
   FILENAME = 'C:\DB\PhotoLibrary_log.ldf')

Next, use the database and create a table for BLOB storage as follows:

USE PhotoLibrary
GO

CREATE TABLE PhotoAlbum(
 PhotoId int PRIMARY KEY,
 RowId uniqueidentifier ROWGUIDCOL NOT NULL UNIQUE DEFAULT NEWID(),
 Description varchar(max),
 Photo varbinary(max) FILESTREAM DEFAULT(0x))

In this table, the Photo column is declared as varbinary(max) FILESTREAM, and will hold pictures that will be stored in the file system behind the scenes. (Refer to Enabling and Using FILESTREAM for a complete explanation of the varbinary(max) FILESTREAM and ROWGUIDCOL columns.) Notice the default value we’ve established for the BLOB column. The value 0x represents a zero-length binary stream, which is different than NULL. Think of it as the difference between a zero-length string and a null string in .NET; the two are not the same. Similarly, you won’t be able to use SqlFileStream against NULL instances of varbinary(max) FILESTREAM columns, and you’ll soon see why.

Writing SqlFileStream Code

Start Visual Studio, create a new Class Library project, and add a PhotoData class as follows:

using System;
using System.Data;
using System.Data.SqlClient;
using System.Data.SqlTypes;
using System.Drawing;
using System.IO;
using System.Transactions;

namespace PhotoLibraryApp
{
  public class PhotoData
  {
    private const string ConnStr =
      "Data Source=.;Integrated Security=True;Initial Catalog=PhotoLibrary;";

    public static void InsertPhoto
      (int photoId, string desc, string filename)
    {
      const string InsertTSql = @"
        INSERT INTO PhotoAlbum(PhotoId, Description)
          VALUES(@PhotoId, @Description);
        SELECT Photo.PathName(), GET_FILESTREAM_TRANSACTION_CONTEXT()
          FROM PhotoAlbum
          WHERE PhotoId = @PhotoId";

      string serverPath;
      byte[] serverTxn;

      using (TransactionScope ts = new TransactionScope())
      {
        using (SqlConnection conn = new SqlConnection(ConnStr))
        {
          conn.Open();

          using (SqlCommand cmd = new SqlCommand(InsertTSql, conn))
          {
            cmd.Parameters.Add("@PhotoId", SqlDbType.Int).Value = photoId;
            cmd.Parameters.Add("@Description", SqlDbType.VarChar).Value = desc;
            using (SqlDataReader rdr = cmd.ExecuteReader())
            {
              rdr.Read();
              serverPath = rdr.GetSqlString(0).Value;
              serverTxn = rdr.GetSqlBinary(1).Value;
              rdr.Close();
            }
          }
          SavePhotoFile(filename, serverPath, serverTxn);
        }
        ts.Complete();
      }
    }

    private static void SavePhotoFile
      (string clientPath, string serverPath, byte[] serverTxn)
    {
      const int BlockSize = 1024 * 512;

      using (FileStream source =
        new FileStream(clientPath, FileMode.Open, FileAccess.Read))
      {
        using (SqlFileStream dest =
          new SqlFileStream(serverPath, serverTxn, FileAccess.Write))
        {
          byte[] buffer = new byte[BlockSize];
          int bytesRead;
          while ((bytesRead = source.Read(buffer, 0, buffer.Length)) > 0)
          {
            dest.Write(buffer, 0, bytesRead);
            dest.Flush();
          }
          dest.Close();
        }
        source.Close();
      }
    }

    public static Image SelectPhoto(int photoId, out string desc)
    {
      const string SelectTSql = @"
        SELECT
            Description,
            Photo.PathName(),
            GET_FILESTREAM_TRANSACTION_CONTEXT()
          FROM PhotoAlbum
          WHERE PhotoId = @PhotoId";

      Image photo;
      string serverPath;
      byte[] serverTxn;

      using (TransactionScope ts = new TransactionScope())
      {
        using (SqlConnection conn = new SqlConnection(ConnStr))
        {
          conn.Open();

          using (SqlCommand cmd = new SqlCommand(SelectTSql, conn))
          {
            cmd.Parameters.Add("@PhotoId", SqlDbType.Int).Value = photoId;

            using (SqlDataReader rdr = cmd.ExecuteReader())
            {
              rdr.Read();
              desc = rdr.GetSqlString(0).Value;
              serverPath = rdr.GetSqlString(1).Value;
              serverTxn = rdr.GetSqlBinary(2).Value;
              rdr.Close();
            }
          }
          photo = LoadPhotoImage(serverPath, serverTxn);
        }

        ts.Complete();
      }

      return photo;
    }

    private static Image LoadPhotoImage(string filePath, byte[] txnToken)
    {
      Image photo;

      using (SqlFileStream sfs =
        new SqlFileStream(filePath, txnToken, FileAccess.Read))
      {
        photo = Image.FromStream(sfs);
        sfs.Close();
      }

      return photo;
    }

  }
}

Let’s explain the code in detail. We’ll start at the top with some required namespace inclusions. The two using statements to take notice of are System.Data.SqlTypes and System.Transactions. The System.Data.SqlTypes namespace defines the SqlFileStream class that we’ll be using to stream BLOBs. No special assembly reference is required to use this class, because it is provided by the System.Data.dll assembly that our project is already referencing (Visual Studio set this reference automatically when it created our project). The System.Transactions namespace defines the TransactionScope class that lets us code implicit transactions against the database. This class is provided by the System.Transactions.dll assembly, which is not referenced automatically. You’ll need to add a reference to it now, or the code will not compile. Right-click the project in Solution Explorer and choose Add Reference. In the Add Reference dialog, click the .NET tab, and scroll to find the System.Transactionscomponent. Then double-click it to add the reference.

At the top of the class, we define a connection string as a hard-coded constant named ConnStr. This is just for demonstration purposes; a real-world application would store the connection string elsewhere (such as in a configuration file, possibly encrypted), but we’re keeping our example simple.

Streaming Into SQL Server

The first method defined in the class is InsertPhoto, which accepts a new photo integer ID, string description, and full path to an image file to be saved to the database. Notice that the InsertTSql string constant defined at the top of the method specifies an INSERT statement that includes the PhotoId and Description columns, but not the actual Photo BLOB column itself. Instead, the INSERT statement is followed immediately by a SELECT statement that retrieves two pieces of information we’ll use to stream the BLOB into the Photo column much more efficiently than using ordinary T-SQL—namely, a logical UNC path name to the file and the transactional context token. These are the two values needed to use SqlFileStream, and you’re about to see how exactly. But all we’ve done so far is define a constant holding two T-SQL statements. The constant is followed by two variables declarations serverPath and serverTxn that will receive the two special values when we later execute those T-SQL statements.

The method then creates and enters a new TransactionScope block. This does not actually begin the database transaction (we’ve not even connected to the database yet), but rather declares that all data access within the block (and in any code called from within the block) must participate in a database transaction. Inside the TransactionScope block, the code creates and opens a new SqlConnection. Being the first data access code inside the TransactionScope block, this also implicitly begins the database transaction. Next, it creates a SqlCommand object associated with the open connection and prepares its command text to contain our T-SQL statements (the INSERT followed by the SELECT).

Invoking the ExecuteReader method executes the T-SQL statements and returns a reader from which we can retrieve the values returned by the SELECT statement. The transaction is still pending at this time. Our INSERT statement does not provide a value for RowId and instead allows SQL Server to automatically generate and assign a new uniqueidentifier ROWGUID value by default. I’ve also pointed out that no value is provided for the Photo column—and this is exactly how the default 0x value that we defined earlier for the Photo column comes into play (I said we’d come back to it, and here we are).

Although the row has been added by the INSERT statement, it will rollback (disappear) if a problem occurs before the transaction is committed. Because we didn’t provide a BLOB value for the Photo column in the new row, SQL Server honors the default value 0x that we established for it in the CREATE TABLE statement for PhotoAlbum. This represents a zero-length binary stream, which is completely different than NULL. Being a varbinary(max) column decorated with the FILESTREAM attribute, an empty file gets created in the file system that SQL Server associates with the new row. At the same time, SQL Server initiates an NTFS file system transaction over this new empty file and synchronizes it with the database transaction. So just like the new row, the new file will disappear if the database transaction does not commit successfully.

Immediately following the INSERT statement, the SELECT statement returns Photo.PathName and GET_FILESTREAM_TRANSACTION_CONTEXT. What we’re essentially doing with the WHERE clause in this SELECT statement is reading back the same row we have just added (but not yet committed) to the PhotoAlbum table in order to reference the BLOB stored in the new file that was just created (also not yet committed) in the file system.

The value returned by Photo.PathName is a fabricated path to the BLOB for the selected PhotoId. The path is expressed in UNC format, and points to the network share name established for the server instance when you first enabled FILESTREAM (by default, this is MSSQLSERVER). It is not a path the file’s physical location on the server, but rather contains information SQL Server can use to derive the file’s physical location. For example, you’ll notice that it always contains the GUID value in the uniqueidentifier ROWGUIDCOL column of the BLOB’s corresponding row. We retrieve the path value from the reader’s first column and store it in the serverPath string variable.

We just explained how SQL Server initiated an NTFS file system transaction over the FILESTREAM data in the new row’s Photo column when we started our database transaction. The GET_FILESTREAM_TRANSACTION_CONTEXT function returns a handle to that NTFS transaction (if you’re not inside a transaction, this function will return NULL and your code won’t work). We obtain the transaction context, which is returned by the reader’s second column as a SqlBinary value, and store it in the byte array named serverTxn.

Armed with the BLOB path reference in serverPath and the transaction context in serverTxn, we have what we need to create a SqlFileStream object and perform direct file access to stream our image into the Photo column. We close the reader, terminate its using block, then terminate the enclosing using block for the SqlConnection as well. This would normally close the database connection implicitly, but that gets deferred in this case because the code is still nested inside the outer using block for the TransactionScope object. So the connection is still open at this time, and the transaction is still pending. It is precisely at this point that we call the SavePhotoFile method to stream the specified image file into the Photo column of the newly inserted PhotoAlbum row, overwriting the empty file just created by default. When control returns from SavePhotoFile, the TransactionScope object’s Complete method is invoked and its using block is terminated, signaling the transaction management API that everything worked as expected. This implicitly commits the database transaction (which in turn commits the NTFS file system transaction) and closes the database connection.

The SavePhotoFile method reads from the source file and writes to the database FILESTREAM storage in 512 KB chunks at a time using ordinary .NET streaming techniques. The method begins by defining a BlockSize integer constant that is set to a reasonable value of 512 KB. Picture files larger than this will be streamed to the server in 512 KB blocks at a time. The local source image file (in clientPath) is then opened on an ordinary read-only FileStream object.

Then the destination file is opened by passing the two special values (serverPath and serverTxn), along with a FileAccess.Write enumeration requesting write access, into the SqlFileStream constructor. Like the source FileStream object, SqlFileStream inherits from System.IO.Stream, so it can be treated just like any ordinary stream. Thus, you attain write access to the destination BLOB on the database server’s NTFS file system. Remember that this output file is enlisted in an NTFS transaction and nothing you stream to it will be permanently saved until the database transaction is committed by the terminating TransactionScope block, after SavePhotoFile completes. The rest of the SavePhotoFile method implements a simple loop that reads from the source FileStream and writes to the destination SqlFileStream, one 512 KB block at a time until the entire source file is processed, and then it closes both streams.

Streaming Out From SQL Server

The rest of the code contains methods to retrieve existing photos and stream their content from the file system into an Image object for display. You’ll find that this code follows the same pattern as the last, only now we’re performing read access.

The SelectPhoto method accepts a photo ID and returns the string description from the database in an output parameter. The actual BLOB itself is returned as the method’s return value in a System.Drawing.Image object. We populate the Image object with the BLOB by streaming into it from the database server’s NTFS file system using SqlFileStream. Once again, we start things off by entering a TransactionScope block and opening a connection. We then execute a simple SELECT statement that queries the PhotoAlbum table for the record specified by the photo ID and returns the description and full path to the image BLOB, as well as the FILESTREAM transactional context token. And once again we use the path name and transactional context with SqlFileStream to tie into the server’s file system in the LoadPhotoImage method.

Just as when we were inserting new photos (only this time using FileAccess.Read instead of FileAccess.ReadWrite), we create a new SqlFileStream object from the logical path name and transaction context. We then pull the BLOB content directly from the NTFS file system on the server into a new System.Drawing.Image object using the static Image.FromStream method against the SqlFileStream object. The populated image can then be passed back up to a Windows Forms application, where it can be displayed using the Image property of a PictureBox control.

Or, to stream a photo over HTTP from a simple ASP.NET service:

using System;
using System.Data;
using System.Data.SqlClient;
using System.Data.SqlTypes;
using System.IO;
using System.Transactions;
using System.Web.UI;

namespace PhotoLibraryHttpService
{
  public partial class PhotoService : Page
  {
    private const string ConnStr =
      "Data Source=.;Integrated Security=True;Initial Catalog=PhotoLibrary";

    protected void Page_Load(object sender, EventArgs e)
    {
      int photoId = Convert.ToInt32(Request.QueryString["photoId"]);
      if (photoId == 0)
      {
        return;
      }

      const string SelectTSql = @"
        SELECT Photo.PathName(), GET_FILESTREAM_TRANSACTION_CONTEXT()
         FROM PhotoAlbum
         WHERE PhotoId = @PhotoId";

      using (TransactionScope ts = new TransactionScope())
      {
        using (SqlConnection conn = new SqlConnection(ConnStr))
        {
          conn.Open();

          string serverPath;
          byte[] serverTxn;

          using (SqlCommand cmd = new SqlCommand(SelectTSql, conn))
          {
            cmd.Parameters.Add("@PhotoId", SqlDbType.Int).Value = photoId;

            using (SqlDataReader rdr = cmd.ExecuteReader())
            {
              rdr.Read();
              serverPath = rdr.GetSqlString(0).Value;
              serverTxn = rdr.GetSqlBinary(1).Value;
              rdr.Close();
            }
          }

          this.StreamPhotoImage(serverPath, serverTxn);
        }
        ts.Complete();
      }
    }

    private void StreamPhotoImage(string serverPath, byte[] serverTxn)
    {
      const int BlockSize = 1024 * 512;
      const string JpegContentType = "image/jpeg";

      using (SqlFileStream sfs =
        new SqlFileStream(serverPath, serverTxn, FileAccess.Read))
      {
        byte[] buffer = new byte[BlockSize];
        int bytesRead;
        Response.BufferOutput = false;
        Response.ContentType = JpegContentType;
        while ((bytesRead = sfs.Read(buffer, 0, buffer.Length)) > 0)
        {
          Response.OutputStream.Write(buffer, 0, bytesRead);
          Response.Flush();
        }
        sfs.Close();
      }
    }
  }
}

Conclusion

The OpenSqlFilestream function provides native file streaming capabilities between FILESTREAM storage in the file system managed by SQL Server and any native-code (e.g., C++) application. SqlFileStream provide a managed code wrapper around OpenSqlFilestream that simplifies direct FILESTREAM access from .NET applications (e.g., C# and VB .NET). This post explained how this API works in detail, and showed the complete data access code that uses SqlFileStream for both reading and writing BLOBs to and from SQL Server. That’s everything you need to know to get the most out of FILESTREAM. I hope you enjoyed it!

Introducing SQL Server Developer Tools (code-named “Juneau”)

With Denali CTP3 released just two weeks ago, I’ve been ramping up fast as I write the new edition of my book (Programming Microsoft SQL Server 2012, MS Press) and prepare for upcoming presentations at the NJSQL User Group (Sep 20) and the SDC event in the Netherlands (Oct 3/4). I recently spent a lot of time working with the Juneau CTP3, code name for the new SQL Server Developer Tools (SSDT), set to ship with SQL Server 2012 (code named Denali) next year. I’m extremely impressed with the features of this new tool, and delighted at the notion that most developers will no longer need to toggle between Visual Studio and SQL Server Management Studio (SSMS), because they may very well never again need to use SSMS at all!

This is not to say that SSDT is intended to be a replacement for SSMS—au contraire, SSMS is alive and well in Denali, and continues to evolve as the primary management tool for database administrators respsonible for maintaining running SQL Server installations. But programmers have been using SSMS to conduct development tasks for years (and before 2005, we were using two dba tools—SQL Enterprise Manager and Query Analyzer). It’s always been necessary to switch away from our primary application development tool (Visual Studio) to a database management tool (SSMS) in order to get our database development done.

But no more.

SQL Server Developer Tools finally gives application developers what they need to get everything done without ever leaving Visual Studio—and it delivers many powerful new capabilities as well. In this post, I’ll describe the most important features that developers are certain to enjoy when they start working with this new tool.

Model-Based Development

The key concept in SSDT is that it uses a model-based approach. That is, there is always an in-memory representation of what a database looks like, and all the SSDT tools (designers, validations, IntelliSense, schema compare, etc.) operate on that model. This model can be backed by a live database (on-premises or Azure), an offline database project, or a snapshot taken of an offline database project at any point in time. But to reiterate, the tools are agnostic to the model’s backing, and work exclusively against the model itself. Thus, you enjoy a rich, consistent experience in any scenario—regardless of whether you’re working with on-premises or cloud databases, offline projects, or versioned model snapshots.

SSMS in Server Explorer

The Server Explorer now provides most of the functionality that developers are accustomed to in SSMS. Although the experience is strikingly similar when working against a connected database, remember that (and I’ll risk overstating this) SSDT tools only operate on a model. So when working connected, SSDT is actually creating a model from the database—on the fly—and then allowing you to edit that model.

When you “save” a schema change, SSDT works out the necessary script to update the database to reflect the change made to the model. Of course, the end result is the same as the connected SSMS experience, so it isn’t strictly necessary to understand the distinction if you don’t exploit the capabilities of SSDT beyond connected development (but why wouldn’t you?). Once you do understand it, then SSDT’s offline development and versioning capabilities will immediately feel natural and intuitive, as those scenarios are simply different backing types of the very same model. It’s just that when you’re working in Server Explorer, the backing happens to be a live connected database.

You can also open query windows to compose and execute T-SQL statements directly against the database. Overall, these Server Explorer-based features give you the same connected management experience you are accustomed to in SSMS; which is an imperative, script-based approach to directly managing a stateful database.

Offline Development in Visual Studio

SSDT offers so much more than a mere replacement for the connected SSMS experience, by providing a rich offline experience with the new SQL Server project type in Visual Studio 2010. If you’re familiar with the previous Database Professional editions of Visual Studio (commonly known as “data dude”), you can think of this project type as the next version of that edition (data dude projects will even load and upgrade to SSDT automatically when opened in Visual Studio 2010). The T-SQL script files in a SQL Server project are declarative in nature (all CREATE statements; no ALTER statements), which is an entirely different approach to how you’re accustomed to “developing” databases in SSMS against a live stateful database. Essentially, you get to focus on “this is how the database should look,” and let the tool worry about and figure out the appropriate T-SQL statements to actually update the live database to match your definition.

The SQL Server project enjoys all the same capabilities of any Visual Studio project. This includes not only source control (as mentioned), but all the common code navigation and refactoring paradigms (like Rename, Goto Definition, and Find All References) that have come to be accepted as indispensible tools of the modern IDE. And the model’s rich metadata provides a far better IntelliSense than what SSMS has been offering since SQL Server 2008. You really get that “strongly-typed” feeling. You can also set breakpoints, single-step through T-SQL code, and utilize the Locals window in Visual Studio much like you can when debugging .NET project types. With SSDT, application and database development tooling has now finally been unified under one roof: Visual Studio 2010.

The beauty of the model-based approach is that you can generate models from almost anything. As already explained, when connected directly via Server Explorer, SSDT creates a model from the connected database. When you create a SQL Server project (which can be imported from any existing database, script, or snapshot), you are creating an offline source-controlled project inside Visual Studio that fully describes a database. Now SSDT generates a model backed by your project, and so the design experience offline is just the same as when connected; the designers, IntelliSense, validation checks, and all other SSDT features all work exactly the same way.

As you conduct your database development within the project, you get the same “background compilation” experience that you’re used to experiencing with typical .NET development using C# or VB .NET. For example, making a change in the project that can’t be submitted to the database because of dependency issues will immediately raise errors in the Errors pane. You can click on the errors to navigate directly to the various dependencies so that they can be dealt with. Once all the build errors disappear, you’ll be able to submit the changes to update the database.

SSDT also provides a new local database runtime for testing and debugging. This is a lightweight, single user instance of SQL Server that spins up on demand when you build your SQL Server project. This is a great way to test your offline work before deploying to a live server or the cloud.

Versioning and Snapshots

A database project gives you an offline definition of a database. Like all projects, each database object (table, view, stored procedure) lives as a source file that can be placed under version control. Thus, the project system enables you to preserve and protect the definition of the database, as opposed to having the definition live within the database itself.

At any point in time, and as often as you’d like, you can create a database snapshot. A snapshot is nothing more than a persisted serialized version of the model based on the current project at the time the snapshot is taken. As such, you can use SSDT to develop, deploy, and synchronize database structures across local/cloud databases and differently versioned offline database projects.

Targeting SQL Azure

SSDT projects have a target switch that lets you specify which SQL Server edition or platform the project is intended to be deployed to. All the validation checks against the project-backed model are based on this setting, so it’s simply a matter of choosing SQL Azure as the target to ensure that your database can be deployed to the cloud without any problems. If your database project defines something that is not supported in Azure (a table with no clustered index, for example), it will get flagged as an error automatically when you attempt to publish.

The New BIDS

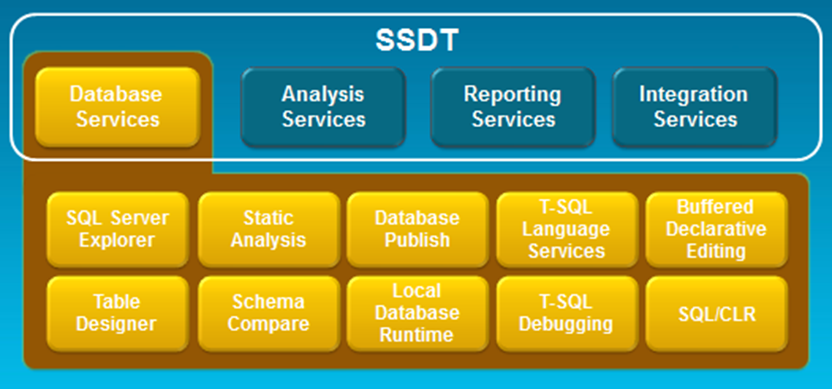
Are you not sufficiently impressed yet? But wait! SSDT is even bigger than what I’ve described so far. As announced at SQL PASS at the end of 2010, SSDT is an umbrella, a packaging of what was the VS2008-based Business Intelligence Developer Studio (BIDS) tools for SSAS, SSRS, and SSIS, combined with a new service, the “database services”. So they’ve really now brought together under the SQL Server umbrella all of the database development experiences inside of Visual Studio 2010. Here’s the picture:

Get Started Now, and Meet Me in New Jersey

SSDT is the next generation database development tool Visual Studio developers, and its coming soon! Hopefully this post inspires you to give SSDT a test drive. Download the Juneau CTP3 bits from http://www.microsoft.com/web/gallery/install.aspx?appid=JUNEAU10 and check it out for yourself.

I’ll be presenting a session at the NJ SQL User Group (http://njsql.org/default.aspx) with lots of demos that show off some of the coolest things about SSDT. The meeting  is being held at SetFocus in Parsippany (directions here: http://www.setfocus.com/about/headquarters.aspx) on Sept 20 from 6 – 8:30. Hope to see you then!

Watch Out Installing Denali CTP3 from DVD to Virtual Machines

So Microsoft just publicly released CTP3 of Denali, the code name for the next (2012) version of SQL Server. But beware installing from DVD to Virtual Machines! I downloaded CTP3, burned it to a DVD, and ran the installer .exe from the DVD on a VM. The installer appears to work and then just disappears. No message. No error. No nothing. No way!!!

It turns out that this particular installer attempts to unpackage the downloaded files in place; that is, on the DVD — which it can’t of course. But it won’t complain. Nor will it prompt you for an alternative unpackage location. It’ll just appear to install and disappear. And you’ll be left scratching your head. Gotta love beta software!

The only way to make it work is to run the installer on a hard disk (either inside or outside the VM) to unpackage the download, and then install from there. For more information and a complete walkthrough for installing Denali CTP3, check out Aaron Bertrand’s post at http://sqlblog.com/blogs/aaron_bertrand/archive/2011/07/12/sql-server-v-next-denali-ctp3-installation-walk-through.aspx.

Denali CTP3 Goes Public!

Just released today, the third Community Technology Preview of SQL Server 2012 codenamed Denali. Really looking forward to (finally!) digging into FILETABLE and numerous other enhancements which I’ll blog about soon. CTP2 was an internal release only, and CTP1 was (frankly) quite bare. Download the 32- and 64-bit versions now — and the Feature Pack — from these easy bit.ly links I created:

http://bit.ly/DenaliCTP3
http://bit.ly/DenaliCTP3FP

Enjoy!

Using SQL Server Audit

SQL Server Audit is a powerful security feature available in SQL Server 2008 and 2008 R2 (Enterprise edition only) that can track virtually any server or database action taken by users and log those activities to the file system or the Windows event log. This feature helps meet the demands of regulatory compliance standards, which typically require that our enterprise installations implement highly stringent security tactics that often include some form of auditing. You can work with SQL Server Audit using either SQL Server Management Studio or in T-SQL using a new set of DDL statements and catalog views.

We’ll mostly cover only the T-SQL DDL auditing statements and catalog views, In SQL Server Management Studio, you’ll find SQL Server Audit support beneath the Security nodes at both the server and database levels.

Creating an Audit Object

Our first step to using SQL Server Audit is to create an audit object with the CREATE SERVER AUDIT statement. When we create an audit object, we are essentially defining a destination to which SQL Server will record information about interesting events that occur. The specific events to be monitored are described by creating audit specifications, which we define after creating one or more audit objects.

An audit object can capture monitored events to either the file system or to the Application or Security event logs. The desired
destination is specified after the TO keyword in the CREATE SERVER AUDIT statement. For example, the following statement creates an audit object named MyFileAudit that records all monitored events that will be associated with this audit object to files that SQL Server will create in the C:\SqlAudits directory (which must already exist, or the statement will fail):

USE master
GO

CREATE SERVER AUDIT MyFileAudit TO FILE (FILEPATH='C:\SqlAudits')

Notice that it is necessary to first switch to the master database before you can create an audit object. If you don’t switch away from a user database to the master database before running this DDL statement, SQL Server will return the following error:

Msg 33074, Level 16, State 1, Line 1
Cannot create a server audit from a user database. This operation must be performed in the master database.

When an audit object is first created, it is in a disabled state and will not audit any events until it is explicitly enabled. You cannot create and enable an audit in a single step using CREATE SERVER AUDIT, so the next step after creating an audit is to enable it using ALTER SERVICE AUDIT. The following statement enables the MyFileAudit audit object we just created:

ALTER SERVER AUDIT MyFileAudit WITH (STATE=ON)

Just as when first creating an audit object, you must switch to the master database before you can execute an ALTER SERVER AUDIT statement (which is not necessary here, as we haven’t yet switched away from master since creating the audit object).

The ALTER SERVER AUDIT statement can also be used with the MODIFY NAME clause to rename the audit object. The audit must be disabled before it can be renamed. For example, the following statements rename the audit object MyFileAudit to SqlFileAudit:

ALTER SERVER AUDIT MyFileAudit WITH (STATE=OFF)
ALTER SERVER AUDIT MyFileAudit MODIFY NAME = SqlFileAudit
ALTER SERVER AUDIT SqlFileAudit WITH (STATE=ON)

Once an audit object is created, you can define one or more audit specifications to monitor specific events of interest and associate those specifications with the audit object. Audited events captured by all audit specifications associated with an audit object are recorded to the destination defined by that audit object. We’ll talk about audit specifications shortly, but first let’s discuss some more general auditing options.

Auditing Options

You can specify several important options for your audit objects. These options, declared after the WITH keyword in either the CREATE SERVER AUDIT or ALTER SERVER AUDIT statements (or in some cases, both), are supported independently of what the audit destination is (that is, whether you’re recording to the file system or the event log).

QUEUE_DELAY

The QUEUE_DELAY  option controls the synchronous or asynchronous behavior of audit processing. Specifying zero for this option
results in synchronous auditing. Otherwise, this option specifies any integer value of 1000 or higher to implement asynchronous processing for better auditing performance. The integer value for this option specifies the longest amount of time (in milliseconds) that is allowed to elapse before audit actions are forced to be processed in the background. The default value of 1000 results in asynchronous processing in which monitored events are audited within one second from the time that they occur.

The QUEUE_DELAY setting can be specified when the audit object is created and then later changed as needed. To change this setting for a running audit object, you must first disable the audit object before making the change and then enable it again after.

The following statements increase the time span for asynchronous processing of our MyFileAudit audit object by specifying the QUEUE_DELAY option with a value of 60000 milliseconds (one minute). The audit object is temporarily disabled while the change is made.

ALTER SERVER AUDIT MyFileAudit WITH (STATE=OFF)
ALTER SERVER AUDIT MyFileAudit WITH (QUEUE_DELAY=60000)
ALTER SERVER AUDIT MyFileAudit WITH (STATE=ON)

ON_FAILURE

You can use the ON_FAILURE option to determine what course of action SQL Server should take if an error occurs while recording audited events. The valid settings for this option are CONTINUE (which is the default) or SHUTDOWN (which requires that the login
be granted the SHUTDOWN permission).

This option can be specified when the audit object is created and then later changed as desired. As with QUEUE_DELAY, a running audit object must be temporarily disabled while the change is made.

The following statements tell SQL Server to stop the auditing process for all audit specifications associated with the MyFileAudit audit object if an error is encountered while recording audits:

ALTER SERVER AUDIT MyFileAudit WITH (STATE=OFF)
ALTER SERVER AUDIT MyFileAudit WITH (ON_FAILURE=SHUTDOWN)
ALTER SERVER AUDIT MyFileAudit WITH (STATE=ON)

AUDIT_GUID

By default, all audits are assigned an automatically generated unique globally unique identifier (GUID) value. In mirroring scenarios,
you need to assign a specific GUID that matches the GUID contained in the mirrored database, and the AUDIT_GUID option allows you to do that. Once an audit object is created, its GUID value cannot be changed.

STATE

The STATE option is valid only with the ALTER SERVER AUDIT statement. It is used to enable or disable an audit object, using the keywords ON and OFF. (As mentioned earlier, an audit object cannot be created in an enabled state.) As demonstrated earlier with the QUEUE_DELAY option, the STATE option cannot be combined with other audit options in an ALTER SERVER AUDIT statement.

When a running audit is disabled using STATE=OFF, an audit entry is created indicating that the audit was stopped, when it was stopped, and which user stopped it.

Recording Audits to the File System

The TO FILE clause is used to record audits to the file system, as we’ve just specified for our MyFileAudit audit object. When you audit to the file system, you can specify several file options, as described here.

FILEPATH

Use the FILEPATH option to designate where in the file system SQL Server should create the files that record monitored events being audited. This can be either a local path or a remote location using a Universal Naming Convention (UNC) path[kws4]  to a network share. The directory specified by this path must exist, or an error will occur. Moreover, you need to make sure the appropriate permissions are granted on each directory you’ll be using, especially network shares. You cannot control the file names used for the files created by SQL Server Audit. Instead, the file names are generated automatically based on the audit name and audit GUID.

MAXSIZE

The MAXSIZE option specifies how large an audit file is permitted to grow before it is closed and a new one is opened (known as “rolling over”). The maximum size is expressed as an integer followed by MB, GB, or TB for megabytes, gigabytes, or terabytes. Note that you cannot specify a value less than one megabyte.

MAXSIZE can also be specified as UNLIMITED (which is the default value). In this case, the audit file can grow to any size before rolling over.

MAX_ROLLOVER_FILES

The MAX_ROLLOVER_FILES option can be used to automatically groom the file system as auditing data accumulates over time. The default value is zero, which means that no cleanup is performed as new audit files are created. (This will eventually, of course, fill the disk.) Alternatively, you can provide an integer value for this option that specifies how many audit files are retained in the file system as they roll over, while older audit files are deleted automatically.

RESERVE_DISK_SPACE

The default setting for the RESERVE_DISK_SPACE option is OFF, which means that disk space is dynamically allocated for the audit file as it expands to record more and more events. Performance can be improved (and disk fragmentation reduced) by preallocating disk space for the audit file at the time it is created. Setting this option to ON will allocate the amount of space specified by the MAXSIZE option when the audit file is created. MAXSIZE must be set to some value other than its default UNLIMITED setting to use RESERVE_DISK_SPACE=ON.

Recording Audits to the Windows Event Log

You can also create audit objects that are recorded to the Windows event log. To send audit entries to either the Application or Security event logs, specify TO APPLICATION_LOG or TO SECURITY_LOG. For example, this statement creates an audit object that is recorded to the Application event log:

CREATE SERVER AUDIT MyEventLogAudit TO APPLICATION_LOG

Auditing Server Events

You create a server audit specification to monitor events that occur at the server level, such as failed login attempts or other actions not associated with any particular database. As already described, we associate our specifications to an audit object configured for recording to either the file system or the event log.

Use the CREATE SERVER AUDIT SPECIFICATION statement to create a specification that monitors one or more server-level events for auditing. The FOR SERVER AUDIT clause links the specification with an audit object that defines the destination, and ADD clauses list the server-level audit action groups to be monitored. Similarly, the ALTER SERVER AUDIT SPECIFICATION statement can be used to ADD additional action groups to be monitored or DROP existing ones that should no longer be monitored.

Unlike audit objects, audit specifications can be created and enabled at the same time using CREATE SERVER AUDIT SPECIFICATION with the STATE=ON option. The following statements create and enable a server audit specification that records all successful logins and failed login attempts to the file system (to the path C:\SqlAudits, as defined by the audit object MyFileAudit created earlier in the section):

CREATE SERVER AUDIT SPECIFICATION CaptureLoginsToFile
 FOR SERVER AUDIT MyFileAudit
 ADD (FAILED_LOGIN_GROUP),
 ADD (SUCCESSFUL_LOGIN_GROUP)
 WITH (STATE=ON)

After executing this statement, all login attempts made against the server (whether or not they succeed) will be audited to the file system. If we later decide to also audit password changes and to stop auditing successful logins, we can alter the specification accordingly (as with audit objects, audit specifications must be disabled while they are being changed):

ALTER SERVER AUDIT SPECIFICATION CaptureLoginsToFile  WITH (STATE=OFF)

ALTER SERVER AUDIT SPECIFICATION CaptureLoginsToFile
 ADD (LOGIN_CHANGE_PASSWORD_GROUP),
 DROP (SUCCESSFUL_LOGIN_GROUP)

ALTER SERVER AUDIT SPECIFICATION CaptureLoginsToFile  WITH (STATE=ON)

You’ll find a complete list of server-level action groups that can be monitored for auditing in SQL Server Books Online. There are more than thirty-five action groups, including backup and restore operations, changes in database ownership, adding or removing logins from server and database roles, or creating, altering, or dropping any database object—just to name a few.

Auditing Database Events

A database audit specification is conceptually similar to a server audit specification. Both specify events to be monitored and directed to a designated audit object. The primary difference is that database audit specifications are associated with actions against a particular database, rather than server-level actions.

Note Database audit specifications reside in the database they are created for. You cannot audit database actions in tempdb.

The CREATE DATABASE AUDIT SPECIFICATION and ALTER DATABASE AUDIT SPECIFICATION statements work the same as their CREATE and ALTER counterparts for server audit specifications that we just examined. Like server audit specifications, database audit specifications can be created in an enabled state by including the clause WITH (STATE=ON).

About fifteen database-level action groups can be monitored for auditing, such as changes in database ownership or permissions, for example. You can find the complete list in SQL Server Books Online. In addition, you can monitor for specific actions directly on database objects, such as schemas, tables, views, stored procedures, and so on. The seven database-level audit actions are SELECT, INSERT, UPDATE, DELETE, EXECUTE, RECEIVE, and REFERENCES.

For example, the following statement creates and enables a database audit specification in the MyDB database named CaptureDbActionsToEventLog:

USE MyDB
GO

CREATE DATABASE AUDIT SPECIFICATION CaptureDbActionsToEventLog
 FOR SERVER AUDIT MyEventLogAudit
 ADD (DATABASE_OBJECT_CHANGE_GROUP),
 ADD (SELECT, INSERT, UPDATE, DELETE
 ON SCHEMA::dbo
 BY public)
 WITH (STATE=ON)

The FOR SERVER AUDIT clause specifies that the monitored events should be directed to the server object MyEventLogAudit, which we created earlier to record audits to the application event log. The first ADD clause specifies DATABASE_OBJECT_CHANGE_GROUP, which watches for DDL changes made to any database object. This effectively audits any CREATE, ALTER, or DROP statement made against any object (table, view, and so on) in the database. The second ADD clause audits any DML action (SELECT, INSERT, UPDATE, or DELETE) made against any object in the dbo schema by any public user (which is every user).

You get very fine-grained control with database audit specifications. The ON clause in the preceding statement causes every object in the dbo schema to be audited, but it could just as easily be written to audit DML operations on specific tables if desired. Similarly, rather than auditing all users by specifying the public role in the BY clause, individual users and roles can be listed so that only
DML operations made by those particular users are audited.

Viewing Audited Events

After you enable your audit objects and audit specifications, SQL Server takes it from there. Audits for each monitored event
declared in your audit specifications are recorded automatically to the destinations you’ve specified in your audit objects. After accumulating several audits, you’ll want to view them, of course.

Audits recorded to the event log can be examined using the Event Viewer (available from Administrative Tools in Control Panel). Audits recorded to the file system are not stored in plain text files that can simply be viewed in Notepad. Instead, they are binary files
that you can view in one of two ways. One way is from inside SQL Server Management Studio. Right-click the desired audit object beneath the Security node at the server instance level (not the Security node at the database level) in the Object Explorer, and then choose View Audit Logs.

Each audit entry contains a wealth of detailed information about the event that was captured and recorded. This includes date and time stamp, server instance, action, object type, success or failure, permissions, principal name and ID (that is, the user that performed the audited action), database name, schema name, object name, the actual statement that was executed (or attempted), and more.

Alternatively, you can use the new table-valued function (TVF) named sys.fn_get_audit_file. This function accepts a parameter that points to one or more audit files (using wildcard pattern matching). Two additional parameters allow you to specify the initial file to process and a known offset location to start reading audit records from. (Both of these parameters are optional but must still be
specified using the keyword default.) The function then reads the binary data from the file(s) and formats the audit entries into an ordinary table that gets returned back. For example:

SELECT event_time, database_name, schema_name, object_name, statement
 FROM sys.fn_get_audit_file('C:\SqlAudits\*.sqlaudit', default, default)

Here are some abbreviated results from this query:

event_time              database_name schema_name object_name statement
----------------------- ------------- ----------- ----------- ------------------------------------
  :
2011-07-01 19:33:19.381 MyDB          dbo                     CREATE TABLE TestTable(TestId...
2011-07-01 19:33:45.789 MyDB          dbo         TestTable   INSERT INTO [TestTable] value...
2011-07-01 19:33:45.789 MyDB          dbo         TestTable   SELECT * FROM TestTable
2011-07-01 19:33:45.789 MyDB          dbo         TestTable   UPDATE [TestTable] set [TestI...
2011-07-01 19:33:45.789 MyDB          dbo         TestTable   UPDATE [TestTable] set [TestI...
2011-07-01 19:33:45.789 MyDB          dbo         TestTable   DELETE [TestTable]  WHERE [Te...
  :

You can of course easily filter and sort this data using WHERE and ORDER BY, as well as INSERT the data elsewhere. The sys.fn_get_audit_file function represents an advantage that auditing to the file system has over auditing to the Windows event log, as there is no equivalent function provided for querying and manipulating audits in the event logs.

Querying Audit Catalog Views

Finally, SQL Server provides a number of catalog views that you can query for information about the audits and audit specifications running on any server instance. These audit catalog views are listed below.

Catalog View Name Description
sys.server_file_audits Returns all of the audit objects that are recorded to the file system
sys.server_audit_specifications Returns all of the server-level audit specifications
sys.server_audit_specification_details Returns detailed monitored event information for all of the server-level audit specifications
sys.database_audit_specifications Returns all of the database-level audit specifications
sys.database_audit_specification_details Returns detailed monitored event information for all of the database-level audit specifications
sys.dm_server_audit_status Returns the status of each audit object
sys.dm_audit_actions Returns every audit action that can be reported on and every audit action group that can be configured
sys.dm_audit_class_type_map Returns a table that maps the class_type
field in the audit log to the class_desc field in sys.dm_audit_actions

Using Sequences in SQL Server Denali

Historically, one notable difference between SQL Server and other database platforms (such as Oracle and DB2) has been the manner in which you implement automatically assigned integer values for primary keys when inserting new rows. SQL Server provides the IDENTITY attribute for the int or bigint data types, while other platforms require you to create an independent “sequence generator” object that feeds incrementing values to new rows in the table. These are two different ways to achieve the same thing, and SQL Server’s IDENTITY attribute is arguably simpler to use, but sequence generators offer their own unique advantages as well.

SQL Server Denali now also supports sequence generators as a powerful alternative to using the IDENTITY attribute. Sequences can be created on integer types (both built-in and user-defined), and you can specify the minimum, maximum, start, and increment (or decrement) values for the sequence. You can also cycle back around to the minimum value when the maximum value is reached (or vice versa).

Sequences are most commonly used to assign new primary key values on INSERT operations as an alternative to using IDENTITY-attributed key columns. But because they exist as objects independent of the data tables that they feed new primary keys to, they offer more flexibility and pose fewer limitations. For example, you can obtain the next value in the sequence before you perform the INSERT, and you can insert any (unique) value into the primary key column without requiring SET IDENTITY INSERT ON/OFF statements. The NEXT VALUE FOR syntax can be used in any SELECT, INSERT, or UPDATE statement to request and increment the next value in the sequence. Sequences are valid in SET, CASE, and DECLARE statements that set integer values, and they can be used in stored procedures, UDFs, and triggers. Let’s see how sequences work:

CREATE TABLE Customer
(Id        int PRIMARY KEY,
 FirstName varchar(max),
 LastName  varchar(max))

-- Create the sequence with a start, increment, and min/max settings
CREATE SEQUENCE CustomerSequence AS int
 START WITH 1
 INCREMENT BY 1
 MINVALUE 0
 NO MAXVALUE

-- Use the sequence for new primary key values
INSERT INTO Customer (Id, FirstName, LastName) VALUES
(NEXT VALUE FOR CustomerSequence, 'Bill', 'Malone'),
(NEXT VALUE FOR CustomerSequence, 'Justin', 'Thorp'),
(NEXT VALUE FOR CustomerSequence, 'Paul', 'Duffy')

Our Customer table uses an integer primary key, but does not specify the IDENTITY attribute. Instead, we use the new CREATE SEQUENCE statement in SQL Server Denali to create a CustomerSequence object that feeds new integers, starting with one and incrementing by one, with no specified upper limit (beyond the maximum size for the integer data type; a 32-bit int data type in this example). We then INSERT three new rows, each of which specifies NEXT VALUE FOR CustomerSequence as the new Id value (note that we’re using the row constructor syntax introduced in SQL Server 2008 to INSERT the three rows with a single statement). The result, as you’d expect, appears like this:

SELECT * FROM Customer

Id    FirstName LastName
----- --------- -------------
1     Bill      Malone
2     Justin    Thorp
3     Paul      Duffy

(3 row(s) affected)

Most likely, you’ll want to emulate the experience of using the IDENTITY attribute; that is, you may wish to omit the primary key values from the INSERT statement and put SQL Server in charge of assigning them to new rows. This is easily done by establishing NEXT VALUE FOR as a DEFAULT constraint on the Id column, like this:

-- Set the default for IDENTITY-behavior
ALTER TABLE Customer
 ADD DEFAULT NEXT VALUE FOR CustomerSequence FOR Id

-- Generates customer ID 4
INSERT INTO Customer (FirstName, LastName) VALUES('Jeff', 'Smith')

With the DEFAULT constraint in place, the INSERT statement looks and works just the same as if we were using an IDENTITY-attributed primary key column. Customer Jeff Smith is automatically assigned an Id value of 4. But by using sequences, we can enjoy a few additional benefits. For example, we can peek at the current value without consuming it by querying the sys.sequences catalog view. Among the many parameters for each sequence object in the database exposed by this view, the current_value column reveals the currently assigned value:

SELECT current_value FROM sys.sequences WHERE name='CustomerSequence'

current_value
-------------
4

(1 row(s) affected)

You can also use the ALTER SEQUENCE statement to change the behavior of an existing sequence object, like so:

ALTER SEQUENCE CustomerSequence
 RESTART WITH 1100
 MINVALUE 1000
 MAXVALUE 9999
 CYCLE

Now the next value returned by CustomerSequence will be 1100, and it will continue to increment by one from there. When it tops 9999, it will start again from 1000 and continue incrementing normally. Naturally, given the uniqueness of primary keys, the sequence can no longer be used to populate the Customer table 100 rows after it recycles to 1000, because we already have customers with primary keys starting at 1100.

Of course, sequences have some restrictions, but these aren’t too onerous overall. Sequences cannot be used in a subquery, CTE, TOP clause, CHECK CONSTRAINT definition, or as an argument to an aggregate function. They also can’t be used in views, computed columns, and user-defined functions, as those object types are not allowed to cause the side effects of sequence number generation. Finally, you cannot issue a DROP SEQUENCE statement to delete a sequence while you have tables with existing DEFAULT constraints that reference the sequence; you’ll need to drop the referencing constraints before you can drop the sequence.

Download the Denali CTP now to start playing with sequences, and have fun!

To Use or Not To Use DataSets

That has been the subject of great debate since the dawn of .NET, and is now even more debatable with the availability of Entity Framework. Some developers have dismissed DataSets out of hand long ago, primarily because—despite their ability to be strongly typed and to encapsulate business logic—they are not true business objects. For example, you need to navigate through relationship objects in the DataSet to connect between parent and child rows. This is not intuitive to object oriented programmers, who think of parent child relationships in simpler terms; each parent has as a child collection property and each child has a parent property. Furthermore, the DataSet paradigm does not allow for inheritance, which is also extremely important to object-oriented developers. Null values in a DataSet also require special handling.

Notwithstanding these concerns, I don’t generally advocate dismissing any technology out of hand. Every application is different, and you are doing yourself a disservice if you don’t examine the facets of all available choices on a case by case basis. Like anything else, DataSets can be used or they can be abused, and it’s true that they do present limitations if you try to use them as business objects.But if what you need is a generic in-memory database model, then that’s what a DataSet is, and that’s what a DataSet gives you. While the aforementioned concerns are all valid, the fact remains that DataSets are very powerful and can serve extremely well as data transfer objects. Furthermore, their unique ability to dynamically adapt their shape according to the schema of whatever data you stream into them is a capability that none of the newer APIs provide.

So to be clear, DataSets are not obsolete. The DataSet is a cornerstone of the .NET framework, and it is not going away. In fact, even as late as .NET 3.5 when LINQ to SQL and Entity Framework were first released, Microsoft has been enhancing DataSets. For example, the TableAdapterManager was added to greatly simplify hierarchical updates. The fact remains that DataSets do still have their place, and you are very likely to encounter them for a long time to come as you maintain existing applications.

Having said that, let me also stress that Microsoft has clearly positioned ADO.NET Entity Framework as the preferred data access technology today and in the future, eclipsing both DataSets and LINQ to SQL. Furthermore, Silverlight implements only a subset of the .NET Framework, and conspicuously absent from that subset is the DataSet. Although there are several third-party vendors that provide a DataSet object for Silverlight, this omission on the part of Microsoft is another indication that DataSets are discouraged for new development.

Server Side Paging with SQL Server Code-Named “Denali”

Well, the captain has just approved the use of electronic devices on my return flight from Las Vegas, where I just spent an exciting week speaking at and attending Visual Studio Live! And I’m eager to share some juicy new SQL Server Denali features with you that I demonstrated in my SQL Server workshop on Friday. Denali, in case you don’t already know, is the code name for the next major version of SQL Server (version 11.0, but whether it will be branded as SQL Server 2011 or SQL Server 2012 is still undetermined).

In the next several posts, I’ll share some of the new T-SQL enhancements offered by Denali. You can start playing with these features right now by downloading the Community Technology Preview (currently, CTP1 is the only publicly available release). Although Microsoft’s greatest advances in Denali center on new Business Intelligence capabilities (which they’re now dubbing “Pervasive Insight”), there are still lots of goodies in store for developers in the relational engine. In this post, I’ll describe a new feature that makes it easier than ever to implement server-side paging.

One Page At A Time, Please

Your query may return hundreds, thousands, or even millions of rows, but users can only cope with so much data at a time. They need paged results; that is, they want to view one chunk at a time in “pages”. The page size can vary of course; 10, 25, 50, or 100 results at a time, but any more than that is just not reasonable. Sure you can allow your query to execute and return a complete resultset from the data access layer to your middle-tier, and then deliver only the subset of that resultset for a single page to display in the user interface. But that’s an incredibly wasteful and inefficient approach. Ideally, of course, if one page is all you want, then that one particular page is all you should need to retrieve from SQL Server when you execute your query.

Returning paged query results was difficult to achieve prior to SQL Server 2005. That release of SQL Server introduced a series of ranking functions, including the ROW_NUMBER function that made it feasible to return one page at a time from your query. I’ll first show how to use ROW_NUMBER in SQL Server 2005 and higher to implement server-side paging, and then show you how much easier it is to achieve the same goal using the new OFFSET/FETCH NEXT syntax introduced in SQL Server Denali.

Using ROW_NUMBER (SQL Server 2005)

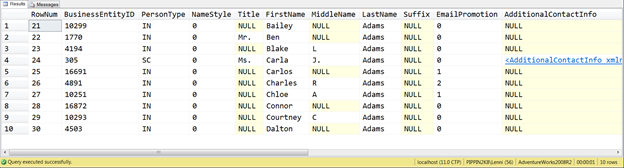
The ROW_NUMBER function does just what its name implies; it generates a sequential number for each row in the resultset returned by your query. The value returned by the ROW_NUMBER function can then be used in your query’s WHERE clause to limit the resultset to just the desired page. Here’s an example from the AdventureWorks2008R2 database that demonstrates how to use ROW_NUMBER. It returns “page 3” of the query results, which (assuming a page size of 10) are rows 21 through 30:

-- Get 10 rows starting at row 21 (rows 21-30; i.e., page 3)
DECLARE @PageNum int = 3
DECLARE @PageSize int = 10
DECLARE @FirstRow int = ((@PageNum - 1) * @PageSize) + 1
DECLARE @LastRow int = @FirstRow + @PageSize - 1

SELECT *
 FROM
   (SELECT RowNum = ROW_NUMBER() OVER (ORDER BY LastName, FirstName), *
     FROM Person.Person
   ) AS a
 WHERE RowNum BETWEEN @FirstRow AND @LastRow
 ORDER BY LastName, FirstName

And here are the results:

Now this certainly works, but there are two undesirables here. First, it requires you to manufacture the row number as an additional column in your resultset, whether or not you want/need it. Second, the syntax is somewhat contorted; the required use of a nested SELECT statement and multiple ORDER BY clauses (as well as the required alias “AS a”) is both awkward and unintuitive.

Using OFFSET/FETCH NEXT (SQL Server Code-Named “Denali”)

Now take a look at how the same result can be achieved in Denali:

DECLARE @PageNum int = 3
DECLARE @PageSize int = 10
DECLARE @Offset int = (@PageNum - 1) * @PageSize

SELECT *
 FROM Person.Person
 ORDER BY LastName, FirstName
 OFFSET @Offset ROWS FETCH NEXT @PageSize ROWS ONLY

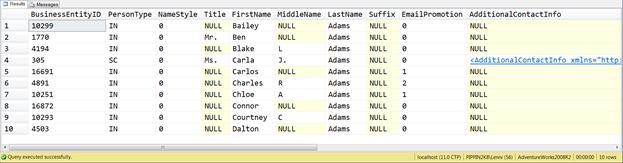
I don’t see how the syntax could be any simpler than this, do you? Just specify your starting row with OFFSET and your page size with FETCH NEXT. Here are the results:

You can see that this query returns the same “page” as the previous version of the query that used the ROW_NUMBER function, yet it wasn’t necessary to manufacture a row number column to do it, nor did we need to code a subquery. It’s highly probable that your presentation layer is well aware of which row numbers are being display; it is after all in charge of managing the UI concerns of which page is being displayed to the user. Nevertheless, if you still want row numbers returned in your resultset, you can combine the new Denali syntax with ROW_NUMBER as follows if desired (you’ll still be able to achieve this with a single SELECT, but you’ll need to duplicate the ORDER BY clause with OVER):

DECLARE @PageNum int = 3
DECLARE @PageSize int = 10
DECLARE @Offset int = (@PageNum - 1) * @PageSize

SELECT RowNum = ROW_NUMBER() OVER (ORDER BY LastName, FirstName), *
 FROM Person.Person
 ORDER BY LastName, FirstName
 OFFSET @Offset ROWS FETCH NEXT @PageSize ROWS ONLY

So there you have it. Server side paging made as easy as one could hope for, thanks to the new OFFSET/FETCH NEXT syntax in SQL Server Denali.

Using Transparent Data Encryption in SQL Server 2008

Happy New Year! 

I’ve got a juicy SQL Server post for you to ring in the new year – Transparent Data Encryption, available only in SQL Server 2008 Enterprise edition. This is good and powerful stuff that works, folks, so check it out here.

Sensitive information (passwords, credit card numbers, salary information, and so on) in your database needs to be encrypted. As of SQL Server 2005, you can encrypt and decrypt sensitive data columns in your tables using symmetric keys. You identify the columns that will hold sensitive information, and then invoke ENCRYPTBYKEY to store data in those columns, and DECRYPTBYKEY to retrieve data from those columns. The process is fairly straightforward, but it does require programming in your application for each encrypted column.

In SQL Server 2008 (Enterprise edition only), Microsoft has added a new feature called Transparent Data Encryption (TDE). This feature automatically encrypts the entire database (data and log files), as well as database backups, without requiring any programming or code changes to your application. The process is entirely transparent, hence the name Transparent Data Encryption. In this blog post, I’ll explain TDE, and demonstrate how to use this new security feature.

(Note that the NTFS file system in Windows Server 2000 and later provides a feature called Encrypted File System [EFS]. This feature also applies transparent encryption to any data stored on the hard drive, but it will not protect databases or backups that have been copied onto a CD or other media. TDE in SQL Server 2008 is based on a certificate that is needed to decrypt or restore any encrypted database, regardless of where the data is transferred.)

When TDE is first enabled for a specific database, SQL Server encrypts the database in the background. During this process, the database remains online and responsive to client requests (similarly, when encryption is disabled, SQL Server decrypts the database in the background). Encryption is performed at the page level, and does not increase the size of the database in any way. Once the entire database is encrypted, new data gets encrypted on the fly as it is written to disk, and all data gets decrypted when read back.  

Multiple Protection Layers

Databases protected with TDE are encrypted with a Database Encryption Key (DEK). You create the DEK and store it in the database, but the DEK itself is associated with a certificate that you create separately in the master database. This means that a backup of the database includes the DEK, but doesn’t include the certificate upon which the DEK is based. Hence, TDE database backups are useless to prying eyes, since they cannot be restored without the certificate. Finally, the certificate itself is encrypted by the Service Master Key (SMK), also contained in the master database.

To get started, you’ll need to create an SMK, if your server doesn’t have one already. Then you can create a certificate for TDE that is encrypted by the SMK which can be used to create one encrypt one or more DEKs. Finally, you create a DEK against the certificate in each database to be encrypted and then enable encryption on the database.

The following diagram illustrates how TDE might be used to encrypt two databases on one server instance:

In this diagram, you can see that the master database holds the SMK (there can be one and only one SMK on any server instance). The master database also holds a certificate whose private key is encrypted by the SMK. The two databases MyDB1 and MyDB3 are each encrypted with DEKs that are, in turn, encrypted by the certificate. The DEKs are entirely dependent on the certificate, so copying or restoring these databases to another server instance without also transferring the certificate upon which the DEKs are based yields a totally unusable database.   

Creating a Service Master Key (SMK)

If your server already has an SMK, you can skip this step. An SMK can only be created in the master database, and there can only be one SMK per server instance. If you don’t already have an SMK, you can create one as follows:   

USE master
GO   

CREATE MASTER KEY
  ENCRYPTION BY PASSWORD = 'Hrd2GessP@$$w0rd!' 

Creating a TDE Certificate

In general, certificates can be created in any database. However, certificates used for TDE must be created in the master database. It should be fairly obvious why the certificates used to encrypt DEKs in each encrypted database are stored outside the encrypted database in master (you wouldn’t want them stored in the encrypted database, as that would defeat the whole protection scheme!)   

USE master
GO 

CREATE CERTIFICATE MyEncryptionCert
  WITH SUBJECT = 'My Encryption Certificate' 

You can then query the sys.certificates view to confirm that the certificate has been created, as follows:   

SELECT name, pvt_key_encryption_type_desc FROM sys.certificates
  WHERE name = 'MyEncryptionCert'

The output confirms that the certificate was created and that its private key is protected by the master key, as shown here:   

name                             pvt_key_encryption_type_desc
-------------------------------- ----------------------------------
MyEncryptionCert                 ENCRYPTED_BY_MASTER_KEY  

(1 row(s) affected) 

Creating a Database Encryption Key (DEK)

Each database to be encrypted requires its own DEK, and each database’s DEK is in turn encrypted by the TDE certificate we just created in the master database. When creating the DEK, you can specify a particular encryption algorithm to be used. Supported algorithms include AES_128, AES_192, AES_256, TRIPLE_DES_3KEY. The DEK protects not only the data and log files, but backups too. Attempting to restore an encrypted database without the certificate is an exercise in futility.   The following T-SQL code creates a DEK for the MyDB database that specifies 128-bit encryption:   

USE MyDB
GO  

CREATE DATABASE ENCRYPTION KEY
  WITH ALGORITHM = AES_128
  ENCRYPTION BY SERVER CERTIFICATE MyEncryptionCert

Notice the ENCRYPTION BY SERVER CERTIFICATE clause that references the TDE certificate MyEncryptionCert we just created in the master database. This means that the MyEncryptionCert certificate must be present and available in the master database of the same server instance as MyDB, or the database will be rendered inaccessible.

(Because we have not yet backed up the TDE certificate, SQL Server issues a warning at this time alerting you to the fact that the certificate being used to encrypt the DEK has not been backed up. This warning should be taken seriously, since you will not be able to access any database encrypted by the DEK without the certificate. Should the certificate be lost or damaged, your encrypted databases will be completely inaccessible. Later in this post, I will show you how to back up and restore the certificate.)

Enabling TDE

With the SMK, certificate, and DEK prepared, you can start transparent data encryption on the database using the ALTER DATABASE…SET ENCRYPTION ON statement. For example:   

ALTER DATABASE MyDB SET ENCRYPTION ON

That’s all there is to it! From this point forward, the database and all of its backups will be encrypted. If an unauthorized party somehow gains access to the physical media holding any backups of MyDB, the backups will be useless without the certificate protecting the DEK.   

Querying TDE Views

You can query the catalog view sys.databases to see which databases are protected by TDE. For example:   

SELECT name, is_encrypted FROM sys.databases

The query results show that MyDB is the only encrypted database on the server:   

name                           is_encrypted
------------------------------ ------------
master                         0
tempdb                         0
model                          0
msdb                           0
ReportServer                   0
ReportServerTempDB             0
MyDB                           1  

(7 row(s) affected)

This output is somewhat misleading, however, since encrypting one or more databases results in the encryption of tempdb as well. This is absolutely necessary since tempdb is shared by all databases, and SQL Server must therefore implicitly protect temporary storage placed into tempdb by databases encrypted by TDE. But because the encryption in tempdb is implicit, is_encrypted is returned as 0 (false) by sys.databases for tempdb (you’ll see next that SQL Server does actually create DEK for tempdb). This can have an undesirable performance impact for unencrypted databases on the same server instance. For this reason, you may wish to consider isolating separate SQL Server instances; one for encrypted databases and one for non-encrypted databases.

You can also query the dynamic management view sys.dm_database_encryption_keys to see all the DEKs and to monitor the progress of encryption (or decryption, when you disable TDE) running on background threads managed by SQL Server. This view returns the unique database ID that can be joined on sys.databases to see the actual database name. For example, if we run the following query after enabling TDE, we can obtain information about the DEK and background encryption process:   

SELECT
   dbs.name,
   keys.encryption_state,
   keys.percent_complete,
   keys.key_algorithm,
   keys.key_length
 FROM
   sys.dm_database_encryption_keys AS keys
   INNER JOIN sys.databases AS dbs ON keys.database_id = dbs.database_id

If this query is executed after we enable TDE but before SQL Server has completed encrypting the entire database in the background, we get results similar to the following:   

name       encryption_state percent_complete key_algorithm    key_length
---------- ---------------- ---------------- ---------------- -----------
tempdb     3                0                AES              256
MyDB       2                78.86916         AES              128   

(2 row(s) affected) 

The value returned by encryption_state tells you the current status of encryption (or decryption), as follows:

1 = Unencrypted
2 = Encryption in progress
3 = Encrypted
4 = Key change in progress
5 = Decryption in progress (after ALTER DATABASE…SET ENCRYPTION OFF)

Certain database operations cannot be performed during any of the “in progress” states (2, 4, or 5). These include enabling or disabling encryption, dropping or detaching the database, dropping a file from a file group, taking the database offline, or transitioning the database (or any of its file groups) to a READ ONLY state. Also note the implicit DEK for tempdb created by SQL Server, which always uses AES_256 encryption.  

Backing Up the Certificate

 It is extremely important to back up the server certificates you use to encrypt your databases with TDE. Without the certificate, you will not be able to access the encrypted database or restore encrypted database backups (which, of course, is the point of TDE). Attempting to restore an encrypted database without the certificate will fail with an error similar to this from SQL Server:   

Msg 33111, Level 16, State 3, Line 1
Cannot find server certificate with thumbprint '0x6B1FEEEE238847DE75D1850FA20D87CF94F71F33'.
Msg 3013, Level 16, State 1, Line 1
RESTORE DATABASE is terminating abnormally. 

Use the following statement to back up the server certificate to a file. In addition to the certificate itself, the certificate’s private key must also be saved to a file and protected with a password: 

BACKUP CERTIFICATE MyEncryptionCert TO FILE='C:\MyEncryptionCert.certbak'
 WITH PRIVATE KEY (
  FILE='C:\MyEncryptionCert.pkbak',
  ENCRYPTION BY PASSWORD='Pr!vK3yP@ssword')

This statement creates two files: MyEncryptionCert.certbak is a backup of the server certificate, and MyEncryptionCert.pkbak is a backup of the certificate’s private key protected with the password Pr!vK3yP@ssword. Password protection is absolutely required when backing up the certificate’s private key. Both of these files and the password will be needed to restore an encrypted database backup onto another server or instance. At the risk of stating the obvious, these backup files and the private key password should be closely safeguarded.

Restoring the Certificate

Before an encrypted database can be restored elsewhere, the server certificate that its DEK is encrypted by must be restored first. And if the target instance does not have a master key, one must be created for it before the server certificate can be restored, as shown here:

USE master

GO
CREATE MASTER KEY ENCRYPTION BY PASSWORD = 'An0thrHrd2GessP@ssw0rd!'

To restore the server certificate from the backup files we made earlier, use an alternative form of the CREATE CERTIFICATE statement, as follows:

CREATE CERTIFICATE MyEncryptionCert
 FROM FILE='C:\MyEncryptionCert.certbak'
 WITH PRIVATE KEY(
  FILE='C:\MyEncryptionCert.pkbak',
  DECRYPTION BY PASSWORD='Pr!vK3yP@ssw0rd')

This statement restores the MyEncryptionCert server certificate from the certificate backup file MyEncryptionCert.certbak and the certificate’s private key backup file MyEncryptionCert.pkbak. Naturally, the password provided in the DECRYPTION BY PASSWORD clause must match the one that was used when the certificate’s private key was backed up or the certificate will fail to restore. With a successfully restored certificate, you can then restore the backup of any encrypted database whose DEK is based on the MyEncryptionCert certificate.   

Summary

With the growing concern about personal data protection and the proliferation of computer viruses, developing a methodology for secure computing continues to be a vital task for developers. With support for Transparent Data Encryption in SQL Server 2008, you can easily implement an additional layer of security by encrypting your entire database without making any code changes in your application. Now go give it a try, and enjoy!