
Using PowerShell to Manage Windows Azure SQL Database

PowerShell is Microsoft’s modern scripting language for system administration that supports a wide variety of tasks by executing commands (known as cmdlets, pronounced command-lets) from the PowerShell command line. Microsoft has also developed PowerShell cmdlets for managing Microsoft Azure, including a number of useful SQL Database commands. In this post, I’ll show you how to get started using these cmdlets.

Even if you already have PowerShell installed, these special cmdlets for Microsoft Azure need to be installed separately. The following instructions describe how to download and install the cmdlets.

Installing the Microsoft Azure PowerShell cmdlets

To install the Microsoft Azure PowerShell cmdlets, follow these steps:

  1. Navigate your web browser to https://www.windowsazure.com/en-us/downloads.
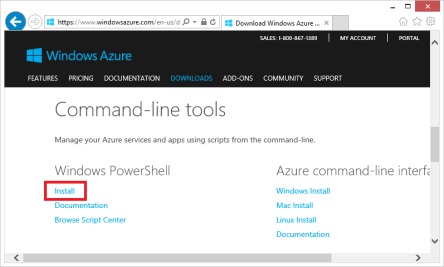
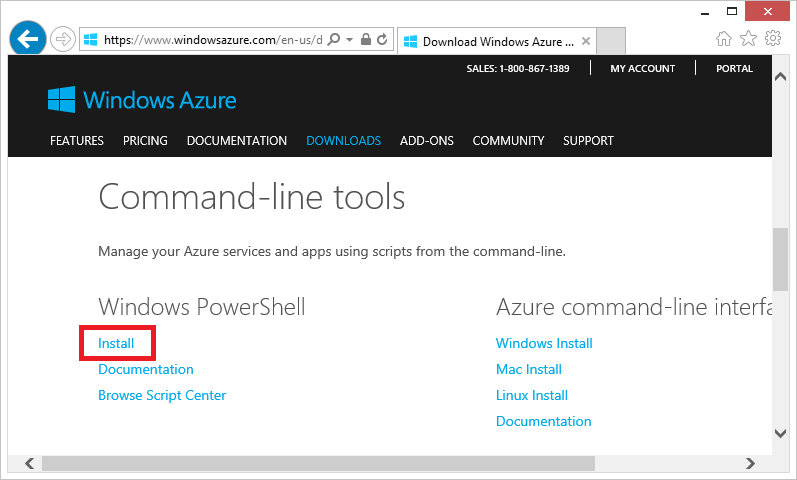
  2. Scroll down to Command-Line Tools, and click the Install link beneath Windows PowerShell.
    F02xx13-markedup
  3. When prompted to run or save, click Run.
  4. If the User Account Control dialog appears, click Yes.
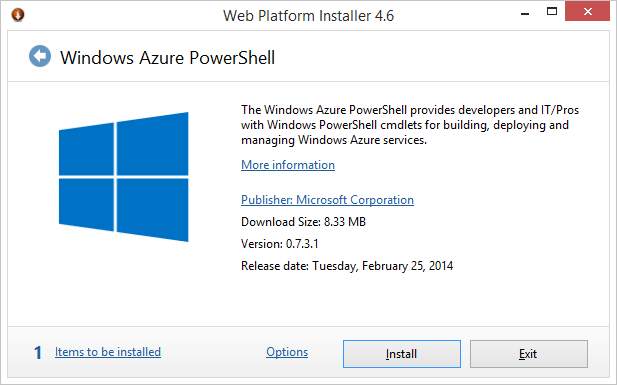
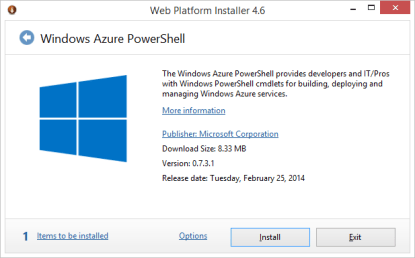
  5. In the Web Platform Installer dialog, click Install.
    F02xx14
  6. Click I Accept to start the installation.
  7. When installation completes, click Finish.
  8. Click Exit to close the Web Platform Installer dialog.
Using the PowerShell Integrated Scripting Environment

Although you can use a simple text editor (even Notepad) to write PowerShell scripts, the PowerShell Integrated Scripting Environment (ISE) is a much more productive environment. As you’ll see, it offers some nice features, such as syntax highlighting and IntelliSense-style auto-completion.

PowerShell can be launched from the command line. To start the PowerShell ISE and view help information for the Azure SQL Database cmdlets, follow these steps:

  1. Open a command prompt.
  2. At the command prompt, type powershell_ise.
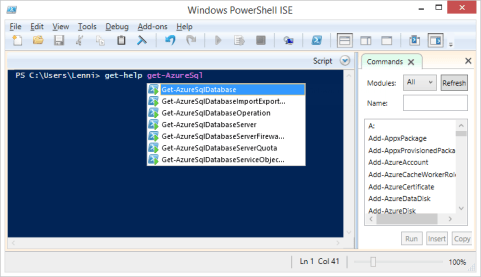
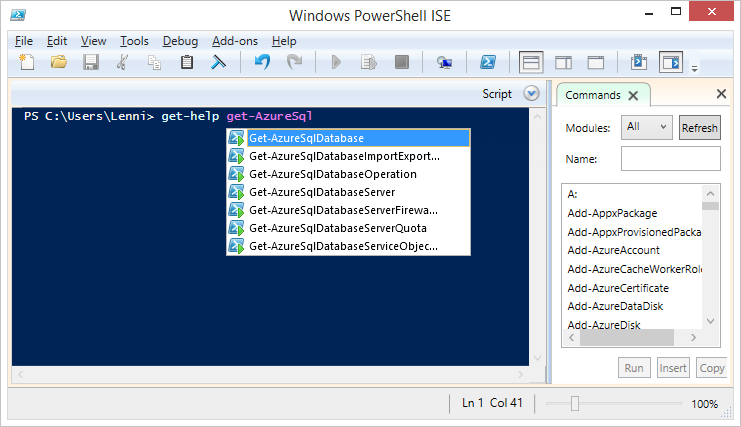
  3. At the PowerShell ISE prompt, type get-help get-azuresql, and then pause. In a moment, a popup window appears showing all the cmdlets that start with get-azuresql.
    F02xx15
  4. Double-click on any of the cmdlets to complete the command, and then press Enter to view help for the selected cmdlet.
Configuring PowerShell for your Microsoft account

Before you can start using PowerShell to manage Azure, you need to configure it for your account. This is simply a matter of logging in to the portal, and then running a few PowerShell commands to retrieve your account information from Azure and import it into PowerShell. This section walks you through the process.

To configure PowerShell for your Microsoft account, follow these steps:

  1. Log in to the Microsoft Azure portal at https://manage.windowsazure.com. This step is necessary for PowerShell to identify your account. If you don’t log in first, you will be prompted to log in when you try to retrieve your account settings in PowerShell.
  2. Start the PowerShell ISE, as explained in the previous procedure.
  3. Type Get-AzurePublishSettingsFile to retrieve your account settings. Internet Explorer will open up automatically and download a .publishsettings file with your account information.
  4. Click Save to save the .publishsettings file to your default Downloads folder.
    Important: The .publishsettings file should be kept safe and private, because it effectively provides access to the Azure subscriptions on your Microsoft account.
  5. Back in the PowerShell ISE, type Import-AzurePublishSettingsFile <.publishsettings file>, where <.publishsettings file> is the complete file name (with path) of the account settings file you just saved to your default Downloads folder. (This is typically C:\Users\<username>\Downloads\<subscription-name>.publishsettings.)

The PowerShell ISE doesn’t boast with a message when the settings are imported successfully. You’ll only get an error message if it fails. Otherwise, you’ll know that all went well if you are silently returned back to the PowerShell command-line prompt.

You are now ready to create a server, and then you can create a database on that server.

Creating a new server

First, create a new server and add a firewall rule for your IP address so that the server will allow you to connect to it using PowerShell. To do this, follow these steps in the PowerShell ISE:

  1. Type New-AzureSqlDatabaseServer –Location “East US” –AdministratorLogin “<new-login>” –AdministratorLoginPassword “<new-password>, where <new-login> and <new-password> are the credentials you want to assign for the new server. The server is created, and PowerShell responds by displaying the new server name.

    F02xx16
  2. Type New-AzureSqlDatabaseServerFirewallRule –ServerName <server-name> –RuleName <any-name> –StartIpAddress <your-ip-address> –EndIpAddress <your-ip-address>, where <server-name> is the name of the new server created in step 1, <any-name> is an arbitrary name for the new rule (no spaces permitted), and <your-ip-address> is the IP address of your machine. This command creates a new firewall rule to allow PowerShell access to the server from your IP address. If you don’t know your IP address, you can find out what it is by visiting whatismyipaddress.com.

    F02xx17

Creating a new database

The New-AzureSqlDatabase cmdlet creates a new database. Before you can use this cmdlet, you must first create an object with your credentials, and then you use those credentials to create a context associated with the server that you want to create the new database on. You store the server context in a variable, and then you specify the server context variable with the New-AzureSqlDatabase cmdlet to create the database (as well as all other cmdlets you might run for that particular server).

To create a new database now, follow these steps in the PowerShell ISE:

  1. Type $creds = new-object System.Management.Automation.PSCredential(“<login-name>“, (“<login-password>” | ConvertTo-SecureString –asPlainText –Force)), where <login-name> and <login-password> are the administrator login and password you assigned when you created the server in the previous procedure. This stores those administrator credentials in a secure string named $creds.
  2. Type $context = New-AzureSqlDatabaseServerContext –ServerName <server-name> –Credential $creds, where <server-name> is the name of the server you created in the previous procedure. (The server name is displayed when you create the server) This creates a context associated with the credentials you created in step 1 and the server you created in the previous procedure, and it stores that context in an object named $context.
  3. Type New-AzureSqlDatabase –Context $context –DatabaseName MyNewDb. This creates a new database named MyNewDb. The database is created on the server associated with $context, using the credentials associated with $creds. When the database is created, PowerShell displays information about the new database.

    F02xx18
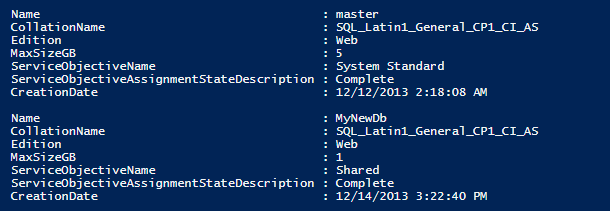
  4. It’s often useful to view all the databases that exist on the server. To do so, type Get-AzureSqlDatabase –Context $context. As shown by this cmdlet’s output below, the server includes a master database, just as an on-premises SQL Server does.
    F02xx19

The database you just created with New-AzureSqlDatabase is, by default, a Web edition database with a maximum size of 1 GB and the default collation. This is the same type of database that gets created when you use Quick Create in the Microsoft Azure management portal. To override these defaults, specify the –Edition, –MaxSizeGb, and –Collation switches with an edition, maximum size, and collation of your own choosing. For example, the following statement creates a Business edition database with a maximum size of 150 GB (the largest possible):

New-AzureSqlDatabase –Context $context –DatabaseName MyBigDb -Edition Business -MaxSizeGB 150

You can also change the edition and maximum size (but not the collation) of an existing database by using the Set-AzureSqlDatabase cmdlet with the –Edition and –MaxSizeGb switches. For example, you can use the following command to reconfigure the MyNewDb database you just created as a Business edition database with a maximum size of 20 GB:

Set-AzureSqlDatabase -Context $context -DatabaseName MyNewDb -Edition Business -MaxSizeGB 20

Deleting a database

The Remove-AzureSqlDatabase cmdlet deletes a SQL Database. To delete the MyNewDb database you just created in the previous section, follow these steps:

  1. Type Remove-AzureSqlDatabase –Context $context –DatabaseName MyNewDb.
  2. When prompted to confirm, click Yes.

If you are using Remove-AzureSqlDatabase to write scripts you intend to run with no user intervention, you can include the –Force switch. This switch causes the database to be deleted immediately, without being prompted to confirm.

There’s a lot more you can do with these PowerShell cmdlets of course, so be sure to explore all the help topics to learn about all the other supported functionality!
 

Creating a New SQL Database on Windows Azure

In my previous post, I showed you how to sign up for a Windows Azure subscription. Once you’ve got your subscription, it’s easy to create a SQL Database, which is very much like an ordinary SQL Server database hosted in the cloud. In this post, I’ll show you how. Essentially, you first need to create a server on Windows Azure, and then you can create the database on that server.

Creating a server

It’s easy to create a server, which is akin to an instance of SQL Server in the sense that it can host multiple databases. All you need to do is create an administrator account user name with a strong password, and specify the geographical region where the server should be located physically. To achieve the best performance, you should choose the region closest to your consumers. You will also want to be sure that any Windows Azure cloud Web sites and services you create are hosted in the same region as the SQL Database servers they communicate with. By locating both in the same region, you will avoid the bandwidth-based fee that gets incurred when your cloud sites, services, and databases communicate across different Azure regions. You will also reduce latency, which results in perceivably better performance.

SQL Database also has special firewall rules you can set to control exactly which computer or computers can access your database server in the cloud. Minimally, you’ll need to add a rule granting access to the IP address of your computer so that you can access the server from your local machine. For production, you might need to add rules granting access to blocks of IP addresses.

Follow these steps to create a new server:

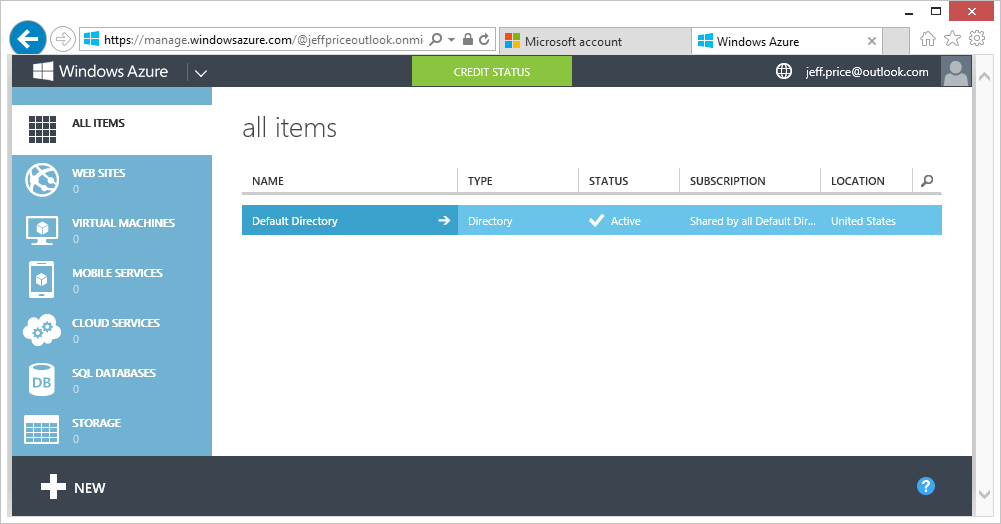
  1. Log in to the Windows Azure portal at https://manage.windowsazure.com. This brings you to the main portal page showing ALL ITEMS.
    F01xx03
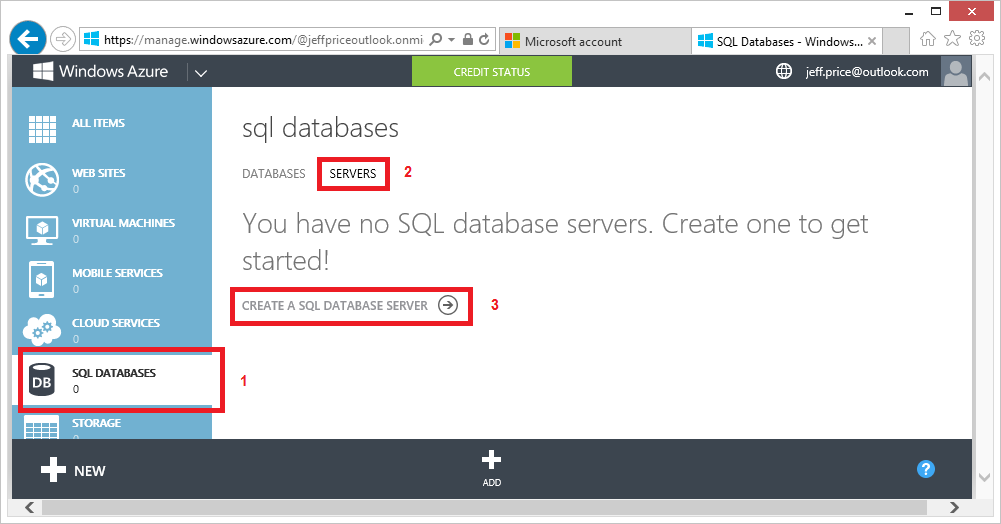
  2. Click SQL DATABASES in the vertical navigation pane on the left, then click SERVERS at the top of the page, and then click CREATE A SQL DATABASE SERVER.
    F01xx04-markedup
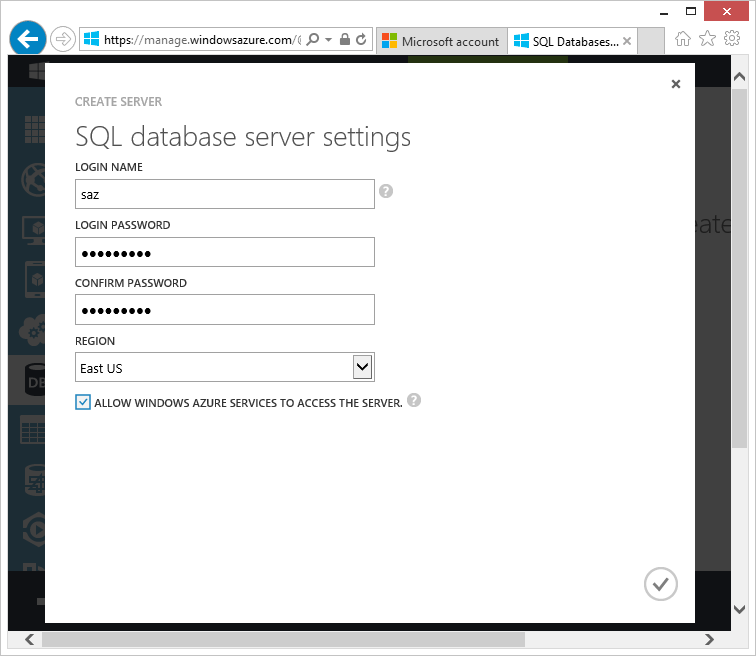
  3. Provide a new server login name—for example, saz.
  4. Supply a password for the new server, and then reenter it to confirm. Typical strong password guidelines apply, which require you to use a combination of mixed case, numbers, and symbols.
  5. Choose a region from the drop-down list—for example, East US. For best performance, pick the region you are located in or nearest to.
  6. Be sure to leave the ALLOW WINDOWS AZURE SERVICES TO ACCESS THE SERVER  check box selected. This makes the server accessible to other Windows Azure cloud services that you can create.
    F01xx05
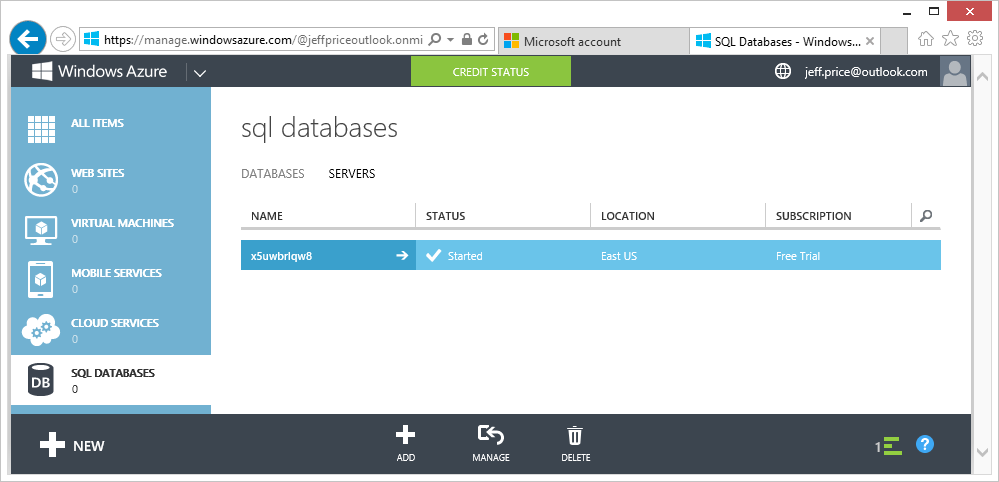
  7. Click the checkmark icon on the lower-right side of the dialog to complete the settings. After just a few moments, the new server is provisioned and ready to use.
    F01xx06

If you’ve ever prepared a new server from scratch yourself, you can really appreciate the time and effort you just saved. This server is now available and ready to host databases in the cloud, and SQL Database has automatically assigned a randomly unique (but relatively short) name by which it can be accessed. But before access is granted, the server firewall must be configured. So the next step is to add a firewall rule so that you can connect to the server from your local machine.

The check box mentioned in step 6 added the special IP address 0.0.0.0, which allows cloud services running on Windws Azure to access the SQL Database server. However, you still need to add the IP address of your local machine to access the server from the SQL Database management portal and other tools (such as SQL Server Management Studio and SQL Server Data Tools in Microsoft Visual Studio).

To add a firewall rule for the IP address of your local machine, follow these steps:

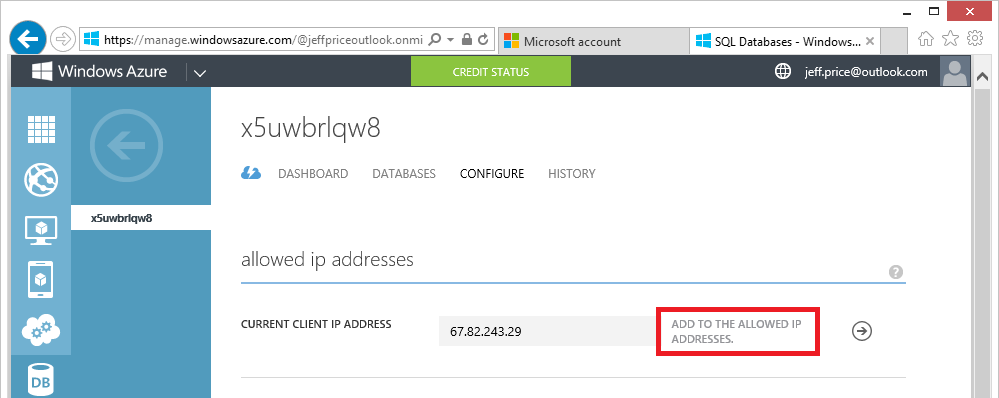
  1. Click the server name, and then click the CONFIGURE link at the top of the page.
  2. To the right of your current detected IP address, click ADD TO THE ALLOWED IP ADDRESSES. A new firewall rule for your IP address is added.
    F01xx07-markedup
  3. Click SAVE at the bottom of the page.
  4. Click the back icon (the large back-pointing arrow) to return to the SQL DATABASES page for the new server.

You might need to wait a few moments for the new firewall rule to take effect, although typically it happens very quickly (often within five to ten seconds). If you don’t wait long enough, however, and the rule has not yet taken effect, you can be quite certain that you will not be able to connect to the server from your local machine until it does.

Creating a SQL Database instance

It will be just about as easy to create a database as it was to create the server. You simply need to choose a name for the new database, an edition, a database size, a default collation, and of course, the server to host the database on.

These settings can be easily changed later on. As part of the elastic scaling provided by SQL Database, you can freely switch back and forth between the Web and Business editions. You can also switch up and down between the sizes (1 GB or 5 GB for the Web edition, or 10 GB through 150 GB for the Business edition) as your changing needs dictate. And if 150 GB is still too small for you, you can partition your database using special sharding techniques.

Follow these steps to create a new SQL Database:

  1. In the Windows Azure portal, click the DATABASES link at the top of the page.
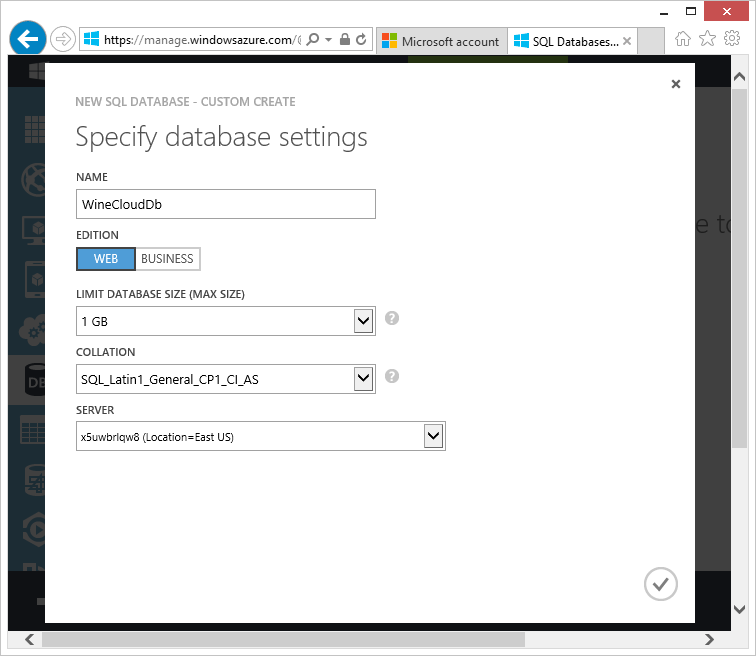
  2. Click CREATE A SQL DATABASE. This opens the NEW SQL DATABASE dialog.
  3. Type the name for the new database.
  4. Leave the default settings to create a Web edition database up to 1 GB in size using the SQL_Lating1_GeneralCP1_CI_AS collation.
  5. Choose the server you created in the previous procedure from the drop-down list.
    F01xx09
  6. Click the checkmark icon in the lower right of the dialog to complete the settings.

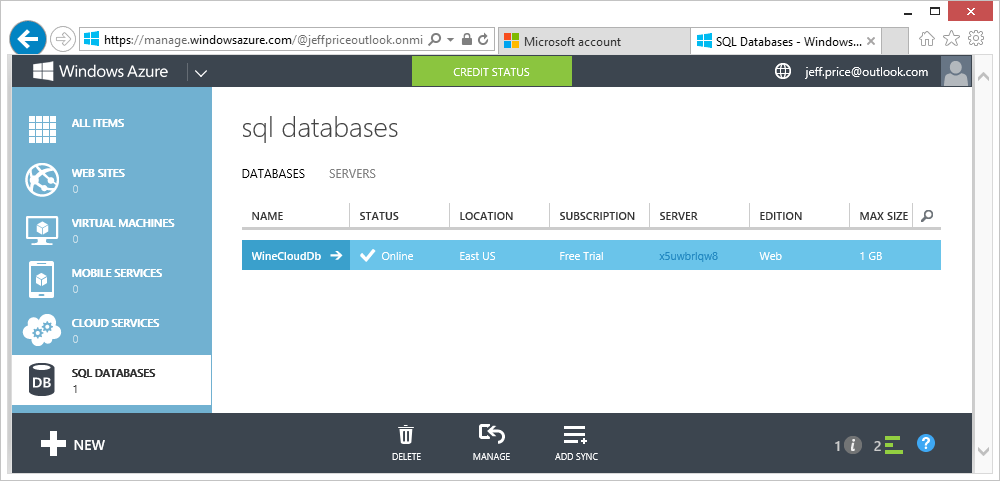
After a few more moments, the new database is created and ready to use.

F01xx10

And that’s all there is to creating a new SQL Database on Windows Azure!


The Same, Only Different: Comparing Windows Azure SQL Database and On-Premise SQL Server

One of the most attractive aspects of Windows Azure SQL Database is that it shares virtually the same code-base and exposes the very same tabular data stream (TDS) as on-premise SQL Server. Thus, to a great extent, the same tools and applications that work with SQL Server work just the same and just as well with SQL Database. Notice that I said to a great extent, because despite their commonality, there are quite a few SQL Server features that SQL Database does not support. In this blog post, I discuss how and why these two platforms differ from one another, and explain the SQL Database constraints that you need to be aware of if you have previous experience with SQL Server. Where possible, I also suggest workarounds.

SQL Server and SQL Database differ in several ways; most notably, in terms of size limitations, feature support, and T-SQL compatibility. In many cases, these constraints are simply the price you pay for enjoying a hassle-free, self-managing, self-healing, always-available database in the cloud. That is, Microsoft cannot responsibly support features that impair its ability to ensure high-availability, and must be able to quickly replicate and relocate a SQL Database. This is why SQL Database places limits on database size, and doesn’t support certain specialized features such as FILESTREAM, for example.

Another common reason why a particular feature or T-SQL syntax might not be supported in SQL Database is that it’s simply not applicable. With SQL Database, administrative responsibilities are split between Microsoft and yourself. Microsoft handles all of the physical administration (such as disk drives and servers), while you manage only the logical administration (such as database design and security). This is why any and all T-SQL syntax that relates to physical resources (such as pathnames) is not supported in SQL Database. For example, you don’t control the location for primary and log filegroups. This is why you can’t include an ON PRIMARY clause with a CREATE DATABASE statement, and indeed, why SQL Database does not permit a filegroup reference in any T-SQL statement. Plainly stated, everything pertaining to physical resources (that is, infrastructure) is abstracted away from you with SQL Database

Yet still, in some cases, a certain SQL Server feature or behavior may be unsupported merely because Microsoft has just not gotten around to properly testing and porting it to SQL Database. Windows Azure is constantly evolving, so you need to keep watch for updates and announcements. This blog post is a great starting point, but the best way to stay current is by reviewing the Guidelines and Limitations section of the SQL Database documentation on the MSDN web site.

Size Limitations

With the exception of the free, lightweight Express edition of SQL Server, there is no practical upper limit on database size in any edition of SQL Server. A SQL Server database can grow as large as 524,272 terabytes (for SQL Server Express edition, the limit is 10 gigabytes).

In contrast, SQL Database has very particular size limitations. You can set the maximum size by choosing between the Web and Business editions. With a Web edition database, you can set the maximum database size to either 1 or 5 gigabytes. With a Business edition database, the maximum database size can range from 10 to 150 gigabytes. Other than the available choices for maximum database size, there is no difference in functionality between the two editions. The absolute largest supported database size is 150 gigabytes, although horizontal partitioning strategies (called sharding) can be leveraged for scenarios that require databases larger than 150 gigabytes.

Connection Limitations

SQL Database is far less flexible than SQL Server when it comes to establishing and maintaining connections. Keep the following in mind when you connect to SQL Database:

  • SQL Server supports a variety of client protocols, such as TCP/IP, Shared Memory, and Named Pipes. Conversely, SQL Database allows connections only over TCP/IP.
  • SQL Database does not support Windows authentication. Every connection string sent to SQL Database must always include a login username and password.
  • SQL Database often requires that @<server> is appended to the login username in connection strings. SQL Server has no such requirement.
  • SQL Database communicates only through port 1433, and does not support static or dynamic port allocation like SQL Server does.
  • SQL Database does fully support Multiple Active Result Sets (MARS), which allows multiple pending requests on a single connection.
  • Due to the unpredictable nature of the internet, SQL Database connections can drop unexpectedly, and you need to account for this condition in your applications. Fortunately, the latest version of the Entity Framework (EF6) addresses this issue with the new Connection Resiliency feature, which automatically handles the retry logic for dropped connections.

Unsupported Features

Listed below are SQL Server capabilities that are not supported in SQL Database, and I suggest workarounds where possible. Again, because this content is subject to change, I recommend that you check the MSDN web site for the very latest information.

  • Agent Service You cannot use the SQL Server Agent service to schedule and run jobs on SQL Database.
  • Audit The SQL Server auditing feature records server and database events to either the Windows event log or the file system, and is not supported in SQL Database.
  • Backup/Restore Conventional backups with the BACKUP and RESTORE commands are not supported with SQL Database. Although the BACPAC feature can be used to import and export databases (effectively backing them up and restoring them), this approach does not provide transactional consistency for changes made during the export operation. To ensure transactional consistency, you can either set the database as read-only before exporting it to a BACPAC, or you can use the Database Copy feature to create a copy of the database with transactional consistency, and then export that copy to a BACPAC file.
  • Browser Service SQL Database listens only on port 1433. Therefore, the SQL Server Browser Service which listens on various other ports is naturally unsupported.
  • Change Data Capture (CDC) This SQL Server feature monitors changes to a database, and captures all activity to change tables. CDC relies on a SQL Server Agent job to function, and is unsupported in SQL Database.
  • Common Language Runtime (CLR) The SQL Server CLR features (often referred to simply as SQL CLR) allow you to write stored procedures, triggers, functions, and user-defined types in any .NET language (such as C# or VB), as an alternative to using traditional T-SQL. In SQL Database, only T-SQL can be used; SQL CLR is not supported.
  • Compression SQL Database does not support the data compression features found in SQL Server, which allow you to compress tables and indexes.
  • Database object naming convention In SQL Server, multipart names can be used to reference a database object in another schema (with the two-part name syntax schema.object), in another database (with the three-part name syntax database.schema.object), and (if you configure a linked server) on another server (with the four-part name syntax server.database.schema.object). In SQL Database, two-part names can also be used to reference objects in different schemas. However, three-part names are limited to reference only temporary objects in tempdb (that is, where the database name is tempdb and the object name starts with a # symbol); you cannot access other databases on the server. And you cannot reference other servers at all, so four-part names can never be used.
  • Extended Events In SQL Server, you can create extended event sessions help to troubleshooting a variety of problems, such as excessive CPU usage, memory pressure, and deadlocks. This feature is not supported in SQL Database.
  • Extended Stored Procedures You cannot execute your own extended stored procedures (these are typically custom coded procedures written in C or C++) with SQL Database. Only conventional T-SQL stored procedures are supported.
  • File Streaming SQL Server native file streaming features, including FILESTREAM and FileTable, are not supported in SQL Database. You can instead consider using Windows Azure Blob Storage containers for unstructured data files, but it will be your job at the application level to establish and maintain references between SQL Database and the files in blob storage, though note that there will be no transactional integrity between them using this approach.
  • Full-Text Searching (FTS) The FTS service in SQL Server that enables proximity searching and querying of unstructured documents is not supported in SQL Database.
  • Mirroring SQL Database does not support database mirroring, which is generally a non-issue because Microsoft is ensuring data redundancy with SQL Database so you don’t need to worry about disaster recovery. This does also mean that you cannot use SQL Database as a location for mirroring a principal SQL Server database running on-premises. However, if you wish to consider the cloud for this purpose, it is possible to host SQL Server inside a Windows Azure virtual machine (VM) against which you can mirror an on-premise principal database. This solution requires that you also implement a virtual private network (VPN) connection between your local network and the Windows Azure VM, although it will work even without the VPN if you use server certificates.
  • Partitioning SQL Server allows you to partition tables and indexes horizontally (by groups of rows) across multiple filegroups within a database, which greatly improves the performance of very large databases. SQL Database has a maximum database size of 150 GB and gives you no control over filegroups, and thus does not support table and index partitioning.
  • Replication SQL Server offers robust replication features for distributing and synchronizing data, including merge replication, snapshot replication, and transactional replication. None of these features are supported by SQL Database, however SQL Data Sync can be used to effectively implement merge replication between a SQL Database and any number of other SQL Databases on Windows Azure and on-premise SQL Server databases.
  • Resource Governor The Resource Governor feature in SQL Server lets you manage workloads and resources by specifying limits on the amount of CPU and memory that can be used to satisfy client requests. These are hardware concepts that do not apply to SQL Database, and so the Resource Governor is naturally unsupported.
  • Service Broker SQL Server Service Broker provides messaging and queuing features, and is not supported in SQL Database.
  • System stored procedures SQL Database supports only a few of the system stored procedures provided by SQL Server. The unsupported ones are typically related to those SQL Server features and behaviors not supported by SQL Database. At the same time, SQL Database provides a few new system stored procedures not found in SQL Server that are specific to SQL Database (for example, sp_set_firewall_rule).
  • Tables without a clustered index Every table in a SQL Database must define a clustered index. By default, SQL Database will create a clustered index over the table’s primary key column, but it won’t do so if you don’t define a primary key. Interestingly enough, SQL Database will actually let you create a table with no clustered index, but it will not allow any rows to be inserted until and unless a clustered index is defined for the table. This limitation does not exist in SQL Server.
  • Transparent Data Encryption (TDE) You cannot use TDE to encrypt a SQL Database like you can with SQL Server.
  • USE In SQL Database, the USE statement can only refer to the current database; it cannot be used to switch between databases as it can with SQL Server. Each SQL Database connection is tied to a single database, so to change databases, you must connect directly to the database.
  • XSD and XML indexing SQL Database fully supports the xml data type, as well as most of the rich XML support that SQL Server provides, including XML Query (XQuery), XML Path (XPath), and the FOR XML clause. However XML schema definitions (XSD) and XML indexes are not supported in SQL Database.

Book Announcement! Windows Azure SQL Database – Step By Step

Just when I thought it was safe to go back in the water…

I’m very happy to announce that I’ll be authoring a new book on Windows Azure SQL Database. The book, part of the Microsoft Press “Step By Step” series, is designed for readers to quickly get productive with Windows Azure SQL Database — the cloud version of SQL Server.

I’m especially lucky and honored to work with my friend and collegue Brian Reynolds, who is co-authoring the book with me. Brian has great knowledge and experience with the Windows Azure platform, which is sure to shine through in his chapters. Plus, I’m once again delighted to work in partnership with Craig Branning and all the wonderful folks at Tallan, Inc.

So who is this book for? Well, anyone interested in quickly getting up and running with SQL Database on Windows Azure. This includes not only those experienced with SQL Server, but readers having general experience with other database technologies, and even those with little to no experience at all. The Step By Step series follows an inviting format that’s chock full of quick rewards — small bits of conceptual information are presented, and that information is then immediately put to practical use by walking through a relatively short procedure, one step at a time.

I’m also happy that the title will once again be published by O’Reilly Media and branded as an MS Press book. Years back, O’Reilly acquired MS Press, but retained the Microsoft logo with the black and red theme, which I think we all agree looks really, really cool.

So (once more!) busy days lie ahead. We’re still in the early stages, so some of this could easily change somewhat, but here’s what we have planned so far to cover:

  • Quick-Start, Setup, and Configuration
  • Security in the cloud
  • Reporting Services in the cloud
  • SQL Data Sync
  • Migration and Backup
  • Using the online management portal, and familiar tools like SSMS and SSDT
  • Programming using such tools as the Entity Framework ORM layer
  • Scalability, Federations, and Performance
  • Differences from on-premise SQL Server

With luck, the book should be out by Q3 2013. I’m looking forward to the work in store, and we hope to produce the best piece of work we can. Along the way, I’ll be blogging more previews of what’s to come. So stay tuned, and thanks for reading.

Introducing SQL Server Developer Tools (code-named “Juneau”)

With Denali CTP3 released just two weeks ago, I’ve been ramping up fast as I write the new edition of my book (Programming Microsoft SQL Server 2012, MS Press) and prepare for upcoming presentations at the NJSQL User Group (Sep 20) and the SDC event in the Netherlands (Oct 3/4). I recently spent a lot of time working with the Juneau CTP3, code name for the new SQL Server Developer Tools (SSDT), set to ship with SQL Server 2012 (code named Denali) next year. I’m extremely impressed with the features of this new tool, and delighted at the notion that most developers will no longer need to toggle between Visual Studio and SQL Server Management Studio (SSMS), because they may very well never again need to use SSMS at all!

This is not to say that SSDT is intended to be a replacement for SSMS—au contraire, SSMS is alive and well in Denali, and continues to evolve as the primary management tool for database administrators respsonible for maintaining running SQL Server installations. But programmers have been using SSMS to conduct development tasks for years (and before 2005, we were using two dba tools—SQL Enterprise Manager and Query Analyzer). It’s always been necessary to switch away from our primary application development tool (Visual Studio) to a database management tool (SSMS) in order to get our database development done.

But no more.

SQL Server Developer Tools finally gives application developers what they need to get everything done without ever leaving Visual Studio—and it delivers many powerful new capabilities as well. In this post, I’ll describe the most important features that developers are certain to enjoy when they start working with this new tool.

Model-Based Development

The key concept in SSDT is that it uses a model-based approach. That is, there is always an in-memory representation of what a database looks like, and all the SSDT tools (designers, validations, IntelliSense, schema compare, etc.) operate on that model. This model can be backed by a live database (on-premises or Azure), an offline database project, or a snapshot taken of an offline database project at any point in time. But to reiterate, the tools are agnostic to the model’s backing, and work exclusively against the model itself. Thus, you enjoy a rich, consistent experience in any scenario—regardless of whether you’re working with on-premises or cloud databases, offline projects, or versioned model snapshots.

SSMS in Server Explorer

The Server Explorer now provides most of the functionality that developers are accustomed to in SSMS. Although the experience is strikingly similar when working against a connected database, remember that (and I’ll risk overstating this) SSDT tools only operate on a model. So when working connected, SSDT is actually creating a model from the database—on the fly—and then allowing you to edit that model.

When you “save” a schema change, SSDT works out the necessary script to update the database to reflect the change made to the model. Of course, the end result is the same as the connected SSMS experience, so it isn’t strictly necessary to understand the distinction if you don’t exploit the capabilities of SSDT beyond connected development (but why wouldn’t you?). Once you do understand it, then SSDT’s offline development and versioning capabilities will immediately feel natural and intuitive, as those scenarios are simply different backing types of the very same model. It’s just that when you’re working in Server Explorer, the backing happens to be a live connected database.

You can also open query windows to compose and execute T-SQL statements directly against the database. Overall, these Server Explorer-based features give you the same connected management experience you are accustomed to in SSMS; which is an imperative, script-based approach to directly managing a stateful database.

Offline Development in Visual Studio

SSDT offers so much more than a mere replacement for the connected SSMS experience, by providing a rich offline experience with the new SQL Server project type in Visual Studio 2010. If you’re familiar with the previous Database Professional editions of Visual Studio (commonly known as “data dude”), you can think of this project type as the next version of that edition (data dude projects will even load and upgrade to SSDT automatically when opened in Visual Studio 2010). The T-SQL script files in a SQL Server project are declarative in nature (all CREATE statements; no ALTER statements), which is an entirely different approach to how you’re accustomed to “developing” databases in SSMS against a live stateful database. Essentially, you get to focus on “this is how the database should look,” and let the tool worry about and figure out the appropriate T-SQL statements to actually update the live database to match your definition.

The SQL Server project enjoys all the same capabilities of any Visual Studio project. This includes not only source control (as mentioned), but all the common code navigation and refactoring paradigms (like Rename, Goto Definition, and Find All References) that have come to be accepted as indispensible tools of the modern IDE. And the model’s rich metadata provides a far better IntelliSense than what SSMS has been offering since SQL Server 2008. You really get that “strongly-typed” feeling. You can also set breakpoints, single-step through T-SQL code, and utilize the Locals window in Visual Studio much like you can when debugging .NET project types. With SSDT, application and database development tooling has now finally been unified under one roof: Visual Studio 2010.

The beauty of the model-based approach is that you can generate models from almost anything. As already explained, when connected directly via Server Explorer, SSDT creates a model from the connected database. When you create a SQL Server project (which can be imported from any existing database, script, or snapshot), you are creating an offline source-controlled project inside Visual Studio that fully describes a database. Now SSDT generates a model backed by your project, and so the design experience offline is just the same as when connected; the designers, IntelliSense, validation checks, and all other SSDT features all work exactly the same way.

As you conduct your database development within the project, you get the same “background compilation” experience that you’re used to experiencing with typical .NET development using C# or VB .NET. For example, making a change in the project that can’t be submitted to the database because of dependency issues will immediately raise errors in the Errors pane. You can click on the errors to navigate directly to the various dependencies so that they can be dealt with. Once all the build errors disappear, you’ll be able to submit the changes to update the database.

SSDT also provides a new local database runtime for testing and debugging. This is a lightweight, single user instance of SQL Server that spins up on demand when you build your SQL Server project. This is a great way to test your offline work before deploying to a live server or the cloud.

Versioning and Snapshots

A database project gives you an offline definition of a database. Like all projects, each database object (table, view, stored procedure) lives as a source file that can be placed under version control. Thus, the project system enables you to preserve and protect the definition of the database, as opposed to having the definition live within the database itself.

At any point in time, and as often as you’d like, you can create a database snapshot. A snapshot is nothing more than a persisted serialized version of the model based on the current project at the time the snapshot is taken. As such, you can use SSDT to develop, deploy, and synchronize database structures across local/cloud databases and differently versioned offline database projects.

Targeting SQL Azure

SSDT projects have a target switch that lets you specify which SQL Server edition or platform the project is intended to be deployed to. All the validation checks against the project-backed model are based on this setting, so it’s simply a matter of choosing SQL Azure as the target to ensure that your database can be deployed to the cloud without any problems. If your database project defines something that is not supported in Azure (a table with no clustered index, for example), it will get flagged as an error automatically when you attempt to publish.

The New BIDS

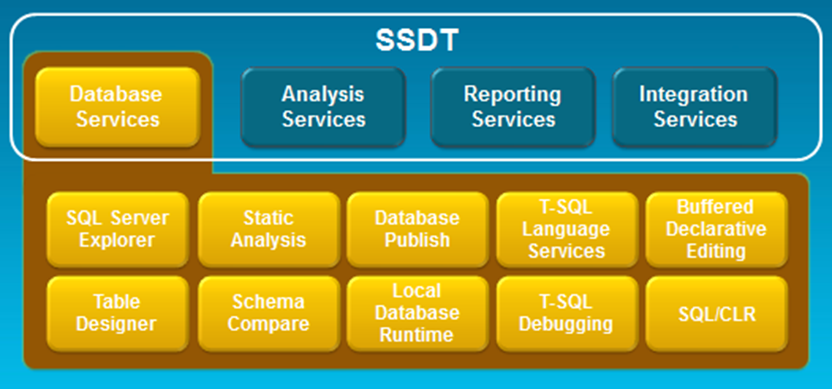
Are you not sufficiently impressed yet? But wait! SSDT is even bigger than what I’ve described so far. As announced at SQL PASS at the end of 2010, SSDT is an umbrella, a packaging of what was the VS2008-based Business Intelligence Developer Studio (BIDS) tools for SSAS, SSRS, and SSIS, combined with a new service, the “database services”. So they’ve really now brought together under the SQL Server umbrella all of the database development experiences inside of Visual Studio 2010. Here’s the picture:

Get Started Now, and Meet Me in New Jersey

SSDT is the next generation database development tool Visual Studio developers, and its coming soon! Hopefully this post inspires you to give SSDT a test drive. Download the Juneau CTP3 bits from http://www.microsoft.com/web/gallery/install.aspx?appid=JUNEAU10 and check it out for yourself.

I’ll be presenting a session at the NJ SQL User Group (http://njsql.org/default.aspx) with lots of demos that show off some of the coolest things about SSDT. The meeting  is being held at SetFocus in Parsippany (directions here: http://www.setfocus.com/about/headquarters.aspx) on Sept 20 from 6 – 8:30. Hope to see you then!

SQL Azure CTP1 Released

Get Introduced to The Cloud

Read my previous post for a .NET developer’s introduction to the Azure Services Platform, and the detailed steps to get up and running quickly with Azure.

Get Your SQL Azure Token

If you’ve been waiting for a SQL Azure token to test-drive Microsoft’s latest cloud-based incarnation of SQL Server, your wait will soon be over. Just this morning, Microsoft announced the release of SQL Azure CTP1, and over the next several weeks they should be sending invitation tokens to everyone that requested them (if you’ve not yet requested a SQL Azure token, go to http://msdn.microsoft.com/en-us/sqlserver/dataservices/default.aspx and click Register for the CTP).

Get the Azure Training Kit

Microsoft has also just released the August update to the Azure training kit that has a lot of new SQL Azure content in it. Be sure to download it here: http://www.microsoft.com/downloads/details.aspx?FamilyID=413E88F8-5966-4A83-B309-53B7B77EDF78.

Read the Documentation

The SQL Azure documentation, which was posted on MSDN on August 4, can be found here: http://msdn.microsoft.com/en-us/library/ee336279.aspx.