
Getting Started with Change Event Streaming in SQL Server 2025 (Part 2: Consuming Events)

Welcome back! In this second part of my two-part series covering the new Change Event Streaming (CES) feature in SQL Server 2025, I’ll show you how to consume events generated by CES. In Part 1, we provisioned an Azure event hub, generated a SAS token to access the event hub, created the CesDemo sample database, and enabled Change Event Streaming (CES) on the database. We then added tables to an event stream group with deliberate choices for @include_old_values and @include_all_columns. So at this point, CES is now emitting DML changes (inserts, updates, and deletes) from those tables into the event hub.

Note: This post is based on SQL Server 2025 CTP 2.1. Syntax and behavior are subject to subtle changes by the time the product is released. Change Event Streaming (CES) will ultimately be supported across all SKUs of SQL Server, including SQL Server 2025 for Windows, SQL Server 2025 for Linux, Azure SQL Database, and Managed Instance.

Now we’re ready to build a client application to consume generated events. But before we start coding, let’s establish some context so the steps make sense.

First, CES merely writes into Event Hubs. It doesn’t know (or care) who’s listening. It’s up to your client application(s) to subsequently consume those events. Our sample C# application will use the Event Hubs client SDK (specifically, EventProcessorClient) to listen for events.

Every CES client needs somewhere to record progress, as it processes events. This is called a checkpoint, which works like a “bookmark”. Using checkpoints, client applications can stop and later resume where they left off, and not reprocess events that have already been processed. The SDK uses Azure Blob Storage for this purpose.

You’ll also encounter the term consumer group. Think of a consumer group as a “view” of the stream with its own checkpoint. By utilizing multiple consumer groups (one per client application), each application can maintain its own checkpoint for bookmarking its place in the event stream. The Basic tier allows for only one consumer group. Moving to (and paying for) a higher tier than Basic will allow you to manage multiple client applications that consume events simultaneously from the same event hub, each at their own pace, without stepping on each other.

Create a Blob Storage Container

You’ll need a blob container in Azure Storage so that the Event Hubs client SDK can manage checkpoints for your consumer groups.

Create a Storage Account

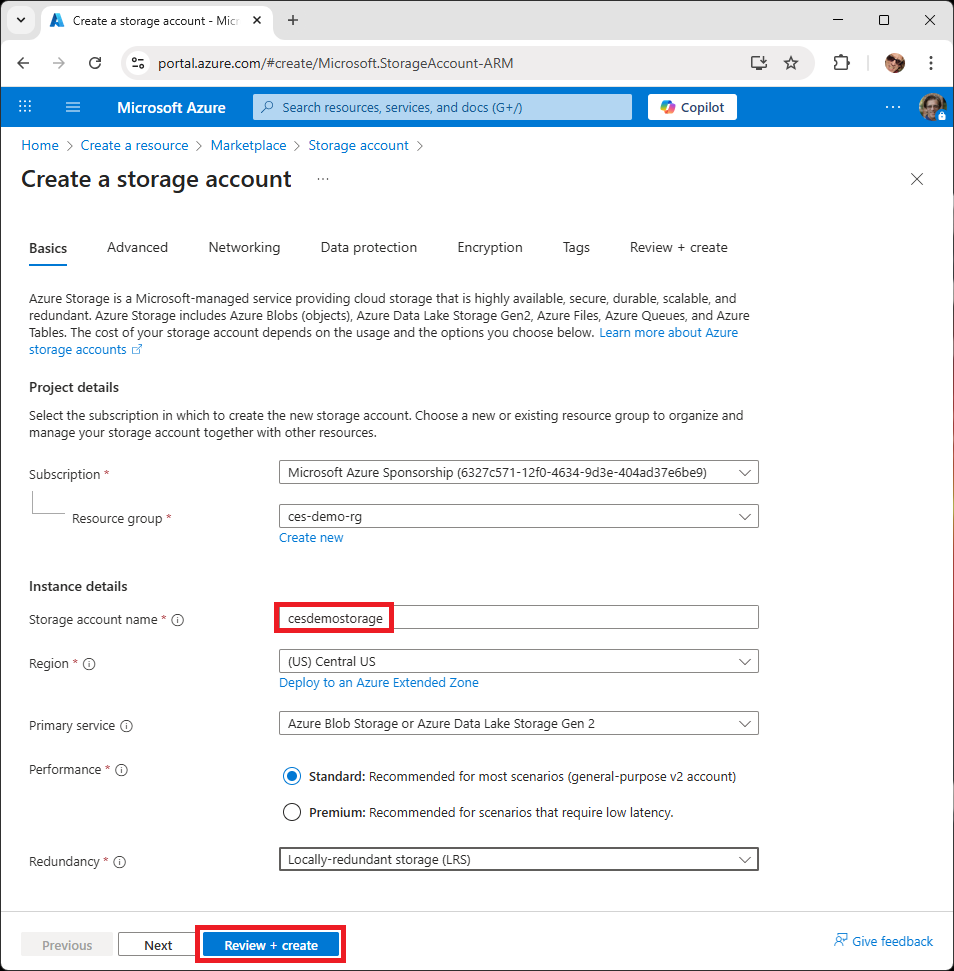
A blob container lives within a storage account. To create a new storage account:

  1. In the Azure portal, create a new resource.
  2. From the Marketplace, create a new Storage Account resource.
  3. Provide a name for a new storage account in either a new or existing resource group (dashes not permitted).
  4. For the Primary service, choose Azure Blob Storage or Azure Data Lake Storage Gen 2.
  5. For Redundancy, choose Locally-redundant storage (LRS) (sufficient for development and testing).
  6. Click Review + create, and then Create.
Create a Blob Container

Now you can create a new blob container within the new storage account:

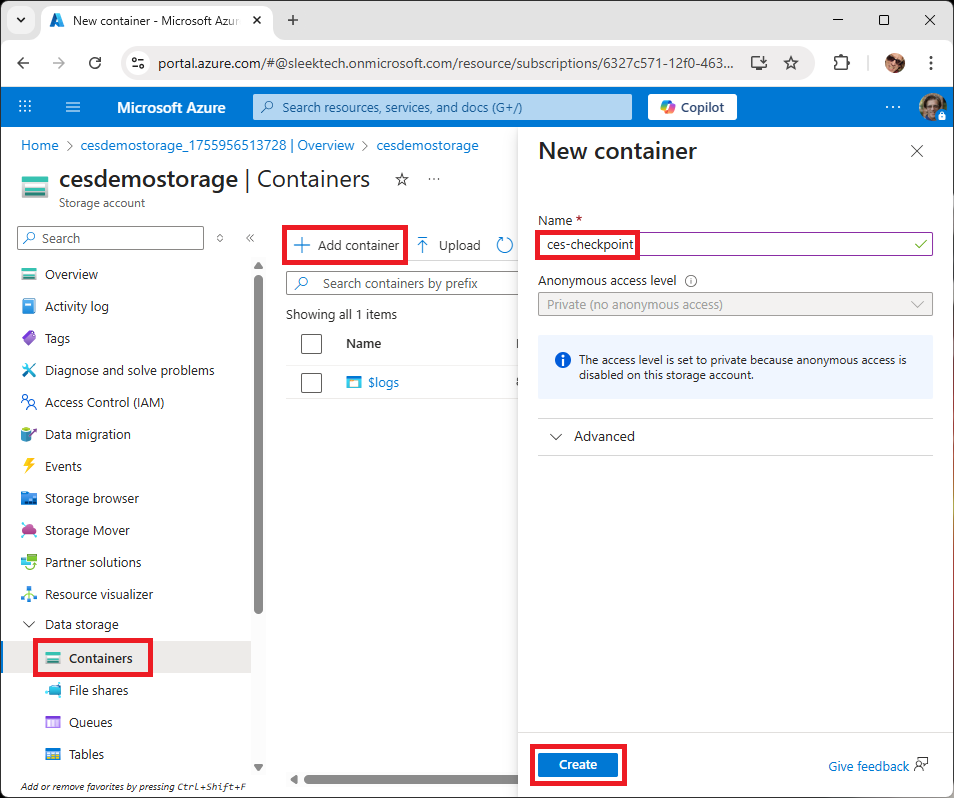
  1. Under Data Storage on the left, click Containers.
  2. Click + Add container.
  3. Provide a name for the new container.
  4. Click Create.

Now get the connection string for the storage account:

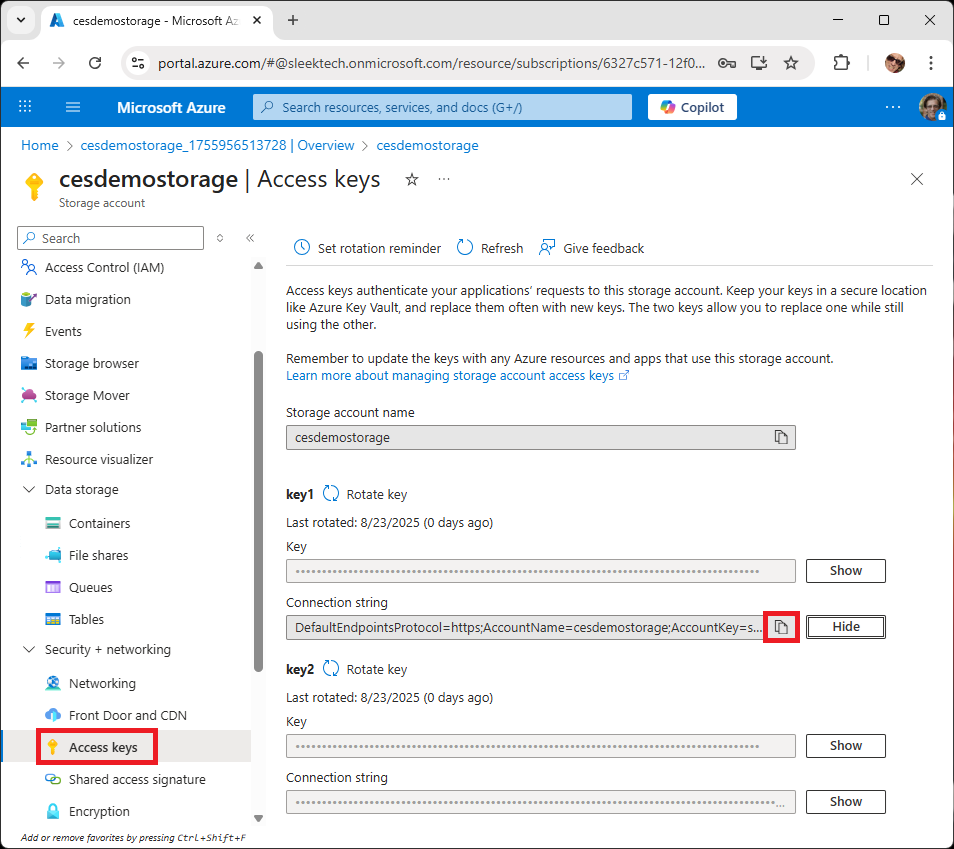
  1. Under Security + Networking on the left, click Access Keys.
  2. Click Show under the Connection String for key1.
  3. Click the Copy icon to copy the connection string to the clipboard.
  4. Paste the connection string into Notepad; it will be needed for the client application configuration.
Create the Visual Studio Project

Alright, we’re ready to roll. We’ll build our consumer client as a simple console app, keeping the the focus on wiring up the stream, deserializing events, and showing what’s happening.

Note: CES consumers can also be built with Azure Functions (I’ll cover that in a later post). Azure Functions hide much of the boilerplate with an Event Hubs trigger, run serverlessly, and scale out automatically. In contrast, building a client “manually” as we’re doing here, gives you maximum control over connection behavior, batching, retry policies, and diagnostics.

Let’s get started!

Launch Visual Studio 2022. Then select Create a new project and choose Console App (C#). Name the project CESClient, click Next, and then click Create.

Install NuGet Packages

First, we’ll need three NuGet packages to support our application. Right-click the CESClient project and choose Manage NuGet Packages. Click the Browse tab, and then locate and install the following packages:

  • Azure.Messaging.EventHubs.Processor
    • Includes the Event Hubs client and processor, as well as Azure Blob Storage for checkpoint support.
  • Microsoft.Extensions.Configuration.Json
    • Supports external configuration in appsettings.json rather than using hard-coded configuration.
  • Newtonsoft.Json
    • Allows us to deserialize the CloudEvent payload received from the event hub, which is supplied as JSON.

Add a Configuration File

Now create the appsettings.json file where we’ll keep our configuration. This includes connection details and secrets (SAS token, Blob connection string).

  1. Right-click the project and choose Add > New Item
  2. Name the file appsettings.json.
  3. Replace its content with:
{
  "EventHub": {
    "HostName": "ces-namespace.servicebus.windows.net",
    "Name": "ces-hub",
    "SasToken": "paste-your-sas-token-here"
  },
  "BlobStorage": {
    "ConnectionString": "paste-your-blob-connection-string-here",
    "ContainerName": "ces-checkpoint"
  }
}
  1. For the EventHub property, note the HostName property specifies our event hub namespace name ces-namespace as the host name prefix, the Name property specifies our event hub name ces-hub, and the SasToken property holds the SAS token generated for accessing the event hub. All three of these values were established during setup and configuration in Part 1.
  2. For the BlobStorage property, paste in values for the ConnectionString and ContainerName for the Azure Storage blob container that you just created.
  3. To ensure this file gets copied to the output directory when we build the project, click appsettings.json in the Solution Explorer panel. Then, in the Properties panel set Copy to Output Directory to Copy if newer.

Add the Code

Now supply the following code in Program.cs:

using Azure;
using Azure.Messaging.EventHubs;
using Azure.Messaging.EventHubs.Processor;
using Azure.Messaging.EventHubs.Consumer;
using Azure.Storage.Blobs;
using Microsoft.Extensions.Configuration;
using System;
using System.Collections.Generic;
using System.IO;
using System.Text.Json;
using System.Threading.Tasks;

namespace CESClient
{
  public class Program
  {
    private static int _eventCount;

    // Add methods here

  }
}

This imports all the namespaces we’ll be referencing and defines a private field as a simple event counter that we’ll increment with each received event.

Next plug in the Main method:

public static async Task Main(string[] args)
{
  // Say hello
  Console.WriteLine("SQL Server 2025 Change Event Streaming Client");
  Console.WriteLine();
  Console.Write("Initializing... ");

  // Load configuration from appsettings.json
  var config = new ConfigurationBuilder()
      .SetBasePath(Directory.GetCurrentDirectory())
      .AddJsonFile("appsettings.json", optional: false, reloadOnChange: true)
      .Build();

  // Create a blob container client that the event processor will use for checkpointing
  var blobStorageConnectionString = config["BlobStorage:ConnectionString"];
  var blobStorageContainerName = config["BlobStorage:ContainerName"];

  var storageClient = new BlobContainerClient(blobStorageConnectionString, blobStorageContainerName);

  // Create an event processor client to process events in the event hub
  var eventHubHostName = config["EventHub:HostName"];
  var eventHubName = config["EventHub:Name"];
  var sasToken = config["EventHub:SasToken"];

  var processor = new EventProcessorClient(
      storageClient,                                        // checkpoint store
      EventHubConsumerClient.DefaultConsumerGroupName,      // Basic tier: one consumer group (e.g., $Default)
      eventHubHostName,
      eventHubName,
      new AzureSasCredential(sasToken)
  );

  // Register handlers for processing events and errors
  processor.ProcessEventAsync += ProcessEventHandler;
  processor.ProcessErrorAsync += ProcessErrorHandler;

  // Start listening for events
  Console.Write("starting... ");
  _eventCount = 0;

  await processor.StartProcessingAsync();

  Console.WriteLine("waiting... press any key to stop.");
  Console.ReadKey(intercept: true);

  // Stop listening for events
  await processor.StopProcessingAsync();

  Console.WriteLine("Stopped");
}

This code loads the configuration from appsettings.json, creates the blob container client (for saving checkpoints), spins up the Event Hubs processor with the default consumer group, and attaches handlers for processing events and errors. Finally, it starts and stops cleanly when the user presses any key.

Process Events

Now add the ProcessEventHandler method. This method first parses the outer CloudEvent envelope, then the inner payload, prints helpful metadata, and routes to the insert/update/delete handlers. Finally (and critically), it updates the checkpoint so restarts will resume from the next event. (I explain the CloudEvent payload structure in Part 1.)

private static async Task ProcessEventHandler(ProcessEventArgs eventArgs)
{
  try
  {
    // Deserialize the event data
    using var doc = JsonDocument.Parse(eventArgs.Data.Body.ToArray());
    var root = doc.RootElement;
    var dataJson = root.GetProperty("data");

    using var innerDoc = JsonDocument.Parse(dataJson.GetString());
    var data = innerDoc.RootElement;

    Console.WriteLine($"Processing event... #{++_eventCount}");

    // Deserialize the "current" and "old" fields in the eventrow property of the event data to dictionaries
    var operation = root.GetProperty("operation").GetString();
    var cols = data.GetProperty("eventsource").GetProperty("cols").EnumerateArray();
    var current = JsonSerializer.Deserialize<Dictionary<string, string>>(data.GetProperty("eventrow").GetProperty("current").GetString());
    var old = JsonSerializer.Deserialize<Dictionary<string, string>>(data.GetProperty("eventrow").GetProperty("old").GetString());

    DisplayEventMetadata(eventArgs, root, data);

    switch (operation)
    {
      case "INS":
        ProcessInsert(cols, current);
        break;
      case "UPD":
        ProcessUpdate(cols, current, old);
        break;
      case "DEL":
        ProcessDelete(cols, old);
        break;
    }

    Console.WriteLine();
    Console.WriteLine(new string('-', 80));
    Console.WriteLine();

    // Persist progress so we don't reprocess this event on restart
    await eventArgs.UpdateCheckpointAsync();
  }
  catch (Exception ex)
  {
    Console.ForegroundColor = ConsoleColor.Red;
    Console.WriteLine(ex.Message);
    Console.ResetColor();
  }
}

Display Event Metadata

This method renders a quick “context dump” for each event: it first prints the sequence number and offset from ProcessEventArgs so you can pinpoint the event’s exact position within the event hub (useful for ordering and replay). It then surfaces key CloudEvent fields from the outer envelope; spec/version, the event type, the DML operation (INS, UPD, DEL), timestamp, unique ID, logical ID, and the data content type. Finally, it drills into the inner CES payload to show the database, schema, and table that produced the event. Together, these details make it easy to correlate what you’re seeing in the console with the emitting source and to troubleshoot issues like unexpected operations or schema mismatches.

private static void DisplayEventMetadata(ProcessEventArgs eventArgs, JsonElement root, JsonElement data)
{
  Console.WriteLine("Event Args");
  Console.WriteLine($"  Sequence:Offset => {eventArgs.Data.SequenceNumber}:{eventArgs.Data.Offset}");
  Console.WriteLine();
  Console.WriteLine("Event Data");
  Console.WriteLine($"  Spec version:       {root.GetProperty("specversion").GetString()}");
  Console.WriteLine($"  Operation:          {root.GetProperty("type").GetString()}");
  Console.WriteLine($"  Time:               {root.GetProperty("time").GetString()}");
  Console.WriteLine($"  Event ID:           {root.GetProperty("id").GetString()}");
  Console.WriteLine($"  Logical ID:         {root.GetProperty("logicalid").GetString()}");
  Console.WriteLine($"  Operation:          {root.GetProperty("operation").GetString()}");
  Console.WriteLine($"  Data content type:  {root.GetProperty("datacontenttype").GetString()}");
  Console.WriteLine();
  Console.WriteLine("Data");
  Console.WriteLine($"  Database:           {data.GetProperty("eventsource").GetProperty("db").GetString()}");
  Console.WriteLine($"  Schema:             {data.GetProperty("eventsource").GetProperty("schema").GetString()}");
  Console.WriteLine($"  Table:              {data.GetProperty("eventsource").GetProperty("tbl").GetString()}");
  Console.WriteLine();
}

Handle Inserts

For inserts, a full “after” image is easiest to read and is a quick way to validate the @include_all_columns setting we established in Part 1.

private static void ProcessInsert(JsonElement.ArrayEnumerator cols, Dictionary<string, string> current)
{
  Console.WriteLine("Operation: Insert");
  Console.ForegroundColor = ConsoleColor.Green;

  foreach (var col in cols)
  {
    var name = col.GetProperty("name").GetString();
    Console.WriteLine($"\t{name}: {current[name]}");
  }

  Console.ResetColor();
}

Handle Updates

For tables where we’ve enabled @include_old_values in Part 1, you’ll get a great side-by-side view; otherwise you’ll just see the “after” image.

private static void ProcessUpdate(JsonElement.ArrayEnumerator cols, Dictionary<string, string> current, Dictionary<string, string> old)
{
  Console.WriteLine("Operation: Update");

  foreach (var col in cols)
  {
    var name = col.GetProperty("name").GetString();

    if (old.Count > 0 && current[name] != old[name])
    {
      Console.ForegroundColor = ConsoleColor.Yellow;
      Console.WriteLine($"\t{name}: {current[name]} (old: {old[name]})");
      Console.ResetColor();
    }
    else
    {
      Console.WriteLine($"\t{name}: {current[name]}");
    }
  }
}

Handle Deletes

Deletes only have the “before” image, which are useful for auditing and reconciliation purposes.

private static void ProcessDelete(JsonElement.ArrayEnumerator cols, Dictionary<string, string> old)
{
  Console.WriteLine("Operation: Delete");
  Console.ForegroundColor = ConsoleColor.Red;

  foreach (var col in cols)
  {
    var name = col.GetProperty("name").GetString();
    Console.WriteLine($"\t{name}: {old[name]}");
  }

  Console.ResetColor();
}

Process Errors

Finally, we need to tolerate errors without crashing the application. Should an error occur, this method displays the exception details. Of course, a real-world scenario would require proper error handling; for example, saving the event details to a queue for automatic retry or manual intervention.

private static Task ProcessErrorHandler(ProcessErrorEventArgs e)
{
  Console.ForegroundColor = ConsoleColor.Red;
  Console.WriteLine(e.Exception.Message);
  Console.ResetColor();
  return Task.CompletedTask;
}

Run the Application

The moment of truth is here! Go ahead and run the application. The client console window should open, and you should see:

SQL Server 2025 Change Event Streaming Client
Initializing... starting... waiting... press any key to stop.

If errors appear, double-check configuration values and NuGet package installs.

Generate and Monitor Change Events

Let’s exercise inserts, updates, deletes, as well as trigger-driven changes, based on the database schema we setup in Part 1. This will allow us to observe the events being captured in real-time, and examine the CloudEvent payloads as we receive them.

Start SSMS and open a query window to the CesDemo database. Then tile the SSMS and client console windows side-by-side. This way, you can examine the events in the client console window as you generate them from the SSMS window.

Create an Order

In SSMS, run the stored procedure to create a new order:

EXEC CreateOrder @CustomerId = 1

In the client console window, you should observe an INS event for the Order table.

Create Order Details

Now add two details to the order:

EXEC CreateOrderDetail @OrderId = 1, @ProductId = 1, @Quantity = 2
EXEC CreateOrderDetail @OrderId = 1, @ProductId = 2, @Quantity = 1

Expect two corresponding INS events for OrderDetail. And because the OrderDetail trigger adjusts Product.ItemsInStock, also expect UPD events for Product reflecting stock decrements (2 for product 1; 1 for product 2).

Delete an Order

Now call the stored procedure that deletes an entire order, along with the order details.

EXEC DeleteOrder @OrderId = 1

Expect DEL events for the order and its details, and UPD events for Product as stock is restored.

Update a Customer

Now change a customer’s city to Chicago:

UPDATE Customer SET City = 'Chicago' WHERE CustomerId = 1

Expect a UPD event for Customer. Recall that in Part 1, we chose not to include old values for this table, so you’ll see only the “after” values.

Bulk Update Products

Let’s apply a 20% discount on the price of all cameras:

UPDATE Product SET UnitPrice = UnitPrice * 0.8 WHERE Category = 'Camera'

Expect UPD events for each matching row. In Part 1, we included old values and only changed columns for Product, so you’ll see the old and new UnitPrice (and the primary key, which is always included).

Update a Table Without a Primary Key

This last example demonstrates the need for always having a primary key defined on a table:

UPDATE TableWithNoPK SET ItemName = 'Stove' WHERE Id = 3

Expect a UPD event without key columns. So you’ll see that an item name was changed to Stove in some row, but you won’t know which row, rendering this event data as useless information.

Conclusion

That’s a wrap! In this two-part blog post series, you have successfully built out an end-to-end CES pipeline. First you configured SQL Server 2025 to stream changes into Azure Event Hubs with the appropriate SAS credential, event stream group, and table settings. Then you built a C# consumer that reads the CloudEvent-wrapped payloads and uses Azure Blob Storage for checkpoints. Our demo ran with the default consumer group (Basic tier) for a single application, but higher tiers support multiple groups for multiple independent clients. You now have a clean, real-time path from database changes to actionable events!
Getting Started with Change Event Streaming in SQL Server 2025 (Part 1: Setup and Configuration)

Change Event Streaming (CES) is one of the most exciting new features coming in SQL Server 2025. It allows you to continuously stream row-level changes from your tables directly into Azure Event Hubs, where multiple consumer applications can subscribe to the event data in real time.

Note: This post is based on SQL Server 2025 CTP 2.1. Syntax and behavior are subject to subtle changes by the time the product is released. Change Event Streaming (CES) will ultimately be supported across all SKUs of SQL Server, including SQL Server 2025 for Windows, SQL Server 2025 for Linux, Azure SQL Database, and Managed Instance.

In this two-part series, I’ll show you how to set up and configure CES (Part 1), and then how to build a consumer application to process the streamed changes (Part 2).

Let’s dive in!

Step 1: Create an Event Hub

Before SQL Server can stream changes, you need a target destination. CES is designed to stream directly into Azure Event Hubs.

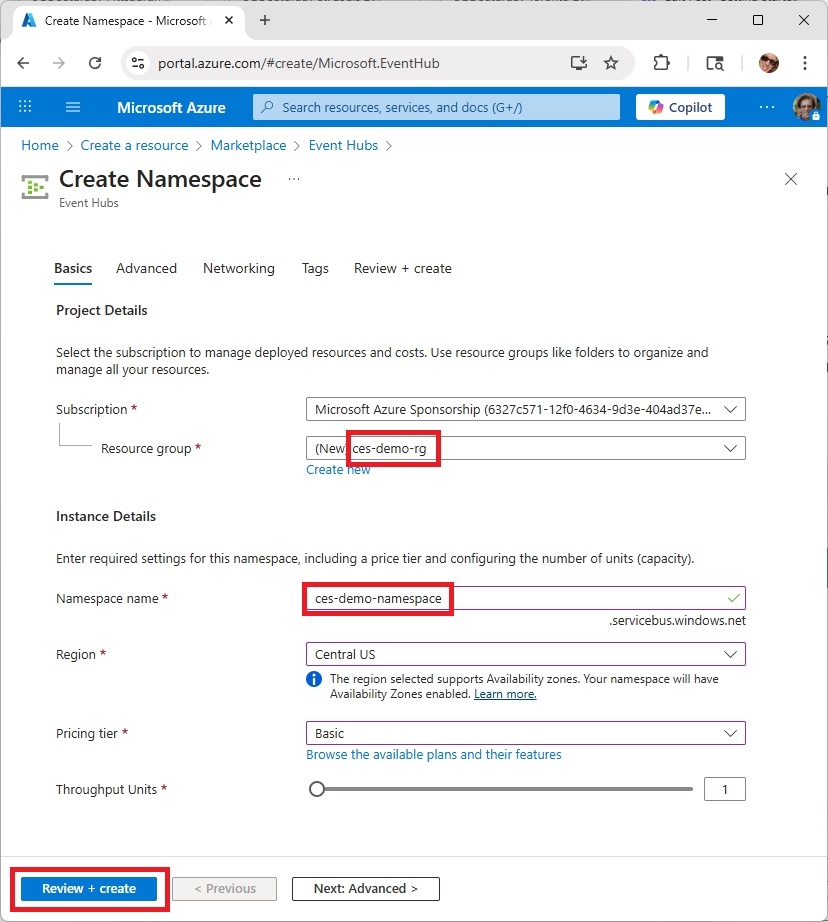
Create an Event Hub Namespace

An event hub lives within an event namespace. To create a new event hub namespace:

  1. In the Azure portal, create a new resource.
  2. From the Marketplace, create a new Event Hubs resource.
  3. Provide a name for a new Event Hubs namespace in either a new or existing resource group.
  4. Choose the Basic pricing tier with 1 throughput unit (sufficient for development and testing).
  5. Click Review + create, and then Create.

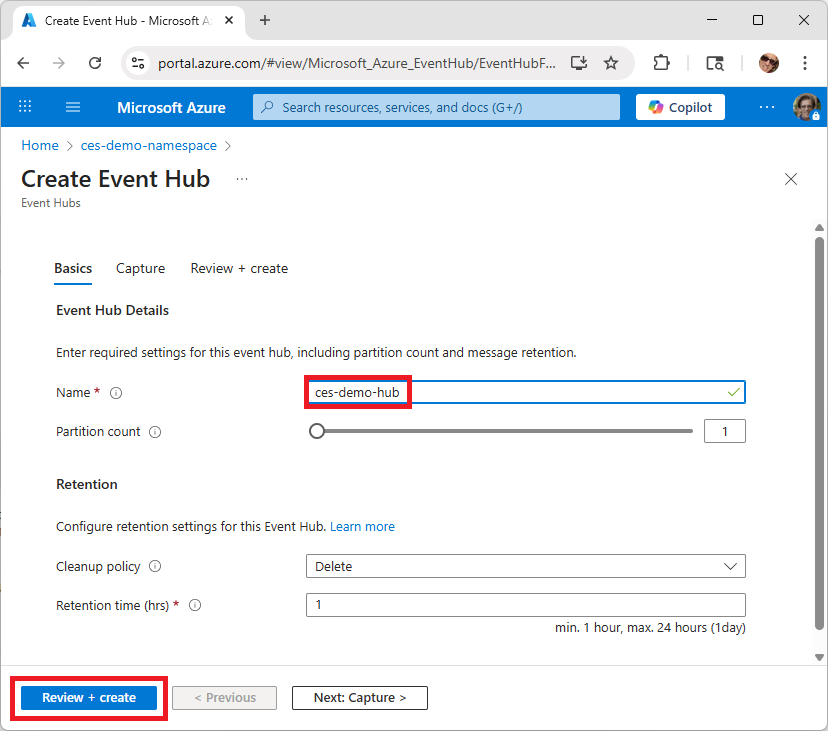
Create an Event Hub

Now you can create a new event hub within the new event hub namespace:

  1. On the namespace Overview page, click + Event Hub.
  2. Provide a name for the new event hub, and leave all other options at their default settings.
  3. Click Review + create, and then Create.

Create an Event Hub Policy

Now create a policy that allows managing the event hub:

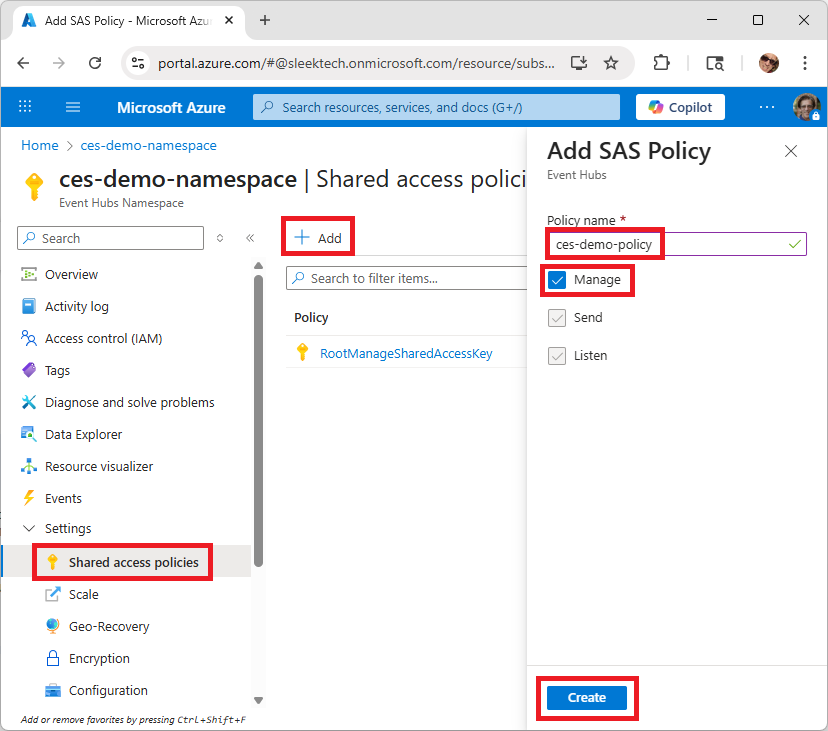
  1. Under Settings on the left, click Shared Access Policies.
  2. Click + Add to create a new policy.
  3. Provide a name for the policy.
  4. Check Manage (which automatically includes Send and Listen).
  5. Click Create.

Generate a SAS Token

Finally, you’ll need a Shared Access Signature (SAS) token for SQL Server and other clients to authenticate against the Event Hub. Unfortunately, the Azure portal does not provide a GUI for generating SAS tokens for Event Hub, so you must generate one programmatically using PowerShell, Azure CLI, or the Azure SDK. In this walkthrough, we’ll use PowerShell.

Install PowerShell Modules

Run PowerShell as an administrator and install the necessary modules.

Note: You only need to install these modules once on a machine. If you’ve already installed them previously, you can skip this step.

# Install the general Azure cmdlets (this can take up to 20 minutes)
Install-Module -Name Az -Scope CurrentUser -Repository PSGallery -Force

# Install the Event Hub module (runs quickly)
Install-Module -Name Az.EventHub -Scope CurrentUser -Force

Create the SAS Token Script

Copy the following code into a new file named Generate-SasToken.ps1. This script was adapted from Microsoft’s documentation at https://learn.microsoft.com/en-us/sql/relational-databases/track-changes/change-event-streaming/configure.

function Generate-SasToken {

    # Provide values for the following resources:
    $resourceGroupName  = "ces-demo-rg"
    $namespaceName      = "ces-namespace"
    $eventHubName       = "ces-hub"
    $policyName         = "ces-policy"

    # Login to Azure and select the Azure Subscription
    Connect-AzAccount -InformationAction SilentlyContinue | Out-Null

    # Validate the existence of the specified resource group, event hub namespace, and event hub
    Get-AzResourceGroup -Name $resourceGroupName -ErrorAction Stop | Out-Null
    Get-AzEventHubNamespace -ResourceGroupName $resourceGroupName -Name $namespaceName -ErrorAction Stop | Out-Null
    Get-AzEventHub -ResourceGroupName $resourceGroupName -NamespaceName $namespaceName -Name $eventHubName -ErrorAction Stop | Out-Null

    # Get the event hub authorization policy (it must have Manage rights)
    $policy = Get-AzEventHubAuthorizationRule -ResourceGroupName $resourceGroupName -NamespaceName $namespaceName -EventHubName $eventHubName -AuthorizationRuleName $policyName -ErrorAction SilentlyContinue

    if (-not ("Manage" -in $policy.Rights)) {
        throw "Authorization rule '$policyName' does not exist, or is missing the required 'Manage' right"
    }

    # Get the Primary Key of the Shared Access Policy
    $keys = Get-AzEventHubKey -ResourceGroupName $resourceGroupName -NamespaceName $namespaceName -EventHubName $eventHubName -AuthorizationRuleName $policyName

    if (-not $keys) {
        throw "Could not obtain Azure Event Hub Key"
    }

    if (-not $keys.PrimaryKey) {
        throw "Could not obtain Primary Key"
    }

    $primaryKey = ($keys.PrimaryKey) 

    # Define a function to create the SAS token
    function Create-SasToken {
        param ([string]$resourceUri, [string]$keyName, [string]$key)

        $sinceEpoch = [datetime]::UtcNow - [datetime]"1970-01-01"
        $expiry = [int]$sinceEpoch.TotalSeconds + (60 * 60 * 24 * 31 * 6)  # 6 months
        $stringToSign = [System.Web.HttpUtility]::UrlEncode($resourceUri) + "`n" + $expiry
        $hmac = New-Object System.Security.Cryptography.HMACSHA256
        $hmac.Key = [Text.Encoding]::UTF8.GetBytes($key)
        $signature = [Convert]::ToBase64String($hmac.ComputeHash([Text.Encoding]::UTF8.GetBytes($stringToSign)))
        $sasToken = "SharedAccessSignature sr=$([System.Web.HttpUtility]::UrlEncode($resourceUri))&sig=$([System.Web.HttpUtility]::UrlEncode($signature))&se=$expiry&skn=$keyName"

        return $sasToken
    }

    # Construct the resource URI for the SAS token
    $resourceUri = "https://$namespaceName.servicebus.windows.net/$eventHubName"

    # Generate the SAS token using the primary key from the new policy
    $sasToken = Create-SasToken -resourceUri $resourceUri -keyName $policyName -key $primaryKey

    # Output the SAS token
    Write-Host "`n-- Generated SAS Token --" -ForegroundColor Gray
    Write-Host $sasToken -ForegroundColor White
    Write-Host "-- End of generated SAS Token --`n" -ForegroundColor Gray

    # Copy the SAS token to the clipboard
    $sasToken | Set-Clipboard
    Write-Host "The generated SAS token has been copied to the clipboard." -ForegroundColor Green
}

Generate-SasToken

At the top of the script (lines 4 through 7), fill in the values for your resource group, namespace, event hub, and policy. Also, the script generates a token that expires after 6 months. To adjust the expiration, edit the $expiry assignment on line 42.

Run the Script

Before you can execute the script, you must allow PowerShell to run local scripts:

Set-ExecutionPolicy -Scope Process -ExecutionPolicy Bypass

When prompted for confirmation, type A (for “Yes to All”) and press Enter.

Now run the script:

.\Generate-SasToken.ps1

You’ll be prompted to log in to your Microsoft account and select your Azure subscription. The script will then generate the SAS token and display it between the lines:

-- Generated SAS Token --
<your SAS token>
-- End of generated SAS Token --

The script also copies the generated SAS token to the clipboard so that you can paste it into Notepad. You’ll need it later when configuring SQL Server to stream events to Event Hubs, and then again (Part 2) when configuring your consumer applications that subsequently read those events from Event Hubs.

Step 2: Create the Demo Database

We’ll use a small sample database to demonstrate CES. Run this script in SSMS to create the database:

-- Create the demo database
USE master
GO

CREATE DATABASE CesDemo
GO

USE CesDemo
GO

-- Create some demo tables
CREATE TABLE Customer (
  CustomerId    int IDENTITY PRIMARY KEY,
  CustomerName  varchar(50),
  City          varchar(20)
)
GO

SET IDENTITY_INSERT Customer ON
INSERT INTO Customer
  (CustomerId,  CustomerName,               City) VALUES
  (1,           'Shutter Bros Wholesale',   'New York'),
  (2,           'Aperture Supply Co.',      'Los Angeles')
SET IDENTITY_INSERT Customer OFF

CREATE TABLE Product (
  ProductId     int IDENTITY PRIMARY KEY,
  Name          varchar(80),
  Color         varchar(15),
  Category      varchar(20),
  UnitPrice     decimal(8, 2),
  ItemsInStock  smallint
)
GO

SET IDENTITY_INSERT Product ON
INSERT INTO Product
  (ProductId, Name,                                  Color,     Category,       UnitPrice,  ItemsInStock) VALUES 
  (1,         'Canon EOS R5 Mirrorless Camera',      'Black',   'Camera',       3899.99,    10),
  (2,         'Nikon Z6 II Mirrorless Camera',       'Silver',  'Camera',       1996.95,    8),
  (3,         'Sony NP-FZ100 Rechargeable Battery',  'Black',   'Accessory',    78.00,      25)
SET IDENTITY_INSERT Product OFF

CREATE TABLE [Order] (
  OrderId       int IDENTITY PRIMARY KEY,
  CustomerId    int REFERENCES Customer(CustomerId),
  OrderDate     datetime2
)
GO

CREATE TABLE OrderDetail (
  OrderDetailId int IDENTITY PRIMARY KEY,
  OrderId       int REFERENCES [Order](OrderId),
  ProductId     int REFERENCES Product(ProductId),
  Quantity      smallint
)
GO

-- This table lacks Primary Key. Combining that with IncludeAllColumns = 0 results in events that
-- have no primary key, which is essentially useless
CREATE TABLE TableWithNoPK (
  Id        int IDENTITY,
  ItemName  varchar(50)
)
GO

INSERT INTO TableWithNoPK (ItemName) VALUES
  ('Camera'),
  ('Automobile'),
  ('Oven'),
  ('Couch')
GO

-- Create a DML trigger on OrderDetail that updates the ItemsInStock column in the Product table
-- based on the Quantity column in the OrderDetail table
CREATE TRIGGER trgUpdateItemsInStock ON OrderDetail AFTER INSERT, UPDATE, DELETE
AS
BEGIN
  -- Handle insert
  IF EXISTS (SELECT * FROM inserted) AND NOT EXISTS (SELECT * FROM deleted)
    UPDATE Product
    SET ItemsInStock = p.ItemsInStock - i.Quantity
    FROM
      Product AS p
      INNER JOIN inserted AS i ON p.ProductId = i.ProductId

  -- Handle update
  ELSE IF EXISTS (SELECT * FROM inserted) AND EXISTS (SELECT * FROM deleted) AND UPDATE(Quantity)
    UPDATE Product
    SET ItemsInStock = p.ItemsInStock + d.Quantity - i.Quantity
    FROM
      Product AS p
      INNER JOIN inserted AS i ON p.ProductId = i.ProductId
      INNER JOIN deleted AS d ON p.ProductId = d.ProductId

  -- Handle delete
  ELSE IF EXISTS (SELECT * FROM deleted) AND NOT EXISTS (SELECT * FROM inserted)
    UPDATE Product
    SET ItemsInStock = p.ItemsInStock + d.Quantity
    FROM
      Product AS p
      INNER JOIN deleted AS d ON p.ProductId = d.ProductId
END
GO

-- Add some procs to handle orders
CREATE OR ALTER PROC CreateOrder
  @CustomerId int
AS
BEGIN
  INSERT INTO [Order](CustomerId, OrderDate)
  VALUES (@CustomerId, SYSDATETIME())

  SELECT OrderId = SCOPE_IDENTITY()
END
GO

CREATE OR ALTER PROC CreateOrderDetail
  @OrderId int,
  @ProductId int,
  @Quantity smallint
AS
BEGIN
  INSERT INTO OrderDetail (OrderId, ProductId, Quantity)
  VALUES (@OrderId, @ProductId, @Quantity)

  SELECT OrderDetailId = SCOPE_IDENTITY()
END
GO

CREATE OR ALTER PROC DeleteOrder
  @OrderId int
AS
BEGIN
  BEGIN TRANSACTION
    DELETE FROM OrderDetail WHERE OrderId = @OrderId
    DELETE FROM [Order] WHERE OrderId = @OrderId
  COMMIT TRANSACTION
END
GO

This database includes:

  • Customer, Order, OrderDetail, and Product tables
  • Stored procedures for inserting/deleting rows in the Order and OrderDetail tables.
  • A trigger on OrderDetail that updates inventory in Product. This is to demonstrate that CES also streams changes to tables that are updated by triggers, not just changes to tables that you issue direct DML statements on.
  • A TableWithNoPK to illustrate why tables without primary keys can be problematic when used with CES.

Step 3: Configure CES

With the Event Hub and database ready, let’s enable CES.

Create a Database Master Key

You need to store the SAS token in SQL Server as a database scoped credential, and that requires creating a password-protected database master key first so that SQL Server encrypt that SAS token credential.

CREATE MASTER KEY ENCRYPTION BY PASSWORD = 'H@rd2Gue$$P@$$w0rd'

Create a Database Scoped Credential

To store the SAS token securely in SQL Server, run the following statement (paste the SAS token you copied to Notepad into the SECRET parameter—keep the entire string intact).

CREATE DATABASE SCOPED CREDENTIAL SqlCesCredential
WITH
  IDENTITY = 'SHARED ACCESS SIGNATURE',
  SECRET = '<your SAS token>'

Enable CES for the Database

Execute this T-SQL to enable CES for the current database:

EXEC sys.sp_enable_event_stream

Now verify that CES is enabled:

SELECT * FROM sys.databases WHERE is_event_stream_enabled = 1

Create an Event Stream Group

An event stream group defines the Event Hub target for your events. Be sure to provide the correct values for your event hub namespace and event hub names in the @destination_location parameter:

EXEC sys.sp_create_event_stream_group
  @stream_group_name      = 'SqlCesGroup',
  @destination_location   = 'ces-namespace.servicebus.windows.net/ces-hub',
  @destination_credential = SqlCesCredential,
  @destination_type       = 'AzureEventHubsAmqp'

Add Tables to the Event Stream Group

Decide whether to include old values and whether to include all columns. Each table in our demo uses different settings for different reasons; old values and all values are included when we need that extra context, and they are excluded in favor of reduced bandwidth for smaller event payloads when we don’t.

-- Customer: full row in each event, no old values
EXEC sys.sp_add_object_to_event_stream_group
  @stream_group_name = 'SqlCesGroup',
  @object_name = 'dbo.Customer',
  @include_old_values = 0,      -- do not include old values on updates/deletes
  @include_all_columns = 1      -- include all columns even if unchanged

-- Product: only changed columns, include old values (important for inventory diffs)
EXEC sys.sp_add_object_to_event_stream_group
  @stream_group_name = 'SqlCesGroup',
  @object_name = 'dbo.Product',
  @include_old_values = 1,      -- include old values for changed columns
  @include_all_columns = 0      -- only include changed columns

-- Order: only changed columns, include old values (for auditing changes)
EXEC sys.sp_add_object_to_event_stream_group
  @stream_group_name = 'SqlCesGroup',
  @object_name = 'dbo.Order',
  @include_old_values = 1,      -- include old values for changed columns
  @include_all_columns = 0      -- only include changed columns

-- OrderDetail: only changed columns, include old values (quantity updates matter)
EXEC sys.sp_add_object_to_event_stream_group
  @stream_group_name = 'SqlCesGroup',
  @object_name = 'dbo.OrderDetail',
  @include_old_values = 1,      -- include old values for changed columns
  @include_all_columns = 0      -- only include changed columns

-- TableWithNoPK: demonstrates CES limitations without a primary key
EXEC sys.sp_add_object_to_event_stream_group
  @stream_group_name = 'SqlCesGroup',
  @object_name = 'dbo.TableWithNoPK',
  @include_old_values = 0,      -- no old values
  @include_all_columns = 0      -- changed columns only (essentially useless without a PK)

  • Customer: All columns included for upsert scenarios. Old values aren’t important here.
  • Product: Old values are essential to calculate stock and pricing diffs.
  • Order: Old values matter for audit.
  • OrderDetail: Old and new quantities are needed for downstream stock adjustments.
  • TableWithNoPK: Included as a demo; in real-world scenarios, CES requires a primary key to make the events useful.

Verify CES on Each Table

Run the following statements to confirm that CES is enabled on all the tables you just added to the event stream group, and to view the associated CES metadata associated with each table:

EXEC sp_help_change_feed_table @source_schema = 'dbo', @source_name = 'Customer'
EXEC sp_help_change_feed_table @source_schema = 'dbo', @source_name = 'Product'
EXEC sp_help_change_feed_table @source_schema = 'dbo', @source_name = 'Order'
EXEC sp_help_change_feed_table @source_schema = 'dbo', @source_name = 'OrderDetail'
EXEC sp_help_change_feed_table @source_schema = 'dbo', @source_name = 'TableWithNoPK'

The CloudEvent Payload

At this point, CES is fully configured! From here on out, all changes to these tables will be streamed to your Event Hub, where they can be consumed by multiple clients in real-time. Specifically, each event is generated and streamed as a CloudEvent with the following JSON structure:

{
	"specversion": "1.0",
	"type": "com.microsoft.SQL.CES.DML.V1",
	"source": "\/",
	"id": "cc3fcdca-09c0-4f46-a8d3-5d0c3c1eb85a",
	"logicalid": "8376457a-17af-49f4-b9ea-0d5071f515f4:0000002C000007300011:00000000000000000002",
	"time": "2025-06-30T12:29:46.290Z",
	"datacontenttype": "application\/avro-json",
	"operation": "UPD",
	"segmentindex": 1,
	"finalsegment": true,
	"data": "{\n  \"eventsource\": {\n    \"db\": \"CesDemo\",\n    \"schema\": \"dbo\",\n    \"tbl\": \"Product\",\n    \"cols\": [\n      {\n        \"name\": \"ProductId\",\n        \"type\": \"int\",\n        \"index\": 0\n      },\n      {\n        \"name\": \"ItemsInStock\",\n        \"type\": \"smallint\",\n        \"index\": 5\n      }\n    ],\n    \"pkkey\": [\n      {\n        \"columnname\": \"ProductId\",\n        \"value\": \"2\"\n      }\n    ],\n    \"transaction\": {\n      \"commitlsn\": \"0000002C:00000730:0011\",\n      \"beginlsn\": \"0000002C:00000730:000C\",\n      \"sequencenumber\": 2,\n      \"committime\": \"2025-06-30T12:29:46.290Z\"\n    }\n  },\n  \"eventrow\": {\n    \"old\": \"{\\\"ProductId\\\": \\\"2\\\", \\\"ItemsInStock\\\": \\\"8\\\"}\",\n    \"current\": \"{\\\"ProductId\\\": \\\"2\\\", \\\"ItemsInStock\\\": \\\"7\\\"}\"\n  }\n}"
}

In this sample, the operation property is UPD, indicating an UPDATE operation on a table. Also notice that there is nested JSON contained in the data property, which you can unpack to get the necessary details of each DML operation:

{
	"eventsource": {
		"db": "CesDemo",
		"schema": "dbo",
		"tbl": "Product",
		"cols": [
			{
				"name": "ProductId",
				"type": "int",
				"index": 0
			},
			{
				"name": "ItemsInStock",
				"type": "smallint",
				"index": 5
			}
		],
		"pkkey": [
			{
				"columnname": "ProductId",
				"value": "2"
			}
		],
		"transaction": {
			"commitlsn": "0000002C:00000730:0011",
			"beginlsn": "0000002C:00000730:000C",
			"sequencenumber": 2,
			"committime": "2025-06-30T12:29:46.290Z"
		}
	},
	"eventrow": {
		"old": "{\"ProductId\": \"2\", \"ItemsInStock\": \"8\"}",
		"current": "{\"ProductId\": \"2\", \"ItemsInStock\": \"7\"}"
	}
}

Here, the eventsource property describes the database, schema, table, columns, primary key, and transaction for the event. And the eventrow property is yet another nested level of JSON within the CloudEvent which provides the actual column values affected by the event as a collection of key/value pairs.

In Part 2, we’ll build a consumer application that listens for events, unpackages the CloudEvent payload, and processes them in real time.